mirror of
https://github.com/zsviczian/obsidian-excalidraw-plugin.git
synced 2025-08-06 05:46:28 +00:00
Compare commits
6 Commits
2.10.0-bet
...
2.10.0
| Author | SHA1 | Date | |
|---|---|---|---|
|
|
063bef92b9 | ||
|
|
2bf9156808 | ||
|
|
391363c419 | ||
|
|
85ae7f7bec | ||
|
|
03718bc927 | ||
|
|
768aebf5d2 |
@@ -1,6 +1,6 @@
|
||||
# Excalidraw
|
||||
|
||||
[简体中文](./docs/zh-cn/README.md)
|
||||
【English | [简体中文](./docs/zh-cn/README.md)】
|
||||
|
||||
👉👉👉 Check out and contribute to the new [Obsidian-Excalidraw Community Wiki](https://excalidraw-obsidian.online/WIKI/Welcome+to+the+WIKI)
|
||||
|
||||
|
||||
@@ -1,5 +1,7 @@
|
||||
# [◀ Excalidraw Automate How To](./readme.md)
|
||||
|
||||
【English | [简体中文](zh-cn/docs/ExcalidrawScriptsEngine.md)】
|
||||
|
||||
[](https://youtu.be/hePJcObHIso)
|
||||
|
||||
## Introduction
|
||||
|
||||
@@ -1,6 +1,6 @@
|
||||
# Excalidraw Automate How To
|
||||
|
||||
【[简体中文](zh-cn/docs/readme.md)】
|
||||
【English | [简体中文](zh-cn/docs/readme.md)】
|
||||
|
||||
Use ExcalidrawAutomate to create or manipulate Excalidraw drawings using the [ExcalidrawAutomate Script Engine](ExcalidrawScriptsEngine.md), the [Templater](https://silentvoid13.github.io/Templater/docs/) or the [QuickAdd](https://github.com/chhoumann/quickadd) plugins, and to generate embedded SVG and PNG images using [DataviewJS](https://blacksmithgu.github.io/obsidian-dataview/docs/api/intro/)
|
||||
|
||||
|
||||
@@ -2,7 +2,7 @@
|
||||
|
||||
> 此说明当前更新至 `5569cff`。
|
||||
|
||||
[English](../../README.md)
|
||||
【[English](../../README.md) | 简体中文】
|
||||
|
||||
👉👉👉 快来查看并为新的 [Obsidian-Excalidraw 社区维基](https://excalidraw-obsidian.online/Hobbies/Excalidraw+Blog/WIKI/Welcome+to+the+WIKI)贡献你的力量吧
|
||||
|
||||
|
||||
410
docs/zh-cn/docs/ExcalidrawScriptsEngine.md
Normal file
410
docs/zh-cn/docs/ExcalidrawScriptsEngine.md
Normal file
@@ -0,0 +1,410 @@
|
||||
# [◀ Excalidraw 自动化使用指南](./readme.md)
|
||||
|
||||
> 此说明当前更新至 `768aebf`。
|
||||
|
||||
【[English](../../ExcalidrawScriptsEngine.md) | 简体中文】
|
||||
|
||||
[](https://youtu.be/hePJcObHIso)
|
||||
|
||||
## 简介
|
||||
|
||||
请将你的 ExcalidrawAutomate 脚本放入 Excalidraw 设置中定义的文件夹中。脚本文件夹不能是你的 Vault 根目录。
|
||||
|
||||

|
||||
|
||||
EA 脚本可以是 markdown 文件、纯文本文件或 .js 文件。唯一的要求是它们必须包含有效的 JavaScript 代码。
|
||||
|
||||

|
||||
|
||||
你可以通过 Obsidian 命令面板从 Excalidraw 访问你的脚本。
|
||||
|
||||

|
||||
|
||||
这样你就可以像设置其他 Obsidian 命令一样,为你喜欢的脚本分配快捷键。
|
||||
|
||||

|
||||
|
||||
## 脚本开发
|
||||
|
||||
Excalidraw 脚本会自动接收两个对象:
|
||||
|
||||
- `ea`:脚本引擎会初始化 `ea` 对象,包括设置调用脚本时的活动视图为当前视图。
|
||||
- `utils`:我从 [QuickAdd](https://github.com/chhoumann/quickadd/blob/master/docs/QuickAddAPI.md) 借用了一些实用函数,但目前并非所有 QuickAdd 实用函数都在 Excalidraw 中实现。目前可用的函数如下。详见下方示例。
|
||||
- `inputPrompt: (header: string, placeholder?: string, value?: string, buttons?: [{caption:string, action:Function}])`
|
||||
- 打开一个提示框请求输入。返回输入的字符串。
|
||||
- 你需要使用 await 等待 inputPrompt 的结果。
|
||||
- `buttons.action(input: string) => string`。按钮动作将接收当前输入字符串。如果动作返回 null,输入将保持不变。如果动作返回字符串,inputPrompt 将解析为该值。
|
||||
```typescript
|
||||
let fileType = "";
|
||||
const filename = await utils.inputPrompt (
|
||||
"Filename for new document",
|
||||
"Placeholder",
|
||||
"DefaultFilename.md",
|
||||
[
|
||||
{
|
||||
caption: "Markdown",
|
||||
action: ()=>{fileType="md";return;}
|
||||
},
|
||||
{
|
||||
caption: "Excalidraw",
|
||||
action: ()=>{fileType="ex";return;}
|
||||
}
|
||||
]
|
||||
);
|
||||
|
||||
```
|
||||
- `suggester: (displayItems: string[], items: any[], hint?: string, instructions?:Instruction[])`
|
||||
- 打开一个建议器。显示 displayItems 并返回 items[] 中对应的项。
|
||||
- 你需要使用 await 等待 suggester 的结果。
|
||||
- 如果用户取消(按ESC键),suggester 将返回 `undefined`
|
||||
- Hint(提示)和 instructions(说明)参数是可选的。
|
||||
```typescript
|
||||
interface Instruction {
|
||||
command: string;
|
||||
purpose: string;
|
||||
}
|
||||
```
|
||||
- 脚本可以有设置。这些设置作为插件设置的一部分存储,用户也可以通过 Obsidian 插件设置窗口更改。
|
||||
- 你可以使用 `ea.getScriptSettings()` 访问当前脚本的设置,并使用 `ea.setScriptSettings(settings:any)` 存储设置值
|
||||
- 在插件设置中显示脚本设置的规则如下:
|
||||
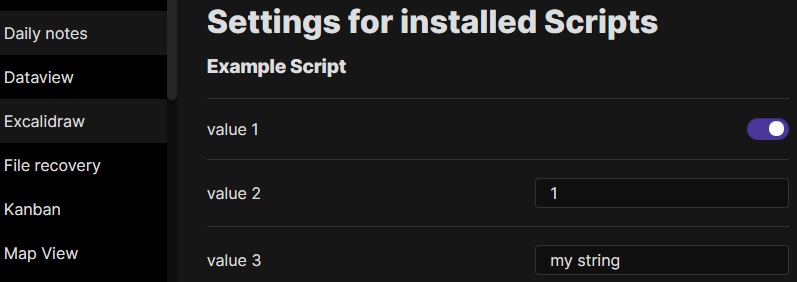
- 如果设置是简单的字面量(布尔值、数字、字符串),这些将按原样显示在设置中。设置的名称将作为值的键。
|
||||
```javascript
|
||||
ea.setScriptSettings({
|
||||
"value 1": true,
|
||||
"value 2": 1,
|
||||
"value 3": "my string"
|
||||
})
|
||||
```
|
||||
|
||||
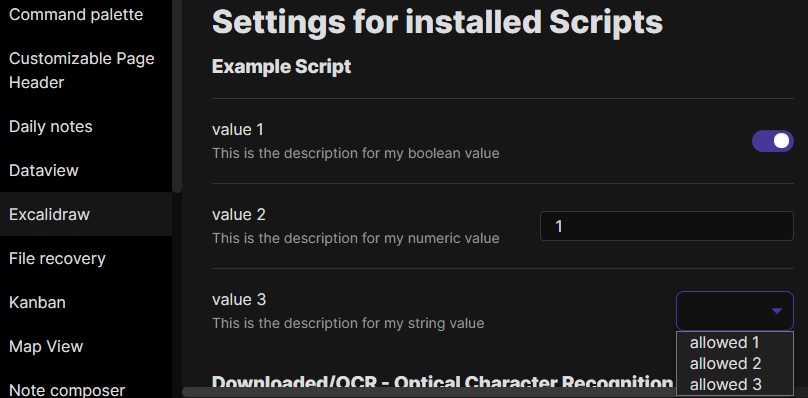
- 如果设置是一个对象并遵循以下结构,则可以添加描述和值集。也可以使用 `hidden` 键从用户界面中隐藏值。
|
||||
```javascript
|
||||
ea.setScriptSettings({
|
||||
"value 1": {
|
||||
"value": true,
|
||||
"description": "This is the description for my boolean value"
|
||||
},
|
||||
"value 2": {
|
||||
"value": 1,
|
||||
"description": "This is the description for my numeric value"
|
||||
},
|
||||
"value 3": {
|
||||
"value": "my string",
|
||||
"description": "This is the description for my string value",
|
||||
"valueset": ["allowed 1","allowed 2","allowed 3"]
|
||||
},
|
||||
"value 4": {
|
||||
"value": "my value",
|
||||
"hidden": true
|
||||
}
|
||||
});
|
||||
```
|
||||
|
||||
|
||||
---------
|
||||
|
||||
## Excalidraw 自动化脚本示例
|
||||
|
||||
这些脚本可以在 GitHub [这个](https://github.com/zsviczian/obsidian-excalidraw-plugin/tree/master/ea-scripts)文件夹 📂 中下载为 `.md` 文件。
|
||||
|
||||
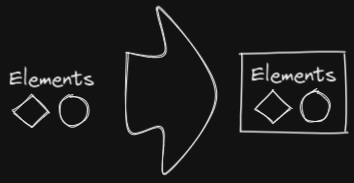
### 为选中元素添加边框
|
||||
|
||||
|
||||
|
||||
此脚本将在 Excalidraw 中当前选中的元素周围添加一个包围框
|
||||
|
||||
```javascript
|
||||
if(!ea.verifyMinimumPluginVersion || !ea.verifyMinimumPluginVersion("1.5.21")) {
|
||||
new Notice("This script requires a newer version of Excalidraw. Please install the latest version.");
|
||||
return;
|
||||
}
|
||||
|
||||
settings = ea.getScriptSettings();
|
||||
//check if settings exist. If not, set default values on first run
|
||||
if(!settings["Default padding"]) {
|
||||
settings = {
|
||||
"Prompt for padding?": true,
|
||||
"Default padding" : {
|
||||
value: 10,
|
||||
description: "Padding between the bounding box of the selected elements, and the box the script creates"
|
||||
}
|
||||
};
|
||||
ea.setScriptSettings(settings);
|
||||
}
|
||||
|
||||
let padding = settings["Default padding"].value;
|
||||
|
||||
if(settings["Prompt for padding?"]) {
|
||||
padding = parseInt (await utils.inputPrompt("padding?","number",padding.toString()));
|
||||
}
|
||||
|
||||
if(isNaN(padding)) {
|
||||
new Notice("The padding value provided is not a number");
|
||||
return;
|
||||
}
|
||||
elements = ea.getViewSelectedElements();
|
||||
const box = ea.getBoundingBox(elements);
|
||||
color = ea
|
||||
.getExcalidrawAPI()
|
||||
.getAppState()
|
||||
.currentItemStrokeColor;
|
||||
//uncomment for random color:
|
||||
//color = '#'+(Math.random()*0xFFFFFF<<0).toString(16).padStart(6,"0");
|
||||
ea.style.strokeColor = color;
|
||||
id = ea.addRect(
|
||||
box.topX - padding,
|
||||
box.topY - padding,
|
||||
box.width + 2*padding,
|
||||
box.height + 2*padding
|
||||
);
|
||||
ea.copyViewElementsToEAforEditing(elements);
|
||||
ea.addToGroup([id].concat(elements.map((el)=>el.id)));
|
||||
ea.addElementsToView(false);
|
||||
```
|
||||
|
||||
----
|
||||
|
||||
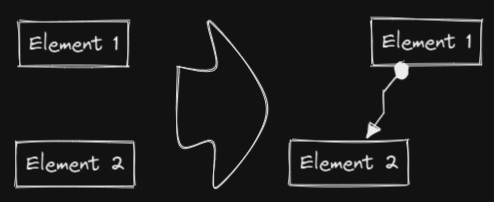
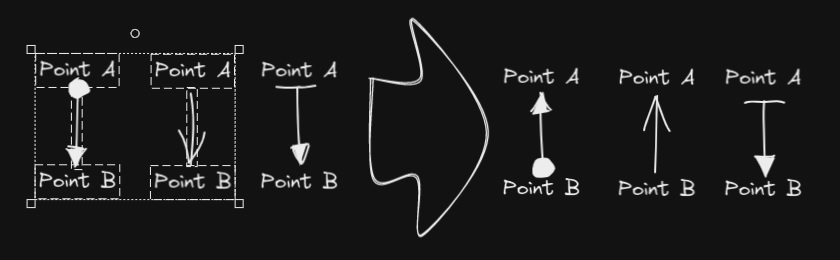
### 用箭头连接选中的元素
|
||||
|
||||
|
||||
|
||||
此脚本将用箭头连接两个对象。如果任一对象是一组分组元素(例如,一个文本元素与一个包围它的矩形分组),脚本会识别这些组,并将箭头连接到组中最大的对象(假设你想将箭头连接到文本元素周围的框)。
|
||||
```javascript
|
||||
if(!ea.verifyMinimumPluginVersion || !ea.verifyMinimumPluginVersion("1.5.21")) {
|
||||
new Notice("This script requires a newer version of Excalidraw. Please install the latest version.");
|
||||
return;
|
||||
}
|
||||
|
||||
settings = ea.getScriptSettings();
|
||||
//set default values on first run
|
||||
if(!settings["Starting arrowhead"]) {
|
||||
settings = {
|
||||
"Starting arrowhead" : {
|
||||
value: "none",
|
||||
valueset: ["none","arrow","triangle","bar","dot"]
|
||||
},
|
||||
"Ending arrowhead" : {
|
||||
value: "triangle",
|
||||
valueset: ["none","arrow","triangle","bar","dot"]
|
||||
},
|
||||
"Line points" : {
|
||||
value: 1,
|
||||
description: "Number of line points between start and end"
|
||||
}
|
||||
};
|
||||
ea.setScriptSettings(settings);
|
||||
}
|
||||
|
||||
const arrowStart = settings["Starting arrowhead"].value === "none" ? null : settings["Starting arrowhead"].value;
|
||||
const arrowEnd = settings["Ending arrowhead"].value === "none" ? null : settings["Ending arrowhead"].value;
|
||||
const linePoints = Math.floor(settings["Line points"].value);
|
||||
|
||||
const elements = ea.getViewSelectedElements();
|
||||
ea.copyViewElementsToEAforEditing(elements);
|
||||
groups = ea.getMaximumGroups(elements);
|
||||
|
||||
if(groups.length !== 2) {
|
||||
//unfortunately getMaxGroups returns duplicated resultset for sticky notes
|
||||
//needs additional filtering
|
||||
cleanGroups=[];
|
||||
idList = [];
|
||||
for (group of groups) {
|
||||
keep = true;
|
||||
for(item of group) if(idList.contains(item.id)) keep = false;
|
||||
if(keep) {
|
||||
cleanGroups.push(group);
|
||||
idList = idList.concat(group.map(el=>el.id))
|
||||
}
|
||||
}
|
||||
if(cleanGroups.length !== 2) return;
|
||||
groups = cleanGroups;
|
||||
}
|
||||
|
||||
els = [
|
||||
ea.getLargestElement(groups[0]),
|
||||
ea.getLargestElement(groups[1])
|
||||
];
|
||||
|
||||
ea.style.strokeColor = els[0].strokeColor;
|
||||
ea.style.strokeWidth = els[0].strokeWidth;
|
||||
ea.style.strokeStyle = els[0].strokeStyle;
|
||||
ea.style.strokeSharpness = els[0].strokeSharpness;
|
||||
|
||||
ea.connectObjects(
|
||||
els[0].id,
|
||||
null,
|
||||
els[1].id,
|
||||
null,
|
||||
{
|
||||
endArrowHead: arrowEnd,
|
||||
startArrowHead: arrowStart,
|
||||
numberOfPoints: linePoints
|
||||
}
|
||||
);
|
||||
ea.addElementsToView();
|
||||
```
|
||||
|
||||
----
|
||||
### 反转选中的箭头
|
||||
|
||||
|
||||
|
||||
反转选中元素范围内**箭头**的方向。
|
||||
|
||||
```javascript
|
||||
elements = ea.getViewSelectedElements().filter((el)=>el.type==="arrow");
|
||||
if(!elements || elements.length===0) return;
|
||||
elements.forEach((el)=>{
|
||||
const start = el.startArrowhead;
|
||||
el.startArrowhead = el.endArrowhead;
|
||||
el.endArrowhead = start;
|
||||
});
|
||||
ea.copyViewElementsToEAforEditing(elements);
|
||||
ea.addElementsToView();
|
||||
```
|
||||
|
||||
----
|
||||
|
||||
### 设置选中元素的线条宽度
|
||||
|
||||
|
||||
|
||||
当你缩放自由绘制的草图并想要减小或增加它们的线条宽度时,这个脚本会很有帮助。
|
||||
```javascript
|
||||
let width = (ea.getViewSelectedElement().strokeWidth??1).toString();
|
||||
width = await utils.inputPrompt("Width?","number",width);
|
||||
const elements=ea.getViewSelectedElements();
|
||||
ea.copyViewElementsToEAforEditing(elements);
|
||||
ea.getElements().forEach((el)=>el.strokeWidth=width);
|
||||
ea.addElementsToView();
|
||||
```
|
||||
|
||||
----
|
||||
|
||||
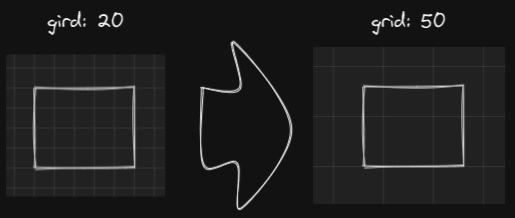
### 设置网格大小
|
||||
|
||||
|
||||
|
||||
Excalidraw 中默认的网格大小是 20。目前通过用户界面无法更改网格大小。
|
||||
```javascript
|
||||
const grid = parseInt(await utils.inputPrompt("Grid size?",null,"20"));
|
||||
const api = ea.getExcalidrawAPI();
|
||||
let appState = api.getAppState();
|
||||
appState.gridSize = grid;
|
||||
api.updateScene({
|
||||
appState,
|
||||
commitToHistory:false
|
||||
});
|
||||
```
|
||||
|
||||
----
|
||||
|
||||
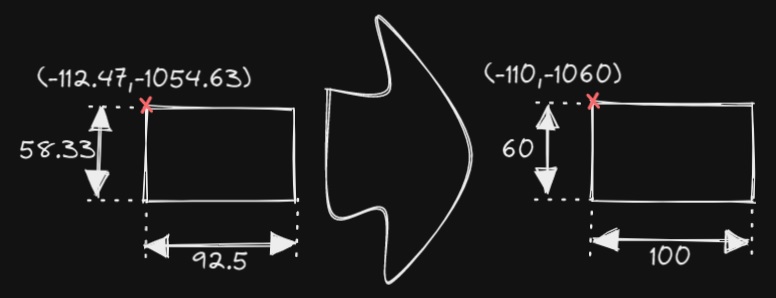
### 设置元素尺寸和位置
|
||||
|
||||
|
||||
|
||||
目前在 Excalidraw 中还没有办法指定对象的精确位置和大小。你可以使用以下简单脚本来解决这个问题。
|
||||
```javascript
|
||||
const elements = ea.getViewSelectedElements();
|
||||
if(elements.length === 0) return;
|
||||
const el = ea.getLargestElement(elements);
|
||||
const sizeIn = [el.x,el.y,el.width,el.height].join(",");
|
||||
let res = await utils.inputPrompt("x,y,width,height?",null,sizeIn);
|
||||
res = res.split(",");
|
||||
if(res.length !== 4) return;
|
||||
let size = [];
|
||||
for (v of res) {
|
||||
const i = parseInt(v);
|
||||
if(isNaN(i)) return;
|
||||
size.push(i);
|
||||
}
|
||||
el.x = size[0];
|
||||
el.y = size[1];
|
||||
el.width = size[2];
|
||||
el.height = size[3];
|
||||
ea.copyViewElementsToEAforEditing([el]);
|
||||
ea.addElementsToView();
|
||||
```
|
||||
|
||||
----
|
||||
|
||||
### 项目符号
|
||||
|
||||
|
||||
|
||||
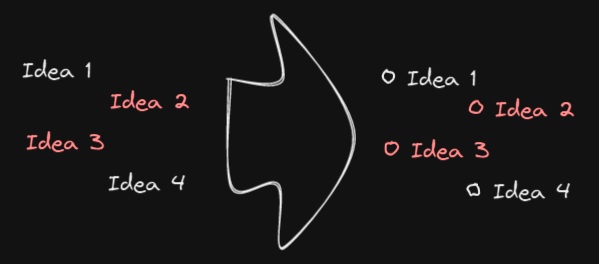
此脚本会在选中的每个文本元素的左上角添加一个小圆圈,并将文本和"项目符号"组合成一个组。
|
||||
```javascript
|
||||
elements = ea.getViewSelectedElements().filter((el)=>el.type==="text");
|
||||
ea.copyViewElementsToEAforEditing(elements);
|
||||
const padding = 10;
|
||||
elements.forEach((el)=>{
|
||||
ea.style.strokeColor = el.strokeColor;
|
||||
const size = el.fontSize/2;
|
||||
const ellipseId = ea.addEllipse(
|
||||
el.x-padding-size,
|
||||
el.y+size/2,
|
||||
size,
|
||||
size
|
||||
);
|
||||
ea.addToGroup([el.id,ellipseId]);
|
||||
});
|
||||
ea.addElementsToView();
|
||||
```
|
||||
|
||||
----
|
||||
|
||||
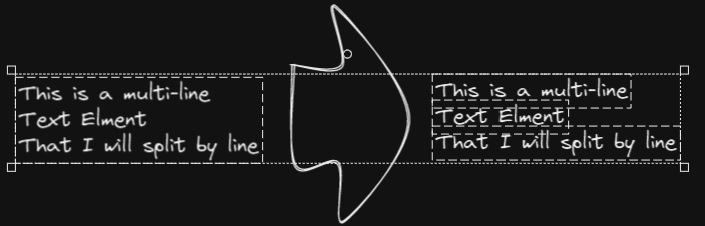
### 按行分割文本
|
||||
|
||||
**!!!需要 Excalidraw 1.5.1 或更高版本**
|
||||
|
||||
|
||||
|
||||
将文本块按行分割成单独的文本元素,以便更容易重新组织
|
||||
```javascript
|
||||
elements = ea.getViewSelectedElements().filter((el)=>el.type==="text");
|
||||
elements.forEach((el)=>{
|
||||
ea.style.strokeColor = el.strokeColor;
|
||||
ea.style.fontFamily = el.fontFamily;
|
||||
ea.style.fontSize = el.fontSize;
|
||||
const text = el.text.split("\n");
|
||||
for(i=0;i<text.length;i++) {
|
||||
ea.addText(el.x,el.y+i*el.height/text.length,text[i]);
|
||||
}
|
||||
});
|
||||
ea.addElementsToView();
|
||||
ea.deleteViewElements(elements);
|
||||
```
|
||||
|
||||
----
|
||||
|
||||
### 设置文本对齐方式
|
||||
|
||||
|
||||
|
||||
设置文本块的对齐方式(居中、右对齐、左对齐)。如果你想为选择文本对齐方式设置键盘快捷键,这个脚本会很有用。
|
||||
```javascript
|
||||
elements = ea.getViewSelectedElements().filter((el)=>el.type==="text");
|
||||
if(elements.length===0) return;
|
||||
let align = ["left","right","center"];
|
||||
align = await utils.suggester(align,align);
|
||||
elements.forEach((el)=>el.textAlign = align);
|
||||
ea.copyViewElementsToEAforEditing(elements);
|
||||
ea.addElementsToView();
|
||||
```
|
||||
|
||||
----
|
||||
|
||||
### 设置字体
|
||||
|
||||
|
||||
|
||||
设置文本块的字体(Virgil、Helvetica、Cascadia)。如果你想为选择字体设置键盘快捷键,这个功能会很有用。
|
||||
```javascript
|
||||
elements = ea.getViewSelectedElements().filter((el)=>el.type==="text");
|
||||
if(elements.length===0) return;
|
||||
let font = ["Virgil","Helvetica","Cascadia"];
|
||||
font = parseInt(await utils.suggester(font,["1","2","3"]));
|
||||
if (isNaN(font)) return;
|
||||
elements.forEach((el)=>el.fontFamily = font);
|
||||
ea.copyViewElementsToEAforEditing(elements);
|
||||
ea.addElementsToView();
|
||||
```
|
||||
@@ -5500,19 +5500,19 @@ Adds context menu to file explorer to create a drawing in any folder.
|
||||
|
||||
# 1.0.8-test
|
||||
|
||||
Adds [ExcalidrawAutomate](https://github.com/zsviczian/obsidian-excalidraw-plugin/blob/master/AutomateHowTo.md) a library of functions to generate Excalidraw drawings with Templater.
|
||||
添加了 [ExcalidrawAutomate](https://github.com/zsviczian/obsidian-excalidraw-plugin/blob/master/AutomateHowTo.md),这是一个用于通过 Templater 生成 Excalidraw 绘图的函数库。
|
||||
|
||||
Fixes issue [#37](https://github.com/zsviczian/obsidian-excalidraw-plugin/issues/37).
|
||||
Adds context menu to file explorer to create a drawing in any folder.
|
||||
修复了问题 [#37](https://github.com/zsviczian/obsidian-excalidraw-plugin/issues/37)。
|
||||
在文件浏览器中添加了上下文菜单,可以在任何文件夹中创建绘图。
|
||||
|
||||
|
||||
# 1.0.7
|
||||
|
||||
Added a small tweak to styles.
|
||||
Now you can control if the text wraps around the object or not.
|
||||
Use `|left` to align the image left without text wrapping and `|left-wrap` to wrap text.
|
||||
对样式做了一个小调整。
|
||||
现在你可以控制文本是否环绕在对象周围。
|
||||
使用 `|left` 可以让图片左对齐且不换行,使用 `|left-wrap` 可以实现文本环绕。
|
||||
|
||||
CSS used:
|
||||
CSS 使用:
|
||||
```
|
||||
svg.excalidraw-svg-right-wrap {
|
||||
float: right;
|
||||
@@ -5535,38 +5535,38 @@ div.excalidraw-svg-left {
|
||||
|
||||
# 1.0.6
|
||||
|
||||
Fixes:
|
||||
修复:
|
||||
[#31](https://github.com/zsviczian/obsidian-excalidraw-plugin/issues/31) [#25](https://github.com/zsviczian/obsidian-excalidraw-plugin/issues/25) [#24](https://github.com/zsviczian/obsidian-excalidraw-plugin/issues/24) [#23](https://github.com/zsviczian/obsidian-excalidraw-plugin/issues/23) [#22](https://github.com/zsviczian/obsidian-excalidraw-plugin/issues/22) [#20](https://github.com/zsviczian/obsidian-excalidraw-plugin/issues/20)
|
||||
|
||||
[](https://youtu.be/ipZPbcP2B0M)
|
||||
|
||||
## Export to SVG and PNG
|
||||
- Using the filename and location of the active drawing
|
||||
### Image Settings
|
||||
- Export with background
|
||||
- Export with theme
|
||||
## 导出为SVG和PNG
|
||||
- 使用当前绘图的文件名和位置
|
||||
### 图片设置
|
||||
- 导出时包含背景
|
||||
- 导出时包含主题
|
||||
|
||||
### Triggering export
|
||||
#### Once-off
|
||||
- Buttons to export active drawing
|
||||
- Command palette action to export active drawing
|
||||
#### Automated
|
||||
- Auto export SVG
|
||||
- Auto export PNG
|
||||
- Keep filenames in Sync
|
||||
### 触发导出
|
||||
#### 一次性导出
|
||||
- 导出当前绘图的按钮
|
||||
- 通过命令面板导出当前绘图
|
||||
#### 自动导出
|
||||
- 自动导出SVG
|
||||
- 自动导出PNG
|
||||
- 保持文件名同步
|
||||
|
||||
## Open drawings on a new page or on the current page
|
||||
### Command Palette
|
||||
- Create a drawing on a new page by splitting the currently active pane
|
||||
- Open a drawing on a new page by splitting the currently active pane
|
||||
### Ribbon Button
|
||||
- Click to open in an active pane
|
||||
- CTRL+Click to open on a new page
|
||||
## 在新页面或当前页面打开绘图
|
||||
### 命令面板
|
||||
- 通过拆分当前活动窗格在新页面创建绘图
|
||||
- 通过拆分当前活动窗格在新页面打开绘图
|
||||
### 功能区按钮
|
||||
- 点击在活动窗格中打开
|
||||
- CTRL+点击在新页面打开
|
||||
|
||||
## SVG styling when embedding using a code block
|
||||
- new formatting option for the code block embed
|
||||
- Valid values: left, right, center... but really anything after the last |.
|
||||
- corresponding CSS
|
||||
## 使用代码块嵌入时的SVG样式
|
||||
- 代码块嵌入的新格式选项
|
||||
- 有效值:left(左对齐)、right(右对齐)、center(居中)...实际上最后一个|后的任何内容都可以
|
||||
- 对应的CSS
|
||||
```
|
||||
.excalidraw-svg-left {
|
||||
float: left;
|
||||
@@ -5582,9 +5582,9 @@ Fixes:
|
||||
.excalidraw-svg {
|
||||
}
|
||||
```
|
||||
# How to install
|
||||
Install from Obsidian Community Plugins or ...
|
||||
Copy the following 3 files into your `vault/.obsidian/plugins/obsidian-excalidraw-plugin` folder
|
||||
# 如何安装
|
||||
从Obsidian社区插件安装或...
|
||||
将以下3个文件复制到你的`vault/.obsidian/plugins/obsidian-excalidraw-plugin`文件夹中
|
||||
- main.js
|
||||
- manifest.json
|
||||
- style.css
|
||||
@@ -5596,35 +5596,35 @@ Fixes:
|
||||
|
||||
[](https://youtu.be/TKgveGuA8Eo)
|
||||
|
||||
# Excalidraw 1.0.6 update
|
||||
## Export to SVG and PNG
|
||||
### New settings
|
||||
- Export with background
|
||||
- Export with theme
|
||||
- Auto export SVG
|
||||
- Auto export PNG
|
||||
- Keep filenames in Sync
|
||||
### Command palette action to export active drawing
|
||||
- Using the filename and location of the active drawing
|
||||
- Image types supported
|
||||
# Excalidraw 1.0.6 更新
|
||||
## 导出为 SVG 和 PNG
|
||||
### 新设置
|
||||
- 导出时包含背景
|
||||
- 导出时包含主题
|
||||
- 自动导出 SVG
|
||||
- 自动导出 PNG
|
||||
- 保持文件名同步
|
||||
### 命令面板导出当前绘图的操作
|
||||
- 使用当前绘图的文件名和位置
|
||||
- 支持的图片类型
|
||||
- PNG
|
||||
- SVG
|
||||
## New command palette actions
|
||||
- Create a new drawing in a new pane by splitting the currently active pane
|
||||
- Open drawing in a new pane by splitting the currently active pane
|
||||
### New setting
|
||||
- Configure the ribbon button to
|
||||
- open in a new pane by splitting the current pane
|
||||
- open in the currently active pane
|
||||
## 命令面板新增功能
|
||||
- 通过拆分当前活动面板来在新面板中创建新绘图
|
||||
- 通过拆分当前活动面板来在新面板中打开绘图
|
||||
### 新设置
|
||||
- 配置功能区按钮以
|
||||
- 通过拆分当前面板在新面板中打开
|
||||
- 在当前活动面板中打开
|
||||
|
||||
## SVG styling when embedding using code block
|
||||
### new options
|
||||
## 使用代码块嵌入时的 SVG 样式
|
||||
### 新选项
|
||||
[[drawing.excalidraw|500|left]]
|
||||
|
||||
[[drawing.excalidraw|500x300|right]]
|
||||
|
||||
[[drawing.excalidraw|center]]
|
||||
### corresponding CSS
|
||||
### 对应的 CSS
|
||||
```
|
||||
.excalidraw-svg-left {
|
||||
float: left;
|
||||
@@ -5640,9 +5640,9 @@ Fixes:
|
||||
.excalidraw-svg {
|
||||
}
|
||||
```
|
||||
## Stencil library bug resolved
|
||||
# How to install the test release
|
||||
Copy the following 3 files into your `vault/.obsidian/plugins/obsidian-excalidraw-plugin` folder
|
||||
## 修复模板库错误
|
||||
# 如何安装测试版本
|
||||
将以下3个文件复制到你的 `vault/.obsidian/plugins/obsidian-excalidraw-plugin` 文件夹中
|
||||
- main.js
|
||||
- manifest.json
|
||||
- style.css
|
||||
@@ -5756,6 +5756,31 @@ Excalidraw 0.7.0 还对客户端模板库的处理方式引入了重大变更。
|
||||

|
||||
|
||||
|
||||
# 0.0.1
|
||||
|
||||
## 发布说明:
|
||||
插件可以工作,但我还没有解决在 .md 文件中嵌入(transclusion)的问题。
|
||||
|
||||
## 安装方法:
|
||||
将3个文件 main.js、manifest.json、styles.css 复制到 vault/.obsidian/plugins/obsidian-excalidraw-plugin/ 文件夹中。
|
||||
|
||||
# 1.0.2
|
||||
|
||||
处理反馈:
|
||||
https://github.com/obsidianmd/obsidian-releases/pull/258
|
||||
|
||||
# 1.0.1
|
||||
|
||||
处理代码相关反馈。
|
||||
https://github.com/obsidianmd/obsidian-releases/pull/258
|
||||
|
||||
# 1.0.0
|
||||
|
||||
这是 Obsidian-Excalidraw 插件的首次发布。
|
||||
件夹中。
|
||||

|
||||
|
||||
|
||||
# 0.0.1
|
||||
|
||||
## 发布说明:
|
||||
|
||||
@@ -1,6 +1,8 @@
|
||||
# Excalidraw 自动化使用指南
|
||||
|
||||
【[English](../../readme.md)】
|
||||
> 此说明当前更新至 `e793526`。
|
||||
|
||||
【[English](../../readme.md) | 简体中文】
|
||||
|
||||
使用 ExcalidrawAutomate 可以通过 [ExcalidrawAutomate 脚本引擎](ExcalidrawScriptsEngine.md)、[Templater](https://silentvoid13.github.io/Templater/docs/) 或 [QuickAdd](https://github.com/chhoumann/quickadd) 插件来创建或操作 Excalidraw 绘图,并使用 [DataviewJS](https://blacksmithgu.github.io/obsidian-dataview/docs/api/intro/) 生成嵌入式的 SVG 和 PNG 图像。
|
||||
|
||||
|
||||
91
docs/zh-cn/ea-scripts/README.md
Normal file
91
docs/zh-cn/ea-scripts/README.md
Normal file
@@ -0,0 +1,91 @@
|
||||
# Excalidraw 脚本引擎脚本库
|
||||
|
||||
> 此说明当前更新至 `768aebf`。
|
||||
|
||||
【[English](../../../ea-scripts/README.md) | 简体中文】
|
||||
|
||||
点击观看介绍视频:
|
||||
|
||||
[](https://youtu.be/hePJcObHIso)
|
||||
|
||||
> **警告**
|
||||
> 相比视频中展示的方法,现在有更简单的方式来安装/管理脚本
|
||||
|
||||
查看 [Excalidraw 脚本引擎](../../ExcalidrawScriptsEngine.md) 文档了解更多详情。
|
||||
|
||||
## 如何在 Obsidian 仓库中安装脚本
|
||||
|
||||
安装内置脚本的步骤:
|
||||
|
||||
- 在 Obsidian 中打开一个 Excalidraw 绘图
|
||||
- 在面板下拉菜单中选择"安装或更新 Excalidraw 脚本"
|
||||
- 点击其中一个可用脚本
|
||||
- 点击"安装此脚本"(注意如果脚本已经安装,你会看到更新选项)
|
||||
- 重启 Obsidian 使脚本生效
|
||||
|
||||
注意:默认情况下,脚本会被安装到你仓库中的 `Excalidraw/Scripts/Downloaded` 文件夹
|
||||
|
||||
<details><summary>手动安装脚本</summary>
|
||||
|
||||
打开你感兴趣的脚本,将其保存到你的 Obsidian 仓库中(包括第一行的 `/*`),或者在"Raw"模式下打开并将全部内容复制到 Obsidian 中。
|
||||
|
||||
|
||||
|
||||
</details>
|
||||
|
||||
## 可用脚本列表
|
||||
|
||||
|标题|描述|图标|贡献者|
|
||||
|----|----|----|----|
|
||||
|[添加连接点](../../../ea-scripts/Add%20Connector%20Point.md)|此脚本将在选中文本元素的左上角添加一个小圆圈,并将文本和"圆点"组合成一组。||[@zsviczian](https://github.com/zsviczian)|
|
||||
|[添加现有文件链接并打开](../../../ea-scripts/Add%20Link%20to%20Existing%20File%20and%20Open.md)|提示从保险库(Vault)中选择文件。为选中的元素添加指向所选文件的链接。你可以在设置中控制是在当前活动面板还是相邻面板中打开文件。|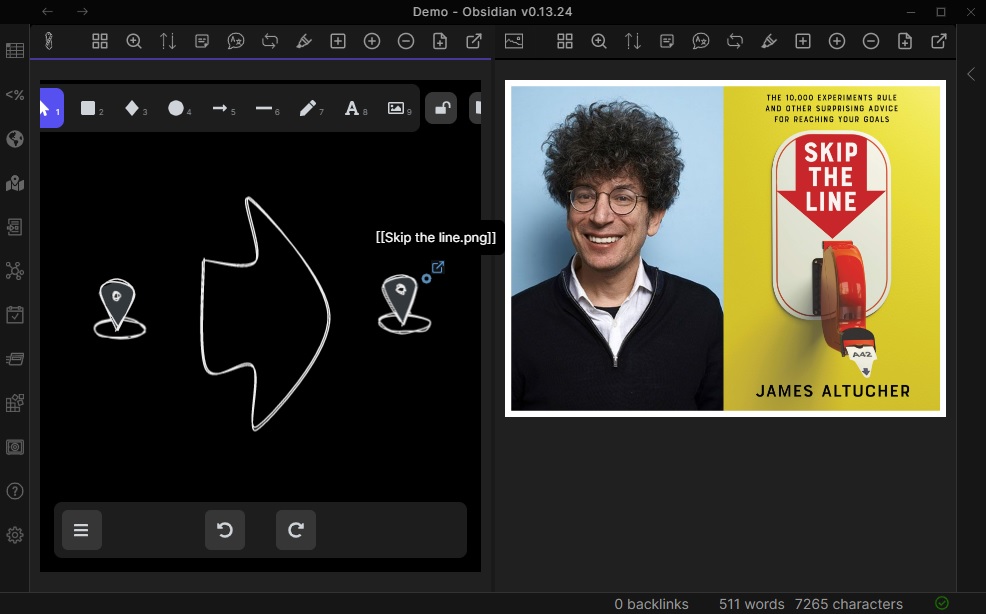|[@zsviczian](https://github.com/zsviczian)|
|
||||
|[添加新页面链接并打开](../../../ea-scripts/Add%20Link%20and%20Open%20Page.md)|提示输入文件名。提供创建和打开新的 Markdown 或 Excalidraw 文档的选项。为绘图中选中的对象添加指向新文件的链接。你可以在设置中控制是在当前活动面板或是相邻面板中打开文件。|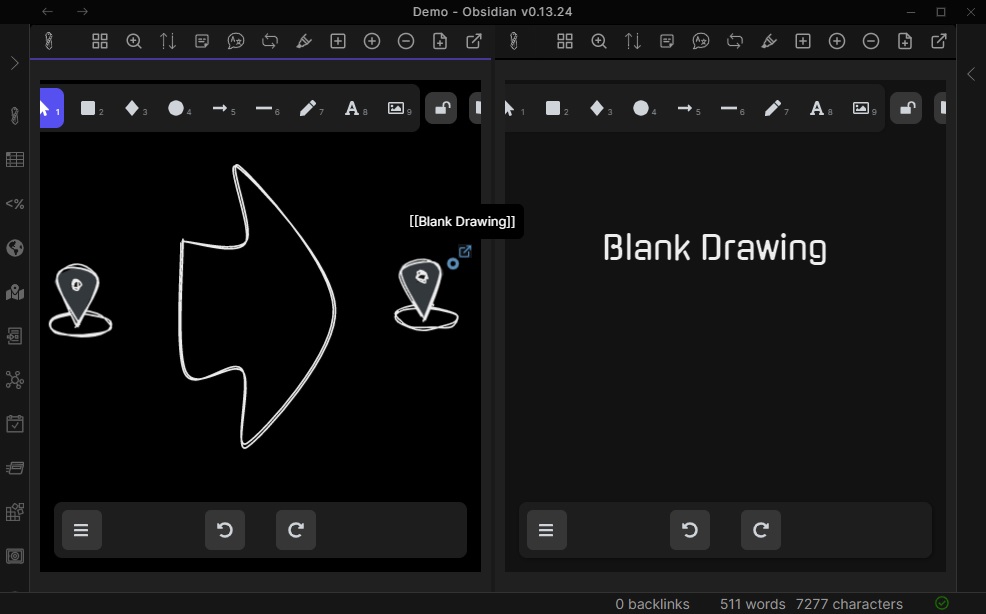|[@zsviczian](https://github.com/zsviczian)|
|
||||
|[添加流程下一步](../../../ea-scripts/Add%20Link%20to%20New%20Page%20and%20Open.md)|此脚本将提示你输入流程步骤的标题,然后创建带有该文本的便签。如果选中了某个元素,脚本将用箭头将这个新步骤与上一步骤(选中的元素)连接起来。如果没有选中元素,脚本会假定这是流程的第一步,只会输出带有输入文本的便签。|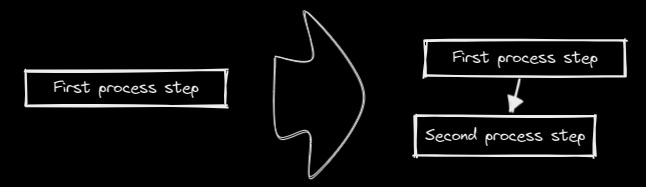|[@zsviczian](https://github.com/zsviczian)|
|
||||
|[分割椭圆](../../../ea-scripts/Boolean%20Operations.md)|使用此脚本可以对形状进行布尔运算。|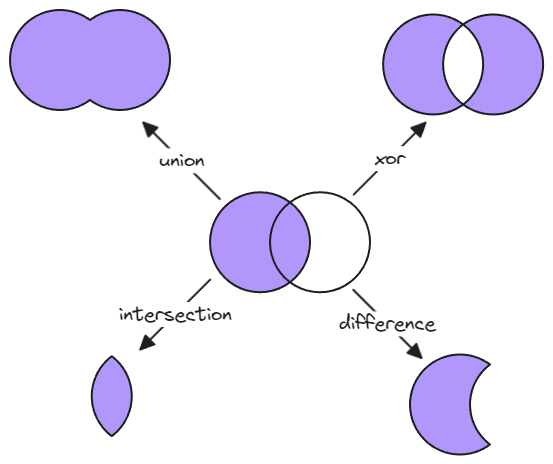|[@GColoy](https://github.com/GColoy)|
|
||||
|[为每个选中的组添加边框](../../../ea-scripts/Box%20Each%20Selected%20Groups.md)|此脚本将为 Excalidraw 中当前选中的每个组添加封装框。|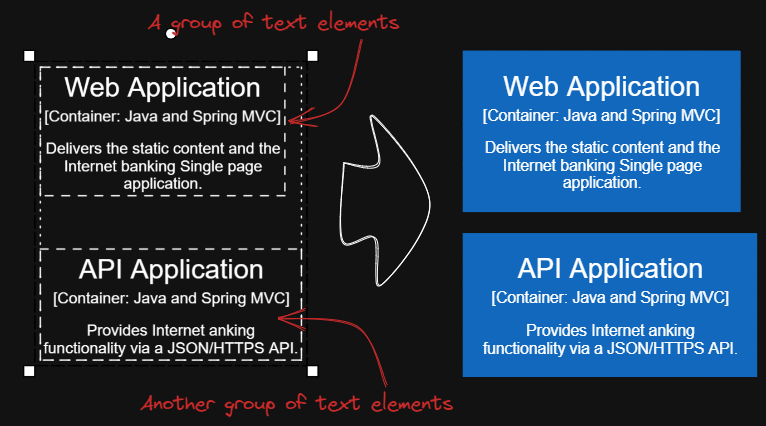|[@1-2-3](https://github.com/1-2-3)|
|
||||
|[为选中元素添加边框](../../../ea-scripts/Box%20Selected%20Elements.md)|此脚本将为 Excalidraw 中当前选中的元素添加一个封装框。||[@zsviczian](https://github.com/zsviczian)|
|
||||
|[更改选中元素的形状](../../../ea-scripts/Change%20shape%20of%20selected%20elements.md)|此脚本允许你更改选中的矩形、菱形和椭圆的形状|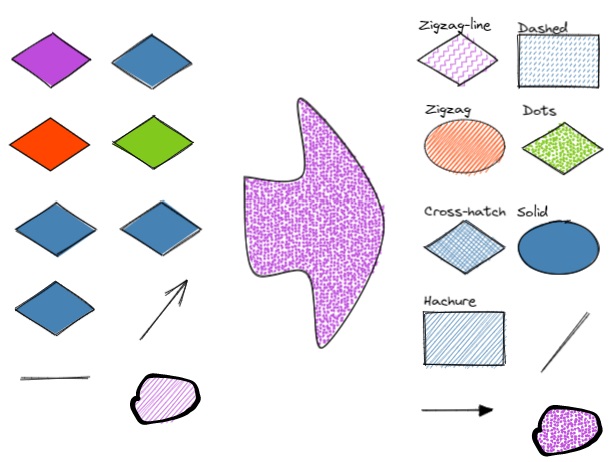|[@zsviczian](https://github.com/zsviczian)|
|
||||
|[连接元素](../../../ea-scripts/Connect%20elements.md)|此脚本将用箭头连接两个对象。如果任一对象是一组分组的元素(例如,与封装矩形分组的文本元素),脚本将识别这些组,并将箭头连接到组中最大的对象(假设你想将箭头连接到文本元素周围的框)。||[@zsviczian](https://github.com/zsviczian)|
|
||||
|[将自由绘制转换为线条](../../../ea-scripts/Convert%20freedraw%20to%20line.md)|将选中的自由绘制对象转换为可编辑的线条。这样你就可以通过拖动线条点来调整绘图,如果是封闭线条还可以选择形状填充。你可以在设置中调整转换点的密度|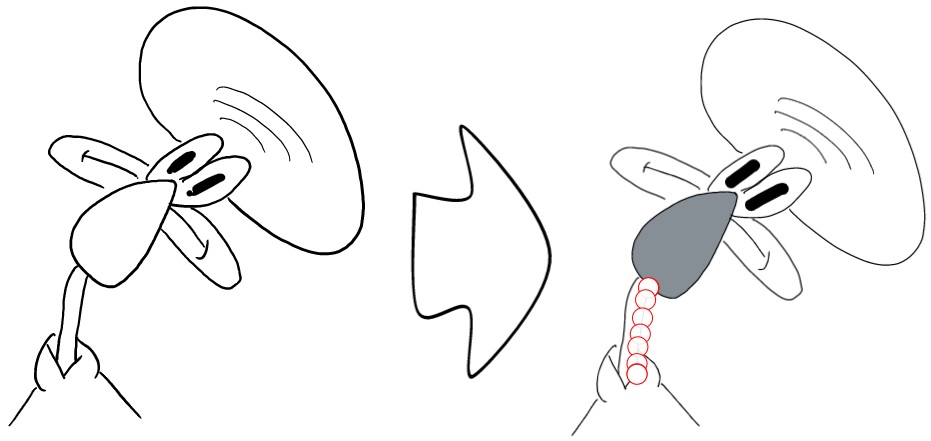|[@zsviczian](https://github.com/zsviczian)|
|
||||
|[将选中的文本元素转换为便签](../../../ea-scripts/Convert%20selected%20text%20elements%20to%20sticky%20notes.md)|将选中的纯文本元素转换为具有透明背景和透明描边颜色的便签。本质上是将文本元素转换为可换行的格式。|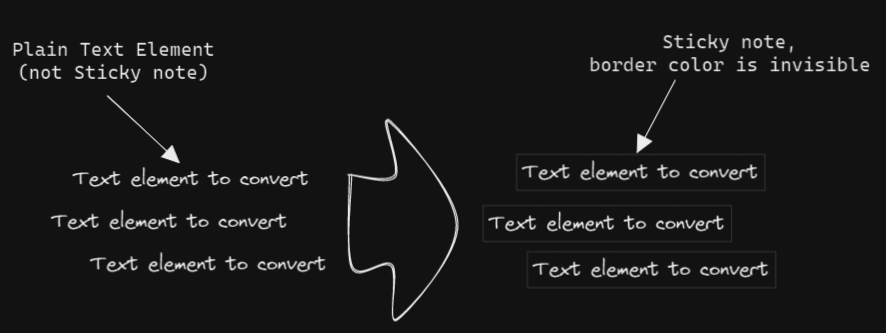|[@zsviczian](https://github.com/zsviczian)|
|
||||
|[将文本转换为带文件夹和别名的链接](../../../ea-scripts/Convert%20text%20to%20link%20with%20folder%20and%20alias.md)|将文本元素转换为指向所选文件夹中文件的链接,并将原始文本设置为别名。脚本会提示用户从保险库(Vault)中选择一个现有文件夹。|`原始文本` => `[[选定文件夹/原始文本\|原始文本]]`|[@zsviczian](https://github.com/zsviczian)|
|
||||
|[将选中元素样式复制到全局](../../../ea-scripts/Copy%20Selected%20Element%20Styles%20to%20Global)|此脚本会将任何选中元素的样式复制到 Excalidraw 的全局样式中。|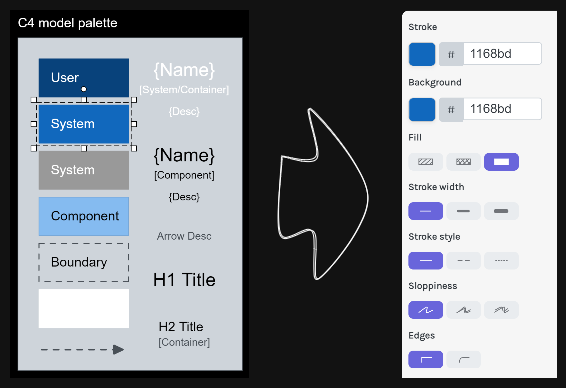|[@1-2-3](https://github.com/1-2-3)|
|
||||
|[创建新的 Markdown 文件并嵌入到当前绘图中](../../../ea-scripts/Create%20new%20markdown%20file%20and%20embed%20into%20active%20drawing.md)|此脚本会提示你输入文件名,然后创建一个具有该文件名的新 Markdown 文档,在相邻面板中打开新的 Markdown 文档,并将该 Markdown 文档嵌入到当前的 Excalidraw 绘图中。|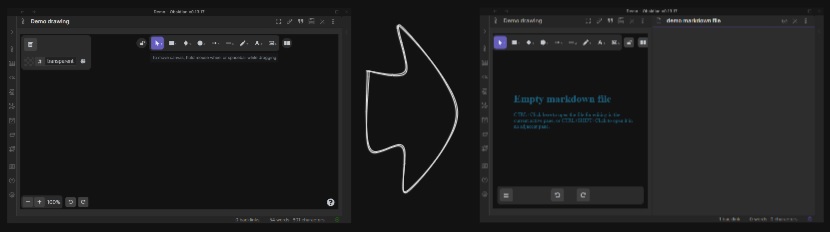|[@zsviczian](https://github.com/zsviczian)|
|
||||
|[加深背景颜色](../../../ea-scripts/Darken%20background%20color.md)|此脚本每次将选中元素的背景颜色加深 2%。你可以多次使用此脚本直到满意为止。建议为此脚本设置快捷键,这样你就可以快速尝试加深和减淡颜色效果。与"修改背景颜色不透明度"脚本相比,其优点是元素的背景颜色不受画布颜色影响,并且颜色值不会以奇怪的 rgba() 形式出现。|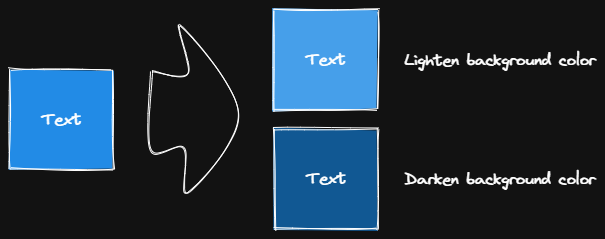|[@1-2-3](https://github.com/1-2-3)|
|
||||
|[肘形连接器](../../../ea-scripts/Elbow%20connectors.md)|此脚本将选中的连接器转换为肘形。|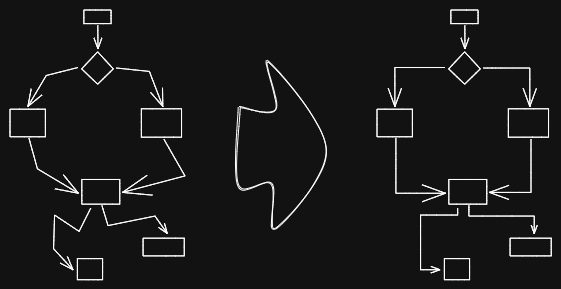|[@1-2-3](https://github.com/1-2-3)|
|
||||
|[水平扩展矩形并保持文本居中](../../../ea-scripts/Expand%20rectangles%20horizontally%20keep%20text20%centered.md)|此脚本会扩展选中矩形的宽度,直到它们都具有相同的宽度,并保持文本居中。||[@1-2-3](https://github.com/1-2-3)|
|
||||
|[水平扩展矩形](../../../ea-scripts/Expand%20rectangles%20horizontally.md)|此脚本会扩展选中矩形的宽度,直到它们都具有相同的宽度。||[@1-2-3](https://github.com/1-2-3)|
|
||||
|[垂直扩展矩形并保持文本居中](../../../ea-scripts/Expand%20rectangles%20vertically%20keep%20text%20centered.md)|此脚本会扩展选中矩形的高度,直到它们都具有相同的高度,并保持文本居中。||[@1-2-3](https://github.com/1-2-3)|
|
||||
|[垂直扩展矩形](../../../ea-scripts/Expand%20rectangles%20vertically.md)|此脚本会扩展选中矩形的高度,直到它们都具有相同的高度。||[@1-2-3](https://github.com/1-2-3)|
|
||||
|[固定中心点水平距离](../../../ea-scripts/Fixed%20horizontal%20distance%20between%20centers.md)|此脚本会以固定的中心点间距水平排列选中的元素。|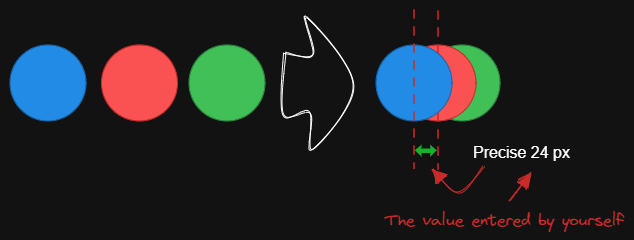|[@1-2-3](https://github.com/1-2-3)|
|
||||
|[固定内部距离](../../../ea-scripts/Fixed%20inner%20distance.md)|此脚本会以固定的内部距离排列选中的元素和组。||[@1-2-3](https://github.com/1-2-3)|
|
||||
|[固定间距](../../../ea-scripts/Fixed%20spacing.md)|此脚本会以固定的间距水平排列选中的元素。当我们创建架构图或思维导图时,经常需要以固定间距排列大量元素。"固定间距"和"固定垂直距离"脚本可以为我们节省大量时间。|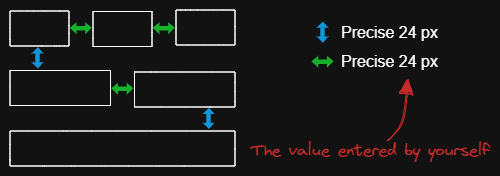|[@1-2-3](https://github.com/1-2-3)|
|
||||
|[固定中心点垂直距离](../../../ea-scripts/Fixed%20vertical%20distance%20between%20centers.md)|此脚本会以固定的中心点间距垂直排列选中的元素。|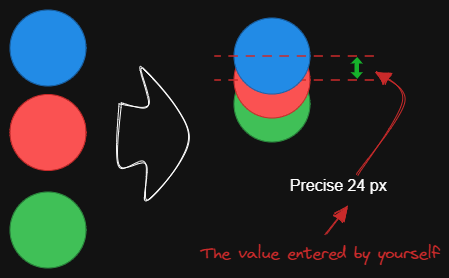|[@1-2-3](https://github.com/1-2-3)|
|
||||
|[固定垂直距离](../../../ea-scripts/Fixed%20vertical%20distance.md)|此脚本会以固定间距垂直排列选中的元素。当我们创建架构图或思维导图时,经常需要以固定间距排列大量元素。`固定间距`和`固定垂直距离`脚本可以为我们节省大量时间。|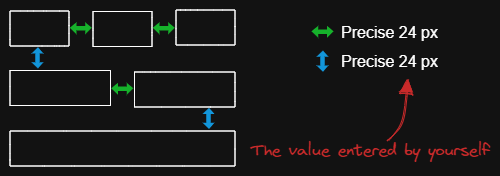|[@1-2-3](https://github.com/1-2-3)|
|
||||
|[减淡背景颜色](../../../ea-scripts/Lighten%20background%20color.md)|此脚本每次将选中元素的背景颜色减淡 2%。你可以多次使用此脚本直到满意为止。建议为此脚本设置快捷键,这样你就可以快速尝试加深和减淡颜色效果。与"修改背景颜色不透明度"脚本相比,其优点是元素的背景颜色不受画布颜色影响,并且颜色值不会以奇怪的 rgba() 形式出现。||[@1-2-3](https://github.com/1-2-3)|
|
||||
|[思维导图连接器](../../../ea-scripts/Mindmap%20connector.md)|此脚本为选中的元素创建类似思维导图的连线(目前仅支持右侧和向下方向)。连线的起点将根据元素的创建时间确定。因此你应该先创建标题元素。|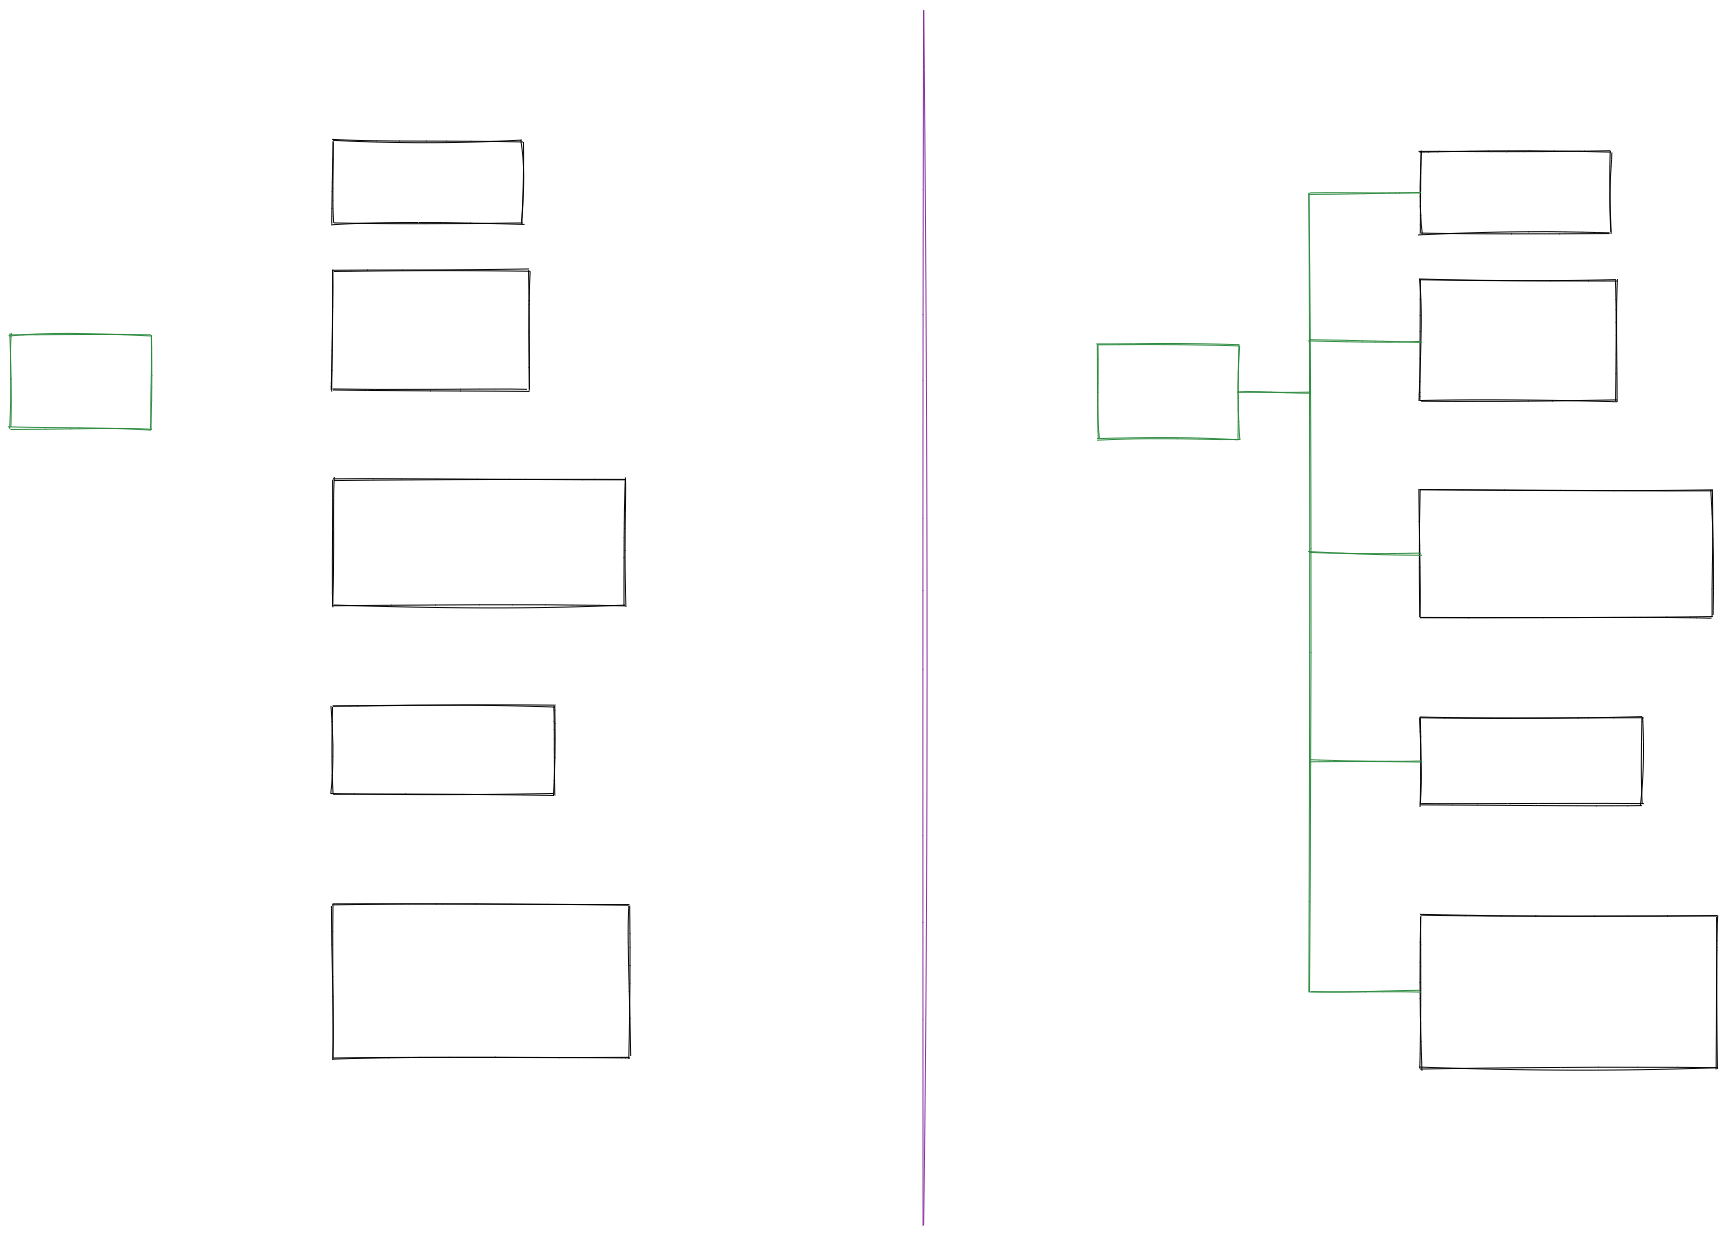|[@xllowl](https://github.com/xllowl)|
|
||||
|[修改背景颜色不透明度](../../../ea-scripts/Modify%20background%20color%20opacity.md)|此脚本会更改选中框的背景颜色不透明度。Excalidraw 中的默认背景颜色太深,导致文字难以阅读。你可以通过设置透明度来使颜色变浅。你可以反复调整透明度直到满意为止。虽然 Excalidraw 在其原生属性设置中有不透明度选项,但它也会改变边框的透明度。使用此脚本可以只更改背景颜色的不透明度而不影响边框。|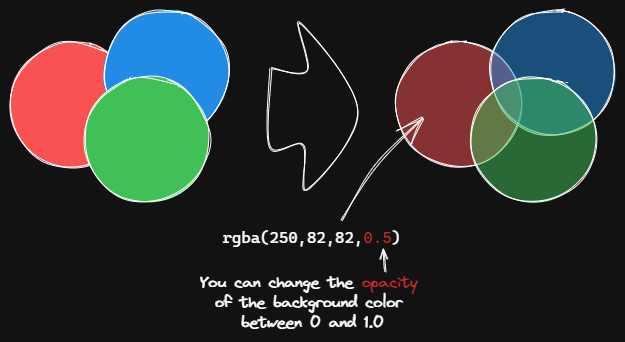|[@1-2-3](https://github.com/1-2-3)|
|
||||
|[标准化选中箭头](../../../ea-scripts/Normalize%20Selected%20Arrows.md)|此脚本将重置选中箭头的起点和终点位置。箭头将指向连接框的中心,并与框保持 8px 的间距。|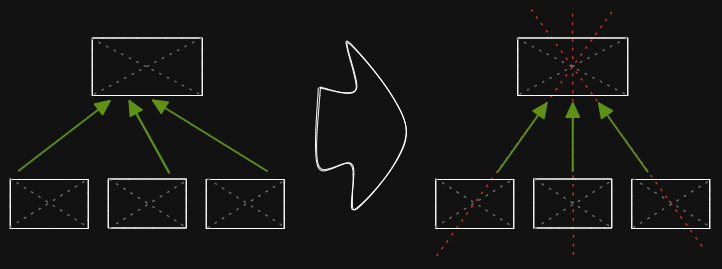|[@1-2-3](https://github.com/1-2-3)|
|
||||
|[OCR - 光学字符识别](../../../ea-scripts/OCR%20-%20Optical%20Character%20Recognition.md)|此脚本将 1) 把选中的图片文件发送到 [taskbone.com](https://taskbone.com) 提取图片中的文字,并 2) 将文字作为文本元素添加到你的绘图中。|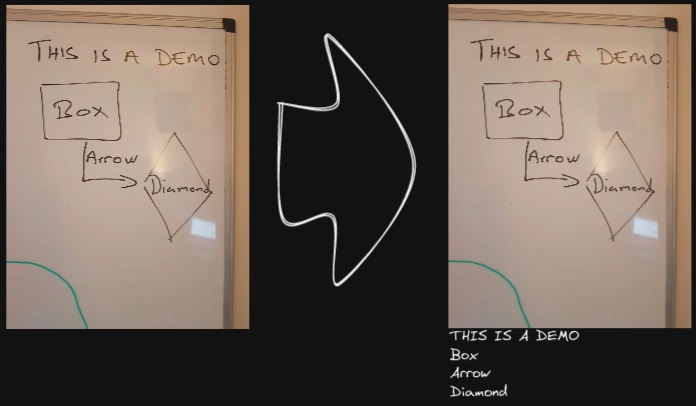|[@zsviczian](https://github.com/zsviczian)|
|
||||
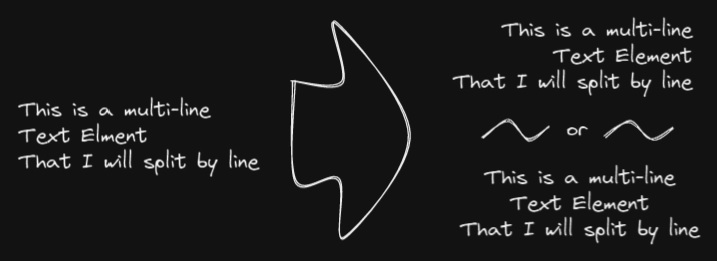
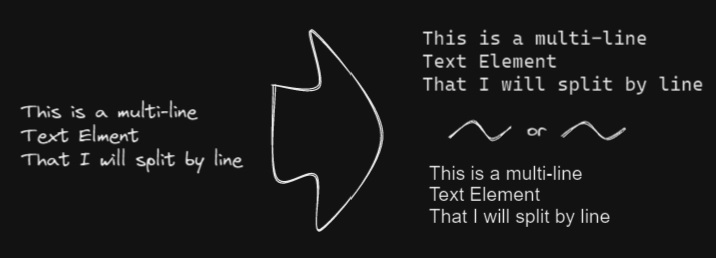
|[有机线条](../../../ea-scripts/Organic%20Line.md)|将选中的自由绘制线条转换为从开始到结束笔压逐渐减小的线条。转换后的线条会被放置在图层的最底层,位于所有其他元素之下。在绘制有机思维导图时很有帮助。|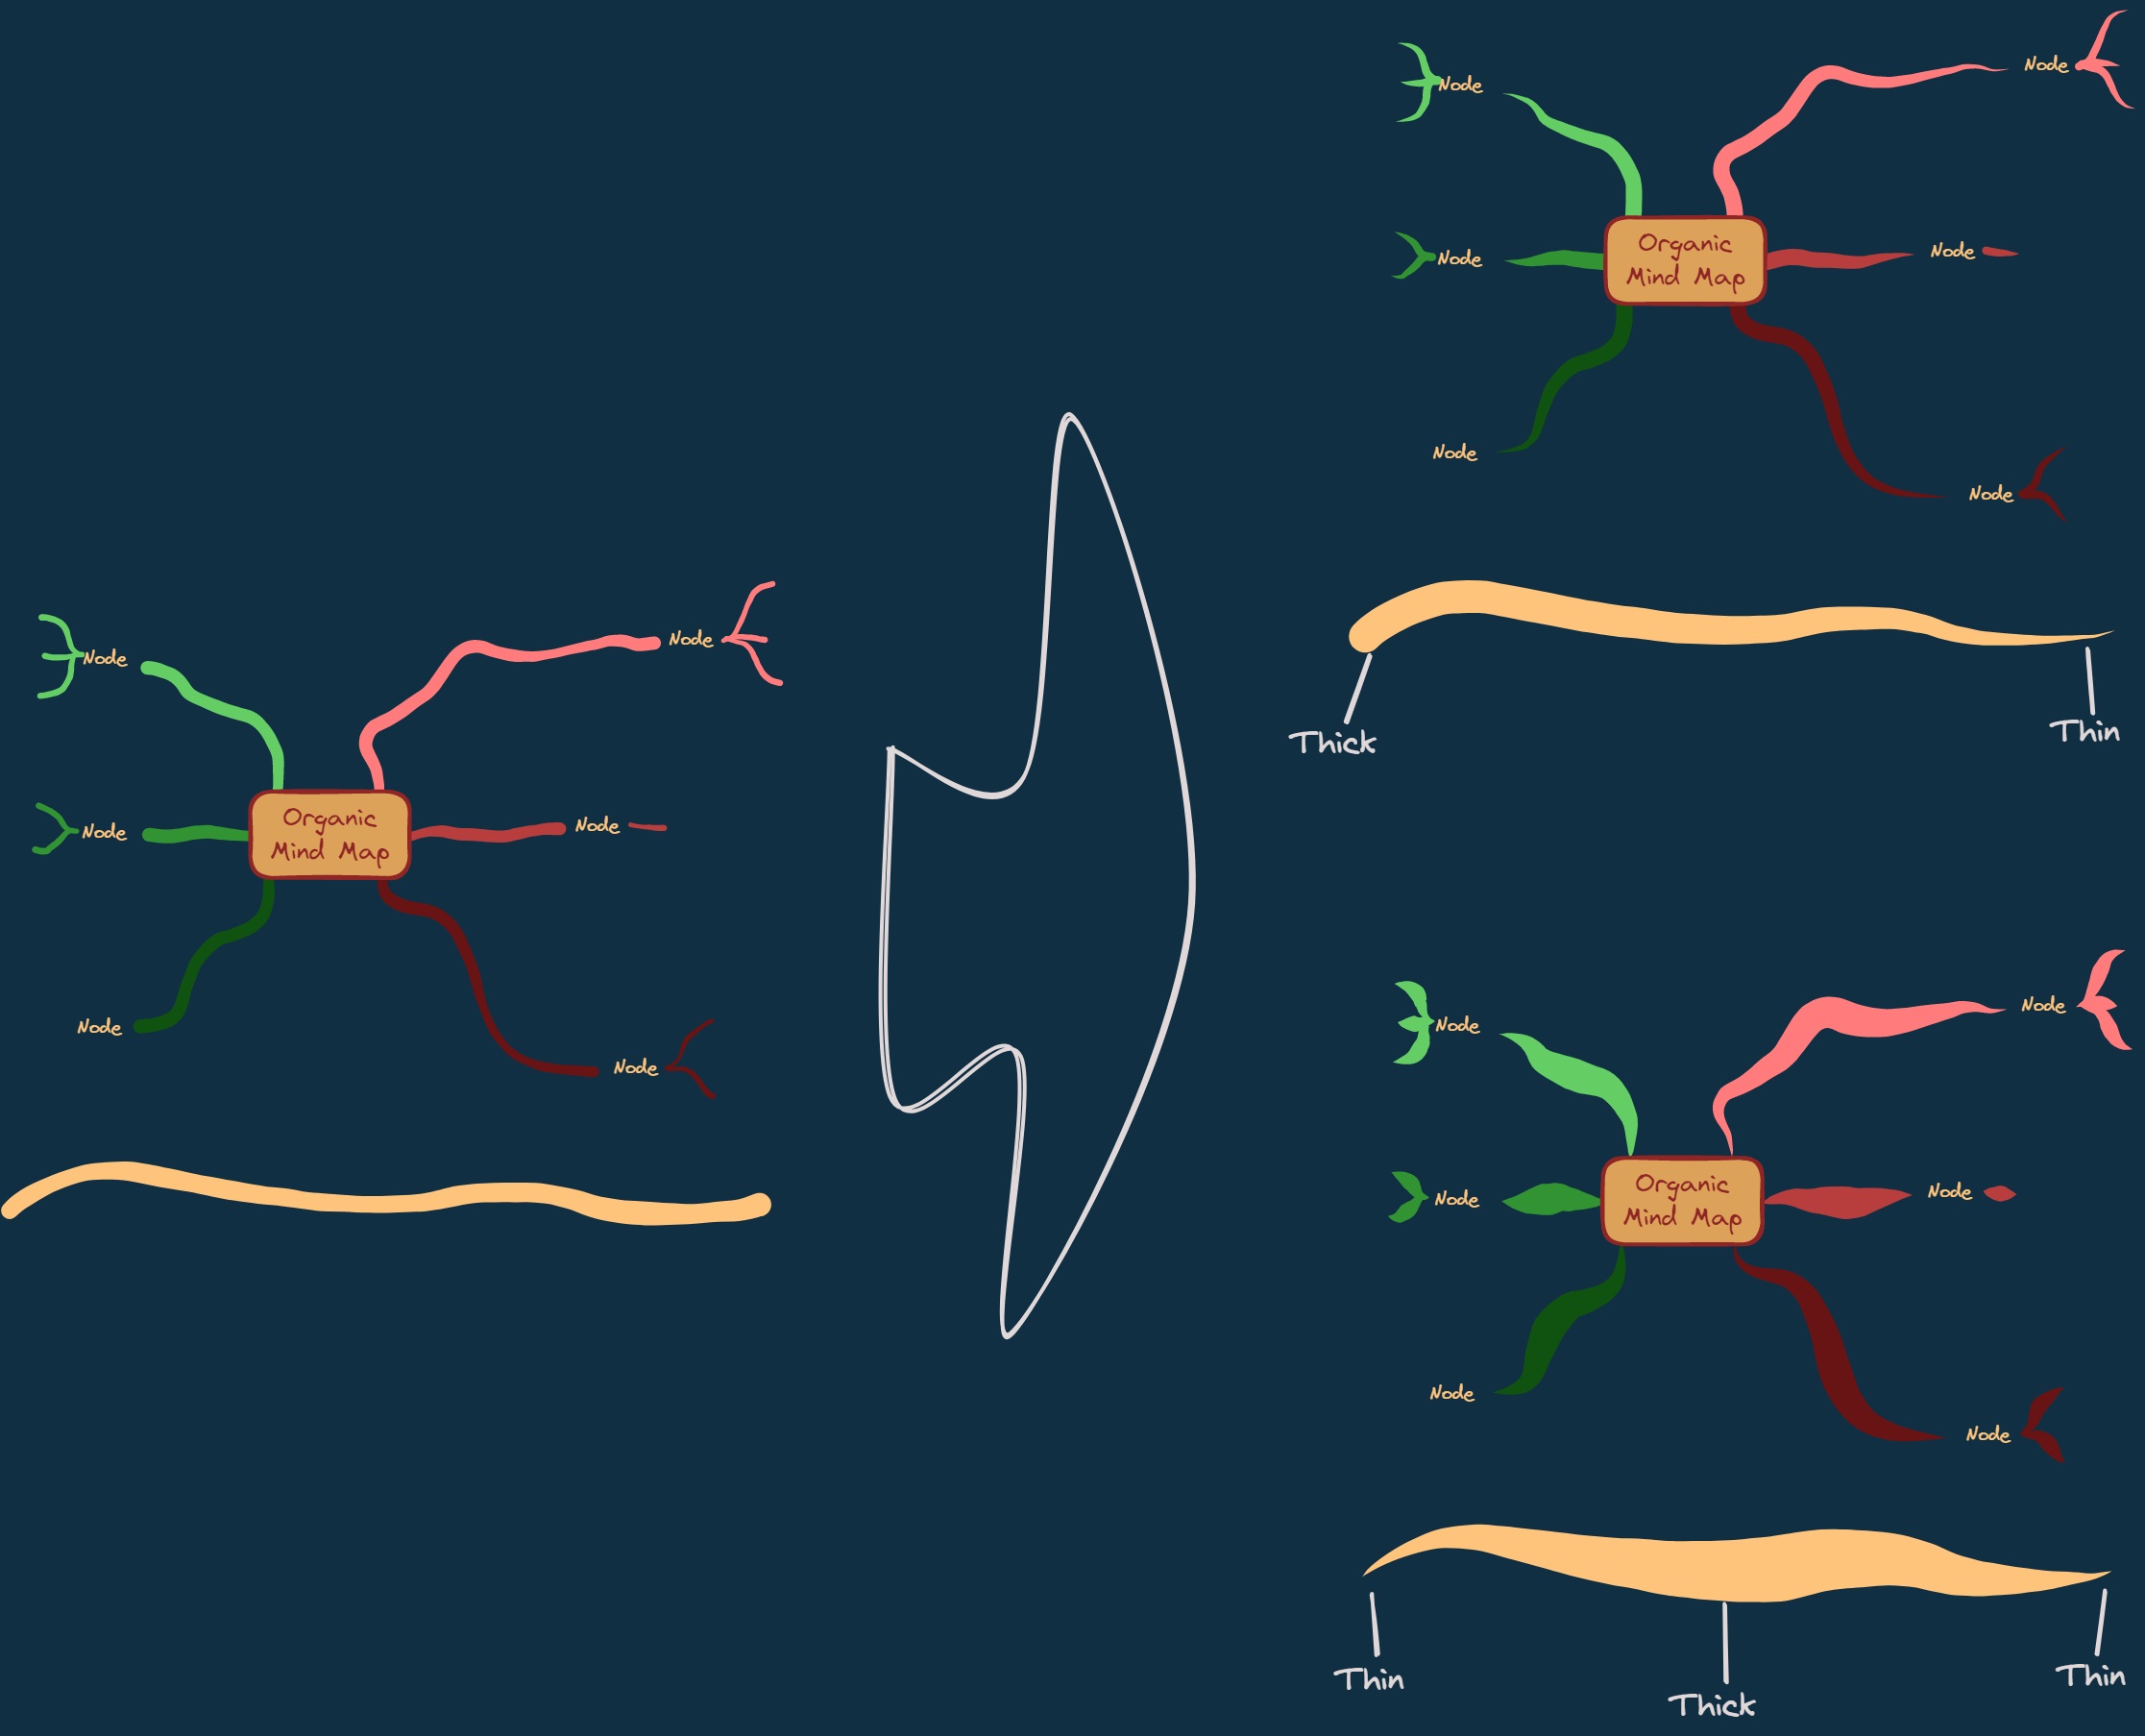|[@zsviczian](https://github.com/zsviczian)|
|
||||
|[重复元素](../../../ea-scripts/Repeat%20Elements.md)|此脚本会检测两个选中元素之间的差异,包括位置、大小、角度、描边和背景颜色,并根据用户输入的重复次数创建多个具有相同差异的元素。|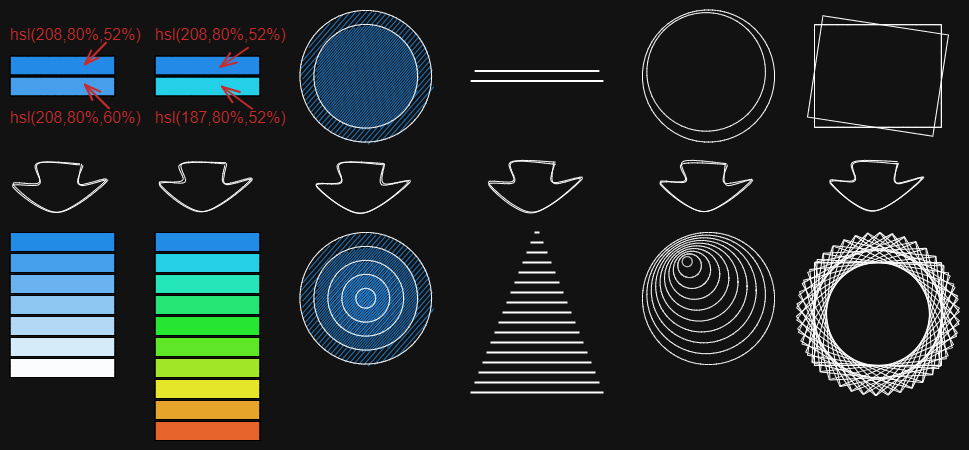|[@1-2-3](https://github.com/1-2-3)|
|
||||
|[重置 LaTeX 大小](../../../ea-scripts/Reset%20LaTeX%20Size.md)|将嵌入的 LaTeX 公式大小重置为默认大小或默认大小的倍数。||[@firai](https://github.com/firai)|
|
||||
|[反转箭头](../../../ea-scripts/Reverse%20arrows.md)|反转选中元素范围内的**箭头**方向。||[@zsviczian](https://github.com/zsviczian)|
|
||||
|[手写助手](../../../ea-scripts/Scribble%20Helper.md)|iOS 手写助手,用于改善文本元素的手写体验。如果没有选中元素,则会在指针位置创建一个文本元素,你可以使用编辑框通过手写来修改文本。如果选中了文本元素,则会打开输入提示框,你可以在其中通过手写修改文本。||[@zsviczian](https://github.com/zsviczian)|
|
||||
|[选择特定类型元素](../../../ea-scripts/Select%20Elements%20of%20Type.md)|显示当前图像中不同元素类型的列表供选择。只有选定类型的元素会在画布上被选中。如果运行脚本时没有选中任何元素,则脚本会处理画布上的所有元素。如果执行脚本时已选中某些元素,则脚本只会处理这些选中的元素。<br>此脚本在以下情况下很有用,例如,当你想要将所有箭头置于顶层,或想要更改所有文本元素的颜色等。||[@zsviczian](https://github.com/zsviczian)|
|
||||
|[通过添加阴影克隆为未闭合线条对象设置背景颜色](../../../ea-scripts/Set%20background%20color%20of%20unclosed%20line%20object%20by%20adding%20a%20shadow%20clone.md)|使用此脚本为未闭合(即开放)线条对象设置背景颜色,方法是创建对象的克隆。脚本会将克隆的描边颜色设置为透明,并添加一条直线来闭合对象。使用设置来定义默认背景颜色、填充样式和克隆的描边宽度。默认情况下,克隆会与原始对象组合在一起,你也可以在设置中禁用此功能。||[@zsviczian](https://github.com/zsviczian)|
|
||||
|[设置尺寸](../../../ea-scripts/Set%20Dimensions.md)|目前在 Excalidraw 中无法指定对象的确切位置和大小。你可以使用这个简单的脚本来弥补这个不足。||[@zsviczian](https://github.com/zsviczian)|
|
||||
|[设置字体](../../../ea-scripts/Set%20Font%20Family.md)|设置文本块的字体(Virgil、Helvetica、Cascadia)。如果你想为选择字体设置键盘快捷键,这个脚本很有用。||[@zsviczian](https://github.com/zsviczian)|
|
||||
|[设置网格](../../../ea-scripts/Set%20Grid.md)|Excalidraw 中的默认网格大小是 20。目前无法通过用户界面更改网格大小。这个脚本提供了一种方法来弥补这个不足。||[@zsviczian](https://github.com/zsviczian)|
|
||||
|[设置链接别名](../../../ea-scripts/Set20%Link20%Alias.md)|遍历选中文本元素中的所有链接,并提示用户为每个找到的链接设置或修改别名。|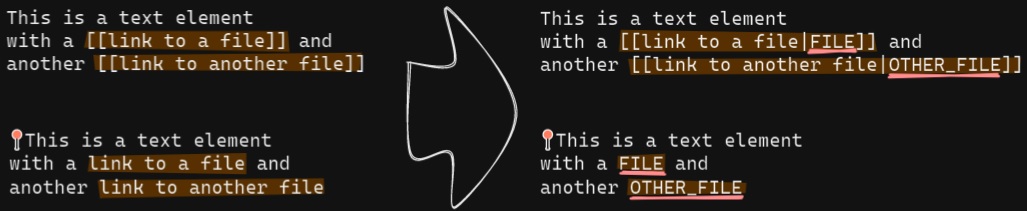|[@zsviczian](https://github.com/zsviczian)|
|
||||
|[设置选中元素的描边宽度](../../../ea-scripts/Set%20Stroke%20Width%20of%20Selected%20Elements.md)|此脚本将设置选中元素的描边宽度。这在缩放自由绘制草图并想要减小或增加其线条宽度时很有用。||[@zsviczian](https://github.com/zsviczian)|
|
||||
|[按行分割文本](../../../ea-scripts/Split%20text%20by%20lines.md)|将文本行分割成单独的文本元素,以便更容易重新组织||[@zsviczian](https://github.com/zsviczian)|
|
||||
|[设置文本对齐方式](../../../ea-scripts/Set%20Text%20Alignment.md)|设置文本块的对齐方式(居中、右对齐、左对齐)。如果你想为选择文本对齐方式设置键盘快捷键,这个脚本很有用。||[@zsviczian](https://github.com/zsviczian)|
|
||||
|[分割椭圆](../../../ea-scripts/Split%20Ellipse.md)|此脚本会在线条与椭圆相交的任何点处分割椭圆。|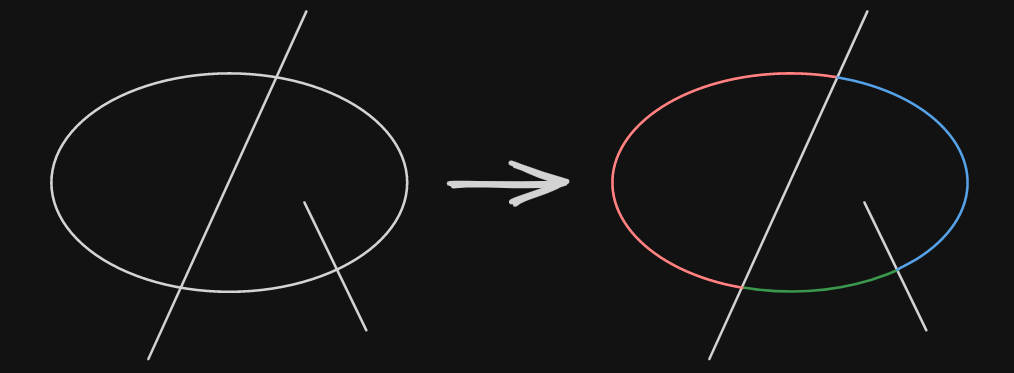|[@GColoy](https://github.com/GColoy)|
|
||||
|[TheBrain导航](../../../ea-scripts/TheBrain-navigation.md)|基于Excalidraw的保险库(Vault)图形用户界面。需要[Dataview插件](https://github.com/blacksmithgu/obsidian-dataview)。生成类似于[TheBrain](https://TheBrain.com)的图形视图。在[YouTube](https://youtu.be/plYobK-VufM)上观看此脚本的介绍。|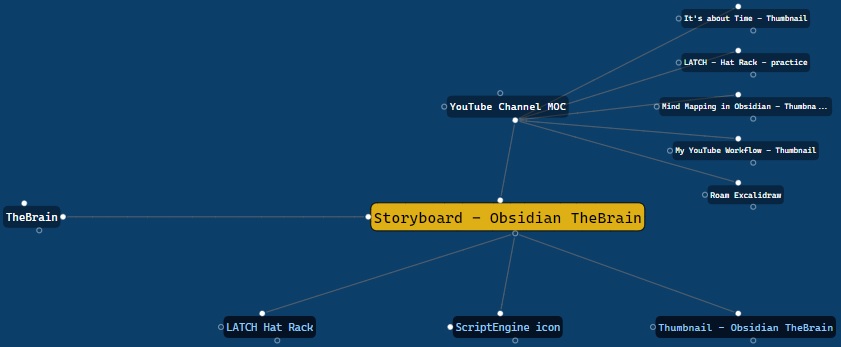|[@zsviczian](https://github.com/zsviczian)|
|
||||
|[移动端切换全屏](../../../ea-scripts/Toggle%20Fullscreen%20on%20Mobile.md)|隐藏Obsidian工作区叶片填充和标题(基于设置中的选项,默认"隐藏标题"=false),这将使Excalidraw全屏显示。⚠ 注意,如果标题不可见,将很难调用命令面板来结束全屏。只有在你有键盘或已经练习过打开命令面板的情况下才隐藏标题!|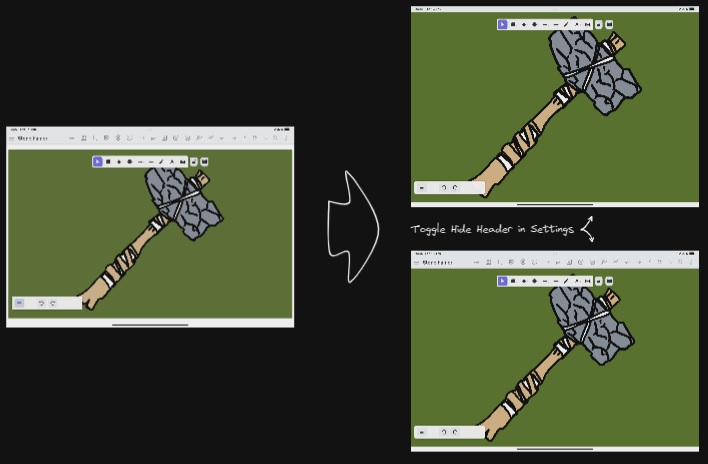|[@zsviczian](https://github.com/zsviczian)|
|
||||
|[切换网格](../../../ea-scripts/Toggle%20Grid.md)|切换网格的显示与隐藏。||[@GColoy](https://github.com/GColoy)|
|
||||
|[将文本元素转移到Excalidraw markdown元数据](../../../ea-scripts/Transfer%20TextElements%20to%20Excalidraw%20markdown%20metadata.md)|此脚本将从画布中删除选中的文本元素,并将这些文本元素中的文本复制到Excalidraw markdown文件的元数据中。这意味着,文本将不再在绘图中可见,但你可以在Obsidian中搜索文本并找到包含此图像的绘图。||[@zsviczian](https://github.com/zsviczian)|
|
||||
|[缩放以适应选中元素](../../../ea-scripts/Zoom%20to%20Fit%20Selected%20Elements.md)|类似于Excalidraw标准的<kbd>SHIFT+2</kbd>功能:缩放以适应选中元素,但可以缩放到1000%。灵感来源:[#272](https://github.com/zsviczian/obsidian-excalidraw-plugin/issues/272)||[@zsviczian](https://github.com/zsviczian)|
|
||||
|[硬件橡皮擦支持](../../../ea-scripts/Hardware%20Eraser%20Support.md)|允许在支持的笔上使用笔反转/硬件橡皮擦。|[@threethan](https://github.com/threethan)|
|
||||
|[笔的自动绘制](../../../ea-scripts/Auto%20Draw%20for%20Pen.md)|当悬停笔时自动从选择工具切换到绘制工具,然后再切换回来。|[@threethan](https://github.com/threethan)|
|
||||
@@ -1,4 +1,7 @@
|
||||
# Excalidraw Script Engine scripts library
|
||||
|
||||
【English | [简体中文](../docs/zh-cn/ea-scripts/README.md)】
|
||||
|
||||
Click to watch the intro video:
|
||||
|
||||
[](https://youtu.be/hePJcObHIso)
|
||||
|
||||
@@ -1,7 +1,7 @@
|
||||
{
|
||||
"id": "obsidian-excalidraw-plugin",
|
||||
"name": "Excalidraw",
|
||||
"version": "2.9.2",
|
||||
"version": "2.10.0",
|
||||
"minAppVersion": "1.1.6",
|
||||
"description": "An Obsidian plugin to edit and view Excalidraw drawings",
|
||||
"author": "Zsolt Viczian",
|
||||
|
||||
@@ -23,7 +23,7 @@
|
||||
"license": "MIT",
|
||||
"dependencies": {
|
||||
"@popperjs/core": "^2.11.8",
|
||||
"@zsviczian/excalidraw": "0.18.0-3",
|
||||
"@zsviczian/excalidraw": "0.18.0-6",
|
||||
"chroma-js": "^2.4.2",
|
||||
"clsx": "^2.0.0",
|
||||
"@zsviczian/colormaster": "^1.2.2",
|
||||
|
||||
@@ -17,6 +17,19 @@ I develop this plugin as a hobby, spending my free time doing this. If you find
|
||||
|
||||
<div class="ex-coffee-div"><a href="https://ko-fi.com/zsolt"><img src="https://storage.ko-fi.com/cdn/kofi6.png?v=6" border="0" alt="Buy Me a Coffee at ko-fi.com" height=45></a></div>
|
||||
`,
|
||||
"2.10.0": `
|
||||
## New from Excalidraw.com
|
||||
- Lasso select [#9169](https://github.com/excalidraw/excalidraw/pull/9169)
|
||||
- Add container to multiple text elements [#9348](https://github.com/excalidraw/excalidraw/pull/9348)
|
||||
|
||||
## Fixed from Excalidraw.com
|
||||
- Rounded diamond edge elbow arrow U route [#9349](https://github.com/excalidraw/excalidraw/pull/9349)
|
||||
- Improved eraser performance [#9352](https://github.com/excalidraw/excalidraw/pull/9352)
|
||||
- Keep arrow label horizontal [#9364](https://github.com/excalidraw/excalidraw/pull/9364)
|
||||
|
||||
## Fixed in ExcalidrawAutomate
|
||||
- ea.addText did not honor the width parameter.
|
||||
`,
|
||||
"2.9.2":`
|
||||
- More minor fix. Toolbars are not responsive when dynamic styling is turned off. [#2287](https://github.com/zsviczian/obsidian-excalidraw-plugin/issues/2287)
|
||||
`,
|
||||
|
||||
Reference in New Issue
Block a user