mirror of
https://github.com/zsviczian/obsidian-excalidraw-plugin.git
synced 2025-08-06 05:46:28 +00:00
Compare commits
10 Commits
| Author | SHA1 | Date | |
|---|---|---|---|
|
|
063bef92b9 | ||
|
|
2bf9156808 | ||
|
|
391363c419 | ||
|
|
85ae7f7bec | ||
|
|
03718bc927 | ||
|
|
768aebf5d2 | ||
|
|
9e31e74d15 | ||
|
|
2acc99d307 | ||
|
|
20892f8541 | ||
|
|
e0f96a2650 |
@@ -161,7 +161,7 @@ Number between 0 and 100. The opacity of an object, both stroke and fill.
|
||||
### strokeSharpness, setStrokeSharpness()
|
||||
```typescript
|
||||
type StrokeSharpness = "round" | "sharp";
|
||||
setStrokeSharpness(val:nmuber);
|
||||
setStrokeSharpness(val:number);
|
||||
```
|
||||
strokeSharpness is a string.
|
||||
|
||||
|
||||
@@ -1,6 +1,6 @@
|
||||
# Excalidraw
|
||||
|
||||
[简体中文](./docs/zh-cn/README.md)
|
||||
【English | [简体中文](./docs/zh-cn/README.md)】
|
||||
|
||||
👉👉👉 Check out and contribute to the new [Obsidian-Excalidraw Community Wiki](https://excalidraw-obsidian.online/WIKI/Welcome+to+the+WIKI)
|
||||
|
||||
|
||||
@@ -54,7 +54,7 @@ Number between 0 and 100. The opacity of an object, both stroke and fill.
|
||||
### strokeSharpness, setStrokeSharpness()
|
||||
```typescript
|
||||
type StrokeSharpness = "round" | "sharp";
|
||||
setStrokeSharpness(val:nmuber);
|
||||
setStrokeSharpness(val:number);
|
||||
```
|
||||
strokeSharpness is a string.
|
||||
|
||||
|
||||
@@ -1,5 +1,7 @@
|
||||
# [◀ Excalidraw Automate How To](./readme.md)
|
||||
|
||||
【English | [简体中文](zh-cn/docs/ExcalidrawScriptsEngine.md)】
|
||||
|
||||
[](https://youtu.be/hePJcObHIso)
|
||||
|
||||
## Introduction
|
||||
|
||||
@@ -1,5 +1,7 @@
|
||||
# Excalidraw Automate How To
|
||||
|
||||
【English | [简体中文](zh-cn/docs/readme.md)】
|
||||
|
||||
Use ExcalidrawAutomate to create or manipulate Excalidraw drawings using the [ExcalidrawAutomate Script Engine](ExcalidrawScriptsEngine.md), the [Templater](https://silentvoid13.github.io/Templater/docs/) or the [QuickAdd](https://github.com/chhoumann/quickadd) plugins, and to generate embedded SVG and PNG images using [DataviewJS](https://blacksmithgu.github.io/obsidian-dataview/docs/api/intro/)
|
||||
|
||||
With a little work, using ExcalidrawAutomate you can generate simple mindmaps, build a family tree, fill out SVG forms, create customized charts, or automate simple tasks (i.e. create macros) in Excalidraw.
|
||||
|
||||
@@ -167,7 +167,7 @@ strokeStyle 是一个字符串。
|
||||
### strokeSharpness, setStrokeSharpness()
|
||||
```typescript
|
||||
type StrokeSharpness = "round" | "sharp";
|
||||
setStrokeSharpness(val:nmuber);
|
||||
setStrokeSharpness(val:number);
|
||||
```
|
||||
strokeSharpness 是一个字符串。
|
||||
|
||||
@@ -282,7 +282,7 @@ addToGroup(objectIds:[]):void
|
||||
```
|
||||
将 `objectIds` 中列出的对象进行分组。
|
||||
|
||||
## Utility functions
|
||||
## 实用函数
|
||||
### clear()
|
||||
`clear()` 将从缓存中清除对象,但会保留元素样式设置。
|
||||
|
||||
@@ -407,7 +407,7 @@ async createPNG(templatePath?:string)
|
||||
- Test 3.1
|
||||
```
|
||||
|
||||
The script:
|
||||
脚本:
|
||||
|
||||
*使用 <kbd>CTRL+Shift+V</kbd> 将代码粘贴到 Obsidian 中!*
|
||||
```javascript
|
||||
|
||||
@@ -2,7 +2,7 @@
|
||||
|
||||
> 此说明当前更新至 `5569cff`。
|
||||
|
||||
[English](../../README.md)
|
||||
【[English](../../README.md) | 简体中文】
|
||||
|
||||
👉👉👉 快来查看并为新的 [Obsidian-Excalidraw 社区维基](https://excalidraw-obsidian.online/Hobbies/Excalidraw+Blog/WIKI/Welcome+to+the+WIKI)贡献你的力量吧
|
||||
|
||||
@@ -107,7 +107,7 @@ Obsidian-Excalidraw 插件将 [Excalidraw](https://excalidraw.com/) 这一功能
|
||||
|
||||
#### 模板
|
||||
|
||||
- 新绘图的模板。该模板将恢复笔画属性。这意味着您可以在模板中设置笔画颜色、笔画宽度、不透明度、字体系列、字体大小、填充样式、笔画样式等的默认值。这同样适用于 ExcalidrawAutomate。
|
||||
- 新绘图的模板。该模板将恢复笔画属性。这意味着您可以在模板中设置笔画颜色、笔画宽度、不透明度、字体系列、字体大小、填充样式、笔画样式等的默认值。这同样适用于 ExcalidrawAutomate。对于 1.6.13 或更高版本,在编辑模板中的 JSON 之前,请确保在设置中启用"在 Markdown 视图中解压缩 Excalidraw JSON"。完成更改后可以禁用此选项。
|
||||
- 通过模板,您可以自定义 Excalidraw 使用的调色板。
|
||||
- 切换到 Markdown 视图。
|
||||
- 滚动到文件底部,找到 `"AppState": {`。
|
||||
@@ -218,6 +218,7 @@ Obsidian-Excalidraw 插件将 [Excalidraw](https://excalidraw.com/) 这一功能
|
||||
- `excalidraw-export-dark`: true == 深色模式 / false == 浅色模式。
|
||||
- `excalidraw-export-padding`:指定图像的导出边距。
|
||||
- `excalidraw-export-pngscale`:这仅影响导出为 PNG。指定图像的导出比例。典型范围在 0.5 到 5 之间,但您也可以尝试其他值。
|
||||
- 从 1.6.13 版本开始,如果您想修改任何 JSON 内容,请在设置中启用"在 Markdown 视图中解压缩 Excalidraw JSON"。
|
||||
|
||||
### 将完整的 Markdown 文件嵌入到您的绘图中
|
||||
|
||||
|
||||
1119
docs/zh-cn/docs/API/ExcalidrawAutomate.d.ts
vendored
Normal file
1119
docs/zh-cn/docs/API/ExcalidrawAutomate.d.ts
vendored
Normal file
File diff suppressed because it is too large
Load Diff
782
docs/zh-cn/docs/API/attributes_functions_overview.md
Normal file
782
docs/zh-cn/docs/API/attributes_functions_overview.md
Normal file
@@ -0,0 +1,782 @@
|
||||
# [◀ Excalidraw 自动化使用指南](../readme.md)
|
||||
|
||||
## 属性和函数概览
|
||||
|
||||
以下是 ExcalidrawAutomate 实现的接口:
|
||||
|
||||
你可以在这里找到源文件: [ExcalidrawAutomate.d.ts](ExcalidrawAutomate.d.ts)。
|
||||
|
||||
```javascript
|
||||
/// <reference types="react" />
|
||||
import ExcalidrawPlugin from "src/main";
|
||||
import { FillStyle, StrokeStyle, ExcalidrawElement, ExcalidrawBindableElement, FileId, NonDeletedExcalidrawElement, ExcalidrawImageElement, StrokeRoundness, RoundnessType } from "@zsviczian/excalidraw/types/element/types";
|
||||
import { Editor, OpenViewState, TFile, WorkspaceLeaf } from "obsidian";
|
||||
import * as obsidian_module from "obsidian";
|
||||
import ExcalidrawView, { ExportSettings } from "src/ExcalidrawView";
|
||||
import { AppState, BinaryFileData, DataURL, ExcalidrawImperativeAPI, Point } from "@zsviczian/excalidraw/types/types";
|
||||
import { EmbeddedFilesLoader } from "src/EmbeddedFileLoader";
|
||||
import { ConnectionPoint, DeviceType } from "src/types";
|
||||
import { ColorMaster } from "colormaster";
|
||||
import { TInput } from "colormaster/types";
|
||||
import { ClipboardData } from "@zsviczian/excalidraw/types/clipboard";
|
||||
import { PaneTarget } from "src/utils/modifierkeyHelper";
|
||||
export declare class ExcalidrawAutomate {
|
||||
/**
|
||||
* Utility function that returns the Obsidian Module object.
|
||||
*/
|
||||
get obsidian(): typeof obsidian_module;
|
||||
get DEVICE(): DeviceType;
|
||||
getAttachmentFilepath(filename: string): Promise<string>;
|
||||
/**
|
||||
* Prompts the user with a dialog to select new file action.
|
||||
* - create markdown file
|
||||
* - create excalidraw file
|
||||
* - cancel action
|
||||
* The new file will be relative to this.targetView.file.path, unless parentFile is provided.
|
||||
* If shouldOpenNewFile is true, the new file will be opened in a workspace leaf.
|
||||
* targetPane control which leaf will be used for the new file.
|
||||
* Returns the TFile for the new file or null if the user cancelled the action.
|
||||
* @param newFileNameOrPath
|
||||
* @param shouldOpenNewFile
|
||||
* @param targetPane //type PaneTarget = "active-pane"|"new-pane"|"popout-window"|"new-tab"|"md-properties";
|
||||
* @param parentFile
|
||||
* @returns
|
||||
*/
|
||||
newFilePrompt(newFileNameOrPath: string, shouldOpenNewFile: boolean, targetPane?: PaneTarget, parentFile?: TFile): Promise<TFile | null>;
|
||||
/**
|
||||
* Generates a new Obsidian Leaf following Excalidraw plugin settings such as open in Main Workspace or not, open in adjacent pane if available, etc.
|
||||
* @param origo // the currently active leaf, the origin of the new leaf
|
||||
* @param targetPane //type PaneTarget = "active-pane"|"new-pane"|"popout-window"|"new-tab"|"md-properties";
|
||||
* @returns
|
||||
*/
|
||||
getLeaf(origo: WorkspaceLeaf, targetPane?: PaneTarget): WorkspaceLeaf;
|
||||
/**
|
||||
* Returns the editor or leaf.view of the currently active embedded obsidian file.
|
||||
* If view is not provided, ea.targetView is used.
|
||||
* If the embedded file is a markdown document the function will return
|
||||
* {file:TFile, editor:Editor} otherwise it will return {view:any}. You can check view type with view.getViewType();
|
||||
* @param view
|
||||
* @returns
|
||||
*/
|
||||
getActiveEmbeddableViewOrEditor(view?: ExcalidrawView): {
|
||||
view: any;
|
||||
} | {
|
||||
file: TFile;
|
||||
editor: Editor;
|
||||
} | null;
|
||||
plugin: ExcalidrawPlugin;
|
||||
elementsDict: {
|
||||
[key: string]: any;
|
||||
};
|
||||
imagesDict: {
|
||||
[key: FileId]: any;
|
||||
};
|
||||
mostRecentMarkdownSVG: SVGSVGElement;
|
||||
style: {
|
||||
strokeColor: string;
|
||||
backgroundColor: string;
|
||||
angle: number;
|
||||
fillStyle: FillStyle;
|
||||
strokeWidth: number;
|
||||
strokeStyle: StrokeStyle;
|
||||
roughness: number;
|
||||
opacity: number;
|
||||
strokeSharpness?: StrokeRoundness;
|
||||
roundness: null | {
|
||||
type: RoundnessType;
|
||||
value?: number;
|
||||
};
|
||||
fontFamily: number;
|
||||
fontSize: number;
|
||||
textAlign: string;
|
||||
verticalAlign: string;
|
||||
startArrowHead: string;
|
||||
endArrowHead: string;
|
||||
};
|
||||
canvas: {
|
||||
theme: string;
|
||||
viewBackgroundColor: string;
|
||||
gridSize: number;
|
||||
};
|
||||
colorPalette: {};
|
||||
constructor(plugin: ExcalidrawPlugin, view?: ExcalidrawView);
|
||||
/**
|
||||
*
|
||||
* @returns the last recorded pointer position on the Excalidraw canvas
|
||||
*/
|
||||
getViewLastPointerPosition(): {
|
||||
x: number;
|
||||
y: number;
|
||||
};
|
||||
/**
|
||||
*
|
||||
* @returns
|
||||
*/
|
||||
getAPI(view?: ExcalidrawView): ExcalidrawAutomate;
|
||||
/**
|
||||
* @param val //0:"hachure", 1:"cross-hatch" 2:"solid"
|
||||
* @returns
|
||||
*/
|
||||
setFillStyle(val: number): "hachure" | "cross-hatch" | "solid";
|
||||
/**
|
||||
* @param val //0:"solid", 1:"dashed", 2:"dotted"
|
||||
* @returns
|
||||
*/
|
||||
setStrokeStyle(val: number): "solid" | "dashed" | "dotted";
|
||||
/**
|
||||
* @param val //0:"round", 1:"sharp"
|
||||
* @returns
|
||||
*/
|
||||
setStrokeSharpness(val: number): "round" | "sharp";
|
||||
/**
|
||||
* @param val //1: Virgil, 2:Helvetica, 3:Cascadia
|
||||
* @returns
|
||||
*/
|
||||
setFontFamily(val: number): "Virgil, Segoe UI Emoji" | "Helvetica, Segoe UI Emoji" | "Cascadia, Segoe UI Emoji" | "LocalFont";
|
||||
/**
|
||||
* @param val //0:"light", 1:"dark"
|
||||
* @returns
|
||||
*/
|
||||
setTheme(val: number): "light" | "dark";
|
||||
/**
|
||||
* @param objectIds
|
||||
* @returns
|
||||
*/
|
||||
addToGroup(objectIds: string[]): string;
|
||||
/**
|
||||
* @param templatePath
|
||||
*/
|
||||
toClipboard(templatePath?: string): Promise<void>;
|
||||
/**
|
||||
* @param file: TFile
|
||||
* @returns ExcalidrawScene
|
||||
*/
|
||||
getSceneFromFile(file: TFile): Promise<{
|
||||
elements: ExcalidrawElement[];
|
||||
appState: AppState;
|
||||
}>;
|
||||
/**
|
||||
* get all elements from ExcalidrawAutomate elementsDict
|
||||
* @returns elements from elementsDict
|
||||
*/
|
||||
getElements(): ExcalidrawElement[];
|
||||
/**
|
||||
* get single element from ExcalidrawAutomate elementsDict
|
||||
* @param id
|
||||
* @returns
|
||||
*/
|
||||
getElement(id: string): ExcalidrawElement;
|
||||
/**
|
||||
* create a drawing and save it to filename
|
||||
* @param params
|
||||
* filename: if null, default filename as defined in Excalidraw settings
|
||||
* foldername: if null, default folder as defined in Excalidraw settings
|
||||
* @returns
|
||||
*/
|
||||
create(params?: {
|
||||
filename?: string;
|
||||
foldername?: string;
|
||||
templatePath?: string;
|
||||
onNewPane?: boolean;
|
||||
frontmatterKeys?: {
|
||||
"excalidraw-plugin"?: "raw" | "parsed";
|
||||
"excalidraw-link-prefix"?: string;
|
||||
"excalidraw-link-brackets"?: boolean;
|
||||
"excalidraw-url-prefix"?: string;
|
||||
"excalidraw-export-transparent"?: boolean;
|
||||
"excalidraw-export-dark"?: boolean;
|
||||
"excalidraw-export-padding"?: number;
|
||||
"excalidraw-export-pngscale"?: number;
|
||||
"excalidraw-default-mode"?: "view" | "zen";
|
||||
"excalidraw-onload-script"?: string;
|
||||
"excalidraw-linkbutton-opacity"?: number;
|
||||
"excalidraw-autoexport"?: boolean;
|
||||
};
|
||||
plaintext?: string;
|
||||
}): Promise<string>;
|
||||
/**
|
||||
*
|
||||
* @param templatePath
|
||||
* @param embedFont
|
||||
* @param exportSettings use ExcalidrawAutomate.getExportSettings(boolean,boolean)
|
||||
* @param loader use ExcalidrawAutomate.getEmbeddedFilesLoader(boolean?)
|
||||
* @param theme
|
||||
* @returns
|
||||
*/
|
||||
createSVG(templatePath?: string, embedFont?: boolean, exportSettings?: ExportSettings, loader?: EmbeddedFilesLoader, theme?: string, padding?: number): Promise<SVGSVGElement>;
|
||||
/**
|
||||
*
|
||||
* @param templatePath
|
||||
* @param scale
|
||||
* @param exportSettings use ExcalidrawAutomate.getExportSettings(boolean,boolean)
|
||||
* @param loader use ExcalidrawAutomate.getEmbeddedFilesLoader(boolean?)
|
||||
* @param theme
|
||||
* @returns
|
||||
*/
|
||||
createPNG(templatePath?: string, scale?: number, exportSettings?: ExportSettings, loader?: EmbeddedFilesLoader, theme?: string, padding?: number): Promise<any>;
|
||||
/**
|
||||
*
|
||||
* @param text
|
||||
* @param lineLen
|
||||
* @returns
|
||||
*/
|
||||
wrapText(text: string, lineLen: number): string;
|
||||
private boxedElement;
|
||||
addIFrame(topX: number, topY: number, width: number, height: number, url?: string, file?: TFile): string;
|
||||
/**
|
||||
*
|
||||
* @param topX
|
||||
* @param topY
|
||||
* @param width
|
||||
* @param height
|
||||
* @returns
|
||||
*/
|
||||
addEmbeddable(topX: number, topY: number, width: number, height: number, url?: string, file?: TFile): string;
|
||||
/**
|
||||
*
|
||||
* @param topX
|
||||
* @param topY
|
||||
* @param width
|
||||
* @param height
|
||||
* @returns
|
||||
*/
|
||||
addRect(topX: number, topY: number, width: number, height: number): string;
|
||||
/**
|
||||
*
|
||||
* @param topX
|
||||
* @param topY
|
||||
* @param width
|
||||
* @param height
|
||||
* @returns
|
||||
*/
|
||||
addDiamond(topX: number, topY: number, width: number, height: number): string;
|
||||
/**
|
||||
*
|
||||
* @param topX
|
||||
* @param topY
|
||||
* @param width
|
||||
* @param height
|
||||
* @returns
|
||||
*/
|
||||
addEllipse(topX: number, topY: number, width: number, height: number): string;
|
||||
/**
|
||||
*
|
||||
* @param topX
|
||||
* @param topY
|
||||
* @param width
|
||||
* @param height
|
||||
* @returns
|
||||
*/
|
||||
addBlob(topX: number, topY: number, width: number, height: number): string;
|
||||
/**
|
||||
* Refresh the size of a text element to fit its contents
|
||||
* @param id - the id of the text element
|
||||
*/
|
||||
refreshTextElementSize(id: string): void;
|
||||
/**
|
||||
*
|
||||
* @param topX
|
||||
* @param topY
|
||||
* @param text
|
||||
* @param formatting
|
||||
* box: if !null, text will be boxed
|
||||
* @param id
|
||||
* @returns
|
||||
*/
|
||||
addText(topX: number, topY: number, text: string, formatting?: {
|
||||
wrapAt?: number;
|
||||
width?: number;
|
||||
height?: number;
|
||||
textAlign?: "left" | "center" | "right";
|
||||
box?: boolean | "box" | "blob" | "ellipse" | "diamond";
|
||||
boxPadding?: number;
|
||||
boxStrokeColor?: string;
|
||||
textVerticalAlign?: "top" | "middle" | "bottom";
|
||||
}, id?: string): string;
|
||||
/**
|
||||
*
|
||||
* @param points
|
||||
* @returns
|
||||
*/
|
||||
addLine(points: [[x: number, y: number]]): string;
|
||||
/**
|
||||
*
|
||||
* @param points
|
||||
* @param formatting
|
||||
* @returns
|
||||
*/
|
||||
addArrow(points: [x: number, y: number][], formatting?: {
|
||||
startArrowHead?: string;
|
||||
endArrowHead?: string;
|
||||
startObjectId?: string;
|
||||
endObjectId?: string;
|
||||
}): string;
|
||||
/**
|
||||
*
|
||||
* @param topX
|
||||
* @param topY
|
||||
* @param imageFile
|
||||
* @returns
|
||||
*/
|
||||
addImage(topX: number, topY: number, imageFile: TFile | string, scale?: boolean, //default is true which will scale the image to MAX_IMAGE_SIZE, false will insert image at 100% of its size
|
||||
anchor?: boolean): Promise<string>;
|
||||
/**
|
||||
*
|
||||
* @param topX
|
||||
* @param topY
|
||||
* @param tex
|
||||
* @returns
|
||||
*/
|
||||
addLaTex(topX: number, topY: number, tex: string): Promise<string>;
|
||||
/**
|
||||
*
|
||||
* @param objectA
|
||||
* @param connectionA type ConnectionPoint = "top" | "bottom" | "left" | "right" | null
|
||||
* @param objectB
|
||||
* @param connectionB when passed null, Excalidraw will automatically decide
|
||||
* @param formatting
|
||||
* numberOfPoints: points on the line. Default is 0 ie. line will only have a start and end point
|
||||
* startArrowHead: "triangle"|"dot"|"arrow"|"bar"|null
|
||||
* endArrowHead: "triangle"|"dot"|"arrow"|"bar"|null
|
||||
* padding:
|
||||
* @returns
|
||||
*/
|
||||
connectObjects(objectA: string, connectionA: ConnectionPoint | null, objectB: string, connectionB: ConnectionPoint | null, formatting?: {
|
||||
numberOfPoints?: number;
|
||||
startArrowHead?: "triangle" | "dot" | "arrow" | "bar" | null;
|
||||
endArrowHead?: "triangle" | "dot" | "arrow" | "bar" | null;
|
||||
padding?: number;
|
||||
}): string;
|
||||
/**
|
||||
* Adds a text label to a line or arrow. Currently only works with a straight (2 point - start & end - line)
|
||||
* @param lineId id of the line or arrow object in elementsDict
|
||||
* @param label the label text
|
||||
* @returns undefined (if unsuccessful) or the id of the new text element
|
||||
*/
|
||||
addLabelToLine(lineId: string, label: string): string;
|
||||
/**
|
||||
* clear elementsDict and imagesDict only
|
||||
*/
|
||||
clear(): void;
|
||||
/**
|
||||
* clear() + reset all style values to default
|
||||
*/
|
||||
reset(): void;
|
||||
/**
|
||||
* returns true if MD file is an Excalidraw file
|
||||
* @param f
|
||||
* @returns
|
||||
*/
|
||||
isExcalidrawFile(f: TFile): boolean;
|
||||
targetView: ExcalidrawView;
|
||||
/**
|
||||
* sets the target view for EA. All the view operations and the access to Excalidraw API will be performend on this view
|
||||
* if view is null or undefined, the function will first try setView("active"), then setView("first").
|
||||
* @param view
|
||||
* @returns targetView
|
||||
*/
|
||||
setView(view?: ExcalidrawView | "first" | "active"): ExcalidrawView;
|
||||
/**
|
||||
*
|
||||
* @returns https://github.com/excalidraw/excalidraw/tree/master/src/packages/excalidraw#ref
|
||||
*/
|
||||
getExcalidrawAPI(): any;
|
||||
/**
|
||||
* get elements in View
|
||||
* @returns
|
||||
*/
|
||||
getViewElements(): ExcalidrawElement[];
|
||||
/**
|
||||
*
|
||||
* @param elToDelete
|
||||
* @returns
|
||||
*/
|
||||
deleteViewElements(elToDelete: ExcalidrawElement[]): boolean;
|
||||
/**
|
||||
* get the selected element in the view, if more are selected, get the first
|
||||
* @returns
|
||||
*/
|
||||
getViewSelectedElement(): any;
|
||||
/**
|
||||
*
|
||||
* @returns
|
||||
*/
|
||||
getViewSelectedElements(): any[];
|
||||
/**
|
||||
*
|
||||
* @param el
|
||||
* @returns TFile file handle for the image element
|
||||
*/
|
||||
getViewFileForImageElement(el: ExcalidrawElement): TFile | null;
|
||||
/**
|
||||
* copies elements from view to elementsDict for editing
|
||||
* @param elements
|
||||
*/
|
||||
copyViewElementsToEAforEditing(elements: ExcalidrawElement[]): void;
|
||||
/**
|
||||
*
|
||||
* @param forceViewMode
|
||||
* @returns
|
||||
*/
|
||||
viewToggleFullScreen(forceViewMode?: boolean): void;
|
||||
setViewModeEnabled(enabled: boolean): void;
|
||||
/**
|
||||
* This function gives you a more hands on access to Excalidraw.
|
||||
* @param scene - The scene you want to load to Excalidraw
|
||||
* @param restore - Use this if the scene includes legacy excalidraw file elements that need to be converted to the latest excalidraw data format (not a typical usecase)
|
||||
* @returns
|
||||
*/
|
||||
viewUpdateScene(scene: {
|
||||
elements?: ExcalidrawElement[];
|
||||
appState?: AppState;
|
||||
files?: BinaryFileData;
|
||||
commitToHistory?: boolean;
|
||||
}, restore?: boolean): void;
|
||||
/**
|
||||
* connect an object to the selected element in the view
|
||||
* @param objectA ID of the element
|
||||
* @param connectionA
|
||||
* @param connectionB
|
||||
* @param formatting
|
||||
* @returns
|
||||
*/
|
||||
connectObjectWithViewSelectedElement(objectA: string, connectionA: ConnectionPoint | null, connectionB: ConnectionPoint | null, formatting?: {
|
||||
numberOfPoints?: number;
|
||||
startArrowHead?: "triangle" | "dot" | "arrow" | "bar" | null;
|
||||
endArrowHead?: "triangle" | "dot" | "arrow" | "bar" | null;
|
||||
padding?: number;
|
||||
}): boolean;
|
||||
/**
|
||||
* zoom tarteView to fit elements provided as input
|
||||
* elements === [] will zoom to fit the entire scene
|
||||
* selectElements toggles whether the elements should be in a selected state at the end of the operation
|
||||
* @param selectElements
|
||||
* @param elements
|
||||
*/
|
||||
viewZoomToElements(selectElements: boolean, elements: ExcalidrawElement[]): void;
|
||||
/**
|
||||
* Adds elements from elementsDict to the current view
|
||||
* @param repositionToCursor default is false
|
||||
* @param save default is true
|
||||
* @param newElementsOnTop controls whether elements created with ExcalidrawAutomate
|
||||
* are added at the bottom of the stack or the top of the stack of elements already in the view
|
||||
* Note that elements copied to the view with copyViewElementsToEAforEditing retain their
|
||||
* position in the stack of elements in the view even if modified using EA
|
||||
* default is false, i.e. the new elements get to the bottom of the stack
|
||||
* @param shouldRestoreElements - restore elements - auto-corrects broken, incomplete or old elements included in the update
|
||||
* @returns
|
||||
*/
|
||||
addElementsToView(repositionToCursor?: boolean, save?: boolean, newElementsOnTop?: boolean, shouldRestoreElements?: boolean): Promise<boolean>;
|
||||
/**
|
||||
* Register instance of EA to use for hooks with TargetView
|
||||
* By default ExcalidrawViews will check window.ExcalidrawAutomate for event hooks.
|
||||
* Using this event you can set a different instance of Excalidraw Automate for hooks
|
||||
* @returns true if successful
|
||||
*/
|
||||
registerThisAsViewEA(): boolean;
|
||||
/**
|
||||
* Sets the targetView EA to window.ExcalidrawAutomate
|
||||
* @returns true if successful
|
||||
*/
|
||||
deregisterThisAsViewEA(): boolean;
|
||||
/**
|
||||
* If set, this callback is triggered when the user closes an Excalidraw view.
|
||||
*/
|
||||
onViewUnloadHook: (view: ExcalidrawView) => void;
|
||||
/**
|
||||
* If set, this callback is triggered, when the user changes the view mode.
|
||||
* You can use this callback in case you want to do something additional when the user switches to view mode and back.
|
||||
*/
|
||||
onViewModeChangeHook: (isViewModeEnabled: boolean, view: ExcalidrawView, ea: ExcalidrawAutomate) => void;
|
||||
/**
|
||||
* If set, this callback is triggered, when the user hovers a link in the scene.
|
||||
* You can use this callback in case you want to do something additional when the onLinkHover event occurs.
|
||||
* This callback must return a boolean value.
|
||||
* In case you want to prevent the excalidraw onLinkHover action you must return false, it will stop the native excalidraw onLinkHover management flow.
|
||||
*/
|
||||
onLinkHoverHook: (element: NonDeletedExcalidrawElement, linkText: string, view: ExcalidrawView, ea: ExcalidrawAutomate) => boolean;
|
||||
/**
|
||||
* If set, this callback is triggered, when the user clicks a link in the scene.
|
||||
* You can use this callback in case you want to do something additional when the onLinkClick event occurs.
|
||||
* This callback must return a boolean value.
|
||||
* In case you want to prevent the excalidraw onLinkClick action you must return false, it will stop the native excalidraw onLinkClick management flow.
|
||||
*/
|
||||
onLinkClickHook: (element: ExcalidrawElement, linkText: string, event: MouseEvent, view: ExcalidrawView, ea: ExcalidrawAutomate) => boolean;
|
||||
/**
|
||||
* If set, this callback is triggered, when Excalidraw receives an onDrop event.
|
||||
* You can use this callback in case you want to do something additional when the onDrop event occurs.
|
||||
* This callback must return a boolean value.
|
||||
* In case you want to prevent the excalidraw onDrop action you must return false, it will stop the native excalidraw onDrop management flow.
|
||||
*/
|
||||
onDropHook: (data: {
|
||||
ea: ExcalidrawAutomate;
|
||||
event: React.DragEvent<HTMLDivElement>;
|
||||
draggable: any;
|
||||
type: "file" | "text" | "unknown";
|
||||
payload: {
|
||||
files: TFile[];
|
||||
text: string;
|
||||
};
|
||||
excalidrawFile: TFile;
|
||||
view: ExcalidrawView;
|
||||
pointerPosition: {
|
||||
x: number;
|
||||
y: number;
|
||||
};
|
||||
}) => boolean;
|
||||
/**
|
||||
* If set, this callback is triggered, when Excalidraw receives an onPaste event.
|
||||
* You can use this callback in case you want to do something additional when the
|
||||
* onPaste event occurs.
|
||||
* This callback must return a boolean value.
|
||||
* In case you want to prevent the excalidraw onPaste action you must return false,
|
||||
* it will stop the native excalidraw onPaste management flow.
|
||||
*/
|
||||
onPasteHook: (data: {
|
||||
ea: ExcalidrawAutomate;
|
||||
payload: ClipboardData;
|
||||
event: ClipboardEvent;
|
||||
excalidrawFile: TFile;
|
||||
view: ExcalidrawView;
|
||||
pointerPosition: {
|
||||
x: number;
|
||||
y: number;
|
||||
};
|
||||
}) => boolean;
|
||||
/**
|
||||
* if set, this callback is triggered, when an Excalidraw file is opened
|
||||
* You can use this callback in case you want to do something additional when the file is opened.
|
||||
* This will run before the file level script defined in the `excalidraw-onload-script` frontmatter.
|
||||
*/
|
||||
onFileOpenHook: (data: {
|
||||
ea: ExcalidrawAutomate;
|
||||
excalidrawFile: TFile;
|
||||
view: ExcalidrawView;
|
||||
}) => Promise<void>;
|
||||
/**
|
||||
* if set, this callback is triggered, when an Excalidraw file is created
|
||||
* see also: https://github.com/zsviczian/obsidian-excalidraw-plugin/issues/1124
|
||||
*/
|
||||
onFileCreateHook: (data: {
|
||||
ea: ExcalidrawAutomate;
|
||||
excalidrawFile: TFile;
|
||||
view: ExcalidrawView;
|
||||
}) => Promise<void>;
|
||||
/**
|
||||
* If set, this callback is triggered whenever the active canvas color changes
|
||||
*/
|
||||
onCanvasColorChangeHook: (ea: ExcalidrawAutomate, view: ExcalidrawView, //the excalidraw view
|
||||
color: string) => void;
|
||||
/**
|
||||
* utility function to generate EmbeddedFilesLoader object
|
||||
* @param isDark
|
||||
* @returns
|
||||
*/
|
||||
getEmbeddedFilesLoader(isDark?: boolean): EmbeddedFilesLoader;
|
||||
/**
|
||||
* utility function to generate ExportSettings object
|
||||
* @param withBackground
|
||||
* @param withTheme
|
||||
* @returns
|
||||
*/
|
||||
getExportSettings(withBackground: boolean, withTheme: boolean): ExportSettings;
|
||||
/**
|
||||
* get bounding box of elements
|
||||
* bounding box is the box encapsulating all of the elements completely
|
||||
* @param elements
|
||||
* @returns
|
||||
*/
|
||||
getBoundingBox(elements: ExcalidrawElement[]): {
|
||||
topX: number;
|
||||
topY: number;
|
||||
width: number;
|
||||
height: number;
|
||||
};
|
||||
/**
|
||||
* elements grouped by the highest level groups
|
||||
* @param elements
|
||||
* @returns
|
||||
*/
|
||||
getMaximumGroups(elements: ExcalidrawElement[]): ExcalidrawElement[][];
|
||||
/**
|
||||
* gets the largest element from a group. useful when a text element is grouped with a box, and you want to connect an arrow to the box
|
||||
* @param elements
|
||||
* @returns
|
||||
*/
|
||||
getLargestElement(elements: ExcalidrawElement[]): ExcalidrawElement;
|
||||
/**
|
||||
* @param element
|
||||
* @param a
|
||||
* @param b
|
||||
* @param gap
|
||||
* @returns 2 or 0 intersection points between line going through `a` and `b`
|
||||
* and the `element`, in ascending order of distance from `a`.
|
||||
*/
|
||||
intersectElementWithLine(element: ExcalidrawBindableElement, a: readonly [number, number], b: readonly [number, number], gap?: number): Point[];
|
||||
/**
|
||||
* Gets the groupId for the group that contains all the elements, or null if such a group does not exist
|
||||
* @param elements
|
||||
* @returns null or the groupId
|
||||
*/
|
||||
getCommonGroupForElements(elements: ExcalidrawElement[]): string;
|
||||
/**
|
||||
* Gets all the elements from elements[] that share one or more groupIds with element.
|
||||
* @param element
|
||||
* @param elements - typically all the non-deleted elements in the scene
|
||||
* @returns
|
||||
*/
|
||||
getElementsInTheSameGroupWithElement(element: ExcalidrawElement, elements: ExcalidrawElement[]): ExcalidrawElement[];
|
||||
/**
|
||||
* Gets all the elements from elements[] that are contained in the frame.
|
||||
* @param element
|
||||
* @param elements - typically all the non-deleted elements in the scene
|
||||
* @returns
|
||||
*/
|
||||
getElementsInFrame(frameElement: ExcalidrawElement, elements: ExcalidrawElement[]): ExcalidrawElement[];
|
||||
/**
|
||||
* See OCR plugin for example on how to use scriptSettings
|
||||
* Set by the ScriptEngine
|
||||
*/
|
||||
activeScript: string;
|
||||
/**
|
||||
*
|
||||
* @returns script settings. Saves settings in plugin settings, under the activeScript key
|
||||
*/
|
||||
getScriptSettings(): {};
|
||||
/**
|
||||
* sets script settings.
|
||||
* @param settings
|
||||
* @returns
|
||||
*/
|
||||
setScriptSettings(settings: any): Promise<void>;
|
||||
/**
|
||||
* Open a file in a new workspaceleaf or reuse an existing adjacent leaf depending on Excalidraw Plugin Settings
|
||||
* @param file
|
||||
* @param openState - if not provided {active: true} will be used
|
||||
* @returns
|
||||
*/
|
||||
openFileInNewOrAdjacentLeaf(file: TFile, openState?: OpenViewState): WorkspaceLeaf;
|
||||
/**
|
||||
* measure text size based on current style settings
|
||||
* @param text
|
||||
* @returns
|
||||
*/
|
||||
measureText(text: string): {
|
||||
width: number;
|
||||
height: number;
|
||||
};
|
||||
/**
|
||||
* Returns the size of the image element at 100% (i.e. the original size)
|
||||
* @param imageElement an image element from the active scene on targetView
|
||||
*/
|
||||
getOriginalImageSize(imageElement: ExcalidrawImageElement): Promise<{
|
||||
width: number;
|
||||
height: number;
|
||||
}>;
|
||||
/**
|
||||
* verifyMinimumPluginVersion returns true if plugin version is >= than required
|
||||
* recommended use:
|
||||
* if(!ea.verifyMinimumPluginVersion || !ea.verifyMinimumPluginVersion("1.5.20")) {new Notice("message");return;}
|
||||
* @param requiredVersion
|
||||
* @returns
|
||||
*/
|
||||
verifyMinimumPluginVersion(requiredVersion: string): boolean;
|
||||
/**
|
||||
* Check if view is instance of ExcalidrawView
|
||||
* @param view
|
||||
* @returns
|
||||
*/
|
||||
isExcalidrawView(view: any): boolean;
|
||||
/**
|
||||
* sets selection in view
|
||||
* @param elements
|
||||
* @returns
|
||||
*/
|
||||
selectElementsInView(elements: ExcalidrawElement[] | string[]): void;
|
||||
/**
|
||||
* @returns an 8 character long random id
|
||||
*/
|
||||
generateElementId(): string;
|
||||
/**
|
||||
* @param element
|
||||
* @returns a clone of the element with a new id
|
||||
*/
|
||||
cloneElement(element: ExcalidrawElement): ExcalidrawElement;
|
||||
/**
|
||||
* Moves the element to a specific position in the z-index
|
||||
*/
|
||||
moveViewElementToZIndex(elementId: number, newZIndex: number): void;
|
||||
/**
|
||||
* Deprecated. Use getCM / ColorMaster instead
|
||||
* @param color
|
||||
* @returns
|
||||
*/
|
||||
hexStringToRgb(color: string): number[];
|
||||
/**
|
||||
* Deprecated. Use getCM / ColorMaster instead
|
||||
* @param color
|
||||
* @returns
|
||||
*/
|
||||
rgbToHexString(color: number[]): string;
|
||||
/**
|
||||
* Deprecated. Use getCM / ColorMaster instead
|
||||
* @param color
|
||||
* @returns
|
||||
*/
|
||||
hslToRgb(color: number[]): number[];
|
||||
/**
|
||||
* Deprecated. Use getCM / ColorMaster instead
|
||||
* @param color
|
||||
* @returns
|
||||
*/
|
||||
rgbToHsl(color: number[]): number[];
|
||||
/**
|
||||
*
|
||||
* @param color
|
||||
* @returns
|
||||
*/
|
||||
colorNameToHex(color: string): string;
|
||||
/**
|
||||
* https://github.com/lbragile/ColorMaster
|
||||
* @param color
|
||||
* @returns
|
||||
*/
|
||||
getCM(color: TInput): ColorMaster;
|
||||
importSVG(svgString: string): boolean;
|
||||
}
|
||||
export declare function initExcalidrawAutomate(plugin: ExcalidrawPlugin): Promise<ExcalidrawAutomate>;
|
||||
export declare function destroyExcalidrawAutomate(): void;
|
||||
export declare function _measureText(newText: string, fontSize: number, fontFamily: number, lineHeight: number): {
|
||||
w: number;
|
||||
h: number;
|
||||
baseline: number;
|
||||
};
|
||||
export declare const generatePlaceholderDataURL: (width: number, height: number) => DataURL;
|
||||
export declare function createPNG(templatePath: string, scale: number, exportSettings: ExportSettings, loader: EmbeddedFilesLoader, forceTheme: string, canvasTheme: string, canvasBackgroundColor: string, automateElements: ExcalidrawElement[], plugin: ExcalidrawPlugin, depth: number, padding?: number, imagesDict?: any): Promise<Blob>;
|
||||
export declare function createSVG(templatePath: string, embedFont: boolean, exportSettings: ExportSettings, loader: EmbeddedFilesLoader, forceTheme: string, canvasTheme: string, canvasBackgroundColor: string, automateElements: ExcalidrawElement[], plugin: ExcalidrawPlugin, depth: number, padding?: number, imagesDict?: any, convertMarkdownLinksToObsidianURLs?: boolean): Promise<SVGSVGElement>;
|
||||
export declare function estimateBounds(elements: ExcalidrawElement[]): [number, number, number, number];
|
||||
export declare function repositionElementsToCursor(elements: ExcalidrawElement[], newPosition: {
|
||||
x: number;
|
||||
y: number;
|
||||
}, center: boolean, api: ExcalidrawImperativeAPI): ExcalidrawElement[];
|
||||
export declare const insertLaTeXToView: (view: ExcalidrawView) => void;
|
||||
export declare const search: (view: ExcalidrawView) => Promise<void>;
|
||||
/**
|
||||
*
|
||||
* @param elements
|
||||
* @param query
|
||||
* @param exactMatch - when searching for section header exactMatch should be set to true
|
||||
* @returns the elements matching the query
|
||||
*/
|
||||
export declare const getTextElementsMatchingQuery: (elements: ExcalidrawElement[], query: string[], exactMatch?: boolean) => ExcalidrawElement[];
|
||||
/**
|
||||
*
|
||||
* @param elements
|
||||
* @param query
|
||||
* @param exactMatch - when searching for section header exactMatch should be set to true
|
||||
* @returns the elements matching the query
|
||||
*/
|
||||
export declare const getFrameElementsMatchingQuery: (elements: ExcalidrawElement[], query: string[], exactMatch?: boolean) => ExcalidrawElement[];
|
||||
export declare const cloneElement: (el: ExcalidrawElement) => any;
|
||||
export declare const verifyMinimumPluginVersion: (requiredVersion: string) => boolean;
|
||||
```
|
||||
19
docs/zh-cn/docs/API/canvas_style.md
Normal file
19
docs/zh-cn/docs/API/canvas_style.md
Normal file
@@ -0,0 +1,19 @@
|
||||
# [◀ Excalidraw 自动化指南](../readme.md)
|
||||
|
||||
## 画布样式设置
|
||||
设置画布的属性。
|
||||
|
||||
### theme, setTheme()
|
||||
字符串。有效值为 "light"(明亮)和 "dark"(黑暗)。
|
||||
|
||||
`setTheme()` 接受一个数字参数:
|
||||
- 0:"light"(明亮)
|
||||
- 其他任何数字:"dark"(黑暗)
|
||||
|
||||
### viewBackgroundColor
|
||||
字符串。这是对象的填充颜色。[CSS 合法颜色值](https://www.w3schools.com/cssref/css_colors_legal.asp)
|
||||
|
||||
允许的值包括 [HTML 颜色名称](https://www.w3schools.com/colors/colors_names.asp)、十六进制 RGB 字符串(例如红色使用 `#FF0000`)或 `transparent`(透明)。
|
||||
|
||||
### gridSize
|
||||
数字。网格的大小。如果设置为零,则不显示网格。
|
||||
110
docs/zh-cn/docs/API/element_style.md
Normal file
110
docs/zh-cn/docs/API/element_style.md
Normal file
@@ -0,0 +1,110 @@
|
||||
# [◀ Excalidraw 自动化指南](../readme.md)
|
||||
|
||||
## 元素样式设置
|
||||
|
||||
你会注意到,一些样式有setter函数。这是为了帮助你设置属性的允许值。但是你不必使用setter函数,也可以直接设置值。
|
||||
|
||||
### strokeColor
|
||||
|
||||
字符串类型。线条的颜色。[CSS合法颜色值](https://www.w3schools.com/cssref/css_colors_legal.asp)
|
||||
|
||||
允许的值包括[HTML颜色名称](https://www.w3schools.com/colors/colors_names.asp)、十六进制RGB字符串,例如红色为`#FF0000`。
|
||||
|
||||
### backgroundColor
|
||||
|
||||
字符串类型。这是对象的填充颜色。[CSS合法颜色值](https://www.w3schools.com/cssref/css_colors_legal.asp)
|
||||
|
||||
允许的值包括[HTML颜色名称](https://www.w3schools.com/colors/colors_names.asp)、十六进制RGB字符串,例如红色为`#FF0000`,或者`transparent`(透明)。
|
||||
|
||||
### angle
|
||||
|
||||
数字类型。以弧度为单位的旋转角度。90度等于`Math.PI/2`。
|
||||
|
||||
### fillStyle, setFillStyle()
|
||||
|
||||
```typescript
|
||||
type FillStyle = "hachure" | "cross-hatch" | "solid";
|
||||
setFillStyle (val:number);
|
||||
```
|
||||
|
||||
fillStyle 是一个字符串。
|
||||
|
||||
`setFillStyle()` 接受一个数字参数:
|
||||
- 0: "hachure"(斜线填充)
|
||||
- 1: "cross-hatch"(交叉填充)
|
||||
- 其他任意数字: "solid"(实心填充)
|
||||
|
||||
### strokeWidth
|
||||
|
||||
数字类型。设置线条的宽度。
|
||||
|
||||
### strokeStyle, setStrokeStyle()
|
||||
|
||||
```typescript
|
||||
type StrokeStyle = "solid" | "dashed" | "dotted";
|
||||
setStrokeStyle (val:number);
|
||||
```
|
||||
|
||||
strokeStyle 是一个字符串。
|
||||
|
||||
`setStrokeStyle()` 接受一个数字参数:
|
||||
- 0: "solid"(实线)
|
||||
- 1: "dashed"(虚线)
|
||||
- 其他任意数字: "dotted"(点线)
|
||||
|
||||
### roughness
|
||||
|
||||
数字类型。在 Excalidraw 中称为随意度。接受三个值:
|
||||
- 0:建筑师风格
|
||||
- 1:艺术家风格
|
||||
- 2:卡通家风格
|
||||
|
||||
### opacity
|
||||
|
||||
数字类型,取值范围在 0~100 之间。用于设置对象的不透明度,同时影响线条和填充的透明度。
|
||||
|
||||
### strokeSharpness, setStrokeSharpness()
|
||||
|
||||
```typescript
|
||||
type StrokeSharpness = "round" | "sharp";
|
||||
setStrokeSharpness(val:number);
|
||||
```
|
||||
|
||||
strokeSharpness 是一个字符串。
|
||||
|
||||
"round"(圆滑)线条是弯曲的,"sharp"(尖锐)线条在转折点处会形成尖角。
|
||||
|
||||
`setStrokeSharpness()` 接受一个数字参数:
|
||||
- 0:"round"(圆滑)
|
||||
- 其他任意数字:"sharp"(尖锐)
|
||||
|
||||
### fontFamily, setFontFamily()
|
||||
|
||||
数字类型。有效值为 1、2 和 3。
|
||||
|
||||
`setFontFamily()` 也接受一个数字参数并返回字体名称:
|
||||
- 1: "Virgil, Segoe UI Emoji"
|
||||
- 2: "Helvetica, Segoe UI Emoji"
|
||||
- 3: "Cascadia, Segoe UI Emoji"
|
||||
|
||||
### fontSize
|
||||
|
||||
数字类型。默认值为 20px。
|
||||
|
||||
### textAlign
|
||||
|
||||
字符串类型。文本的水平对齐方式。有效值为 "left"(左对齐)、"center"(居中对齐)、"right"(右对齐)。
|
||||
|
||||
这在使用 `addText()` 函数设置固定宽度时很有用。
|
||||
|
||||
### verticalAlign
|
||||
|
||||
字符串类型。文本的垂直对齐方式。有效值为 "top"(顶部对齐)和 "middle"(居中对齐)。
|
||||
|
||||
这在使用 `addText()` 函数设置固定高度时很有用。
|
||||
|
||||
### startArrowHead, endArrowHead
|
||||
|
||||
字符串类型。有效值为 "arrow"(箭头)、"bar"(线段)、"dot"(圆点)和 "none"(无)。用于指定箭头的起始和结束样式。
|
||||
|
||||
这在使用 `addArrow()` 和 `connectObjects()` 函数时很有用。
|
||||
113
docs/zh-cn/docs/API/introduction.md
Normal file
113
docs/zh-cn/docs/API/introduction.md
Normal file
@@ -0,0 +1,113 @@
|
||||
# [◀ Excalidraw Automate 使用指南](../readme.md)
|
||||
|
||||
## API 介绍
|
||||
|
||||
你可以通过 ExcalidrawAutomate 对象来访问 Excalidraw Automate。我建议在 Templater、DataView 和 QuickAdd 脚本中使用以下代码开始:
|
||||
|
||||
*使用 <kbd>CTRL+Shift+V</kbd> 将代码粘贴到 Obsidian 中!*
|
||||
|
||||
```javascript
|
||||
const ea = ExcalidrawAutomate;
|
||||
ea.reset();
|
||||
```
|
||||
|
||||
第一行创建了一个常量,这样你就可以避免重复写 ExcalidrawAutomate 上百次。
|
||||
|
||||
第二行将 ExcalidrawAutomate 重置为默认值。这一步很重要,因为你不会知道之前执行了哪个模板,因此也不知道 Excalidraw 处于什么状态。
|
||||
|
||||
**⚠ 注意:** 如果你正在使用 Excalidraw 插件内置的[脚本引擎](../ExcalidrawScriptsEngine.md),引擎会自动处理 `ea` 对象的初始化。
|
||||
|
||||
### Excalidraw Automate 的基本使用逻辑
|
||||
|
||||
1. 设置要绘制元素的样式
|
||||
2. 添加元素。当你添加元素时,每个新元素都会被添加到前一个元素的上层,因此在元素重叠的情况下,后添加的元素会显示在先添加元素的上方。
|
||||
3. 调用 `await ea.create();` 来实例化绘图,或使用 `ea.setView();` 后跟 `ea.addElementsToView();` 将元素添加到现有视图中,或使用 `await ea.createSVG();` 或 `await ea.createPNG();` 从你的元素创建 PNG 或 SVG 图像。
|
||||
|
||||
你可以在添加不同元素之间改变样式。我将元素样式和创建分开的逻辑基于这样一个假设:你可能会设置一个描边颜色、描边样式、描边粗糙度等,并使用这些设置来绘制大多数元素。每次添加元素时都重新设置所有这些参数是没有意义的。
|
||||
|
||||
### 在深入了解之前,这里有三个简单的 [Templater](https://github.com/SilentVoid13/Templater) 脚本示例
|
||||
|
||||
#### 使用模板在自定义文件夹中创建具有自定义名称的新绘图
|
||||
|
||||
这个简单的脚本相比 Excalidraw 插件设置提供了更大的灵活性,让你可以为绘图命名、将其放入文件夹中并应用模板。
|
||||
|
||||
*使用 <kbd>CTRL+Shift+V</kbd> 将代码粘贴到 Obsidian 中!*
|
||||
|
||||
```javascript
|
||||
<%*
|
||||
const ea = ExcalidrawAutomate;
|
||||
ea.reset();
|
||||
await ea.create({
|
||||
filename : tp.date.now("HH.mm"),
|
||||
foldername : tp.date.now("YYYY-MM-DD"),
|
||||
templatePath: "Excalidraw/Template1.excalidraw",
|
||||
onNewPane : false
|
||||
});
|
||||
%>
|
||||
```
|
||||
|
||||
#### 创建一个简单的绘图
|
||||
|
||||
*使用 <kbd>CTRL+Shift+V</kbd> 将代码粘贴到 Obsidian 中!*
|
||||
|
||||
```javascript
|
||||
<%*
|
||||
const ea = ExcalidrawAutomate;
|
||||
ea.reset();
|
||||
ea.addRect(-150,-50,450,300);
|
||||
ea.addText(-100,70,"Left to right");
|
||||
ea.addArrow([[-100,100],[100,100]]);
|
||||
|
||||
ea.style.strokeColor = "red";
|
||||
ea.addText(100,-30,"top to bottom",{width:200,textAligh:"center"});
|
||||
ea.addArrow([[200,0],[200,200]]);
|
||||
await ea.create();
|
||||
%>
|
||||
```
|
||||
|
||||
该脚本将生成以下绘图:
|
||||
|
||||

|
||||
|
||||
#### 在打开的 Excalidraw 视图中添加一个带框的文本元素
|
||||
|
||||
将新元素放置在当前选中元素的下方,并用箭头从选中的元素指向新添加的文本。
|
||||
|
||||
*使用 <kbd>CTRL+Shift+V</kbd> 将代码粘贴到 Obsidian 中!*
|
||||
|
||||
```javascript
|
||||
<%*
|
||||
const ea = ExcalidrawAutomate;
|
||||
ea.reset();
|
||||
ea.setView("first");
|
||||
selectedElement = ea.getViewSelectedElement();
|
||||
ea.setStrokeSharpness(0);
|
||||
const boxPadding = 5;
|
||||
id = ea.addText(
|
||||
selectedElement.x + boxPadding,
|
||||
selectedElement.y+selectedElement.height+100,
|
||||
"[[Next process step]]",
|
||||
{
|
||||
textAlign:"center",
|
||||
box:true,
|
||||
boxPadding:boxPadding,
|
||||
width:selectedElement.width-boxPadding*2,
|
||||
}
|
||||
);
|
||||
ea.setStrokeSharpness(1);
|
||||
ea.style.roughness= 0;
|
||||
ea.connectObjectWithViewSelectedElement(
|
||||
id,
|
||||
"top",
|
||||
"bottom",
|
||||
{
|
||||
numberOfPoints:2,
|
||||
startArrowHead:"arrow",
|
||||
endArrowHead:"dot",
|
||||
padding:5
|
||||
});
|
||||
ea.addElementsToView();
|
||||
%>
|
||||
```
|
||||
|
||||
[点击此处查看动画演示](https://user-images.githubusercontent.com/14358394/131967188-2a488e38-f742-49d9-ae98-33238a8d4712.mp4)
|
||||
94
docs/zh-cn/docs/API/objects.md
Normal file
94
docs/zh-cn/docs/API/objects.md
Normal file
@@ -0,0 +1,94 @@
|
||||
# [◀ Excalidraw 自动化使用指南](../readme.md)
|
||||
|
||||
## 添加对象
|
||||
|
||||
这些函数将向你的绘图中添加对象。画布是无限的,可以接受负数和正数的 X 和 Y 值。X 值从左到右递增,Y 值从上到下递增。
|
||||
|
||||

|
||||
|
||||
### addRect(), addDiamond(), addEllipse()
|
||||
|
||||
```typescript
|
||||
addRect(topX:number, topY:number, width:number, height:number):string
|
||||
addDiamond(topX:number, topY:number, width:number, height:number):string
|
||||
addEllipse(topX:number, topY:number, width:number, height:number):string
|
||||
```
|
||||
|
||||
返回对象的 `id`。当使用线条连接对象时需要用到这个 `id`,详见后文。
|
||||
|
||||
### addText()
|
||||
|
||||
```typescript
|
||||
addText(
|
||||
topX:number,
|
||||
topY:number,
|
||||
text:string,
|
||||
formatting?:{
|
||||
wrapAt?:number,
|
||||
width?:number,
|
||||
height?:number,
|
||||
textAlign?:string,
|
||||
box?: "box"|"blob"|"ellipse"|"diamond",
|
||||
boxPadding?:number
|
||||
},
|
||||
id?:string
|
||||
):string
|
||||
```
|
||||
|
||||
向绘图中添加文本。
|
||||
|
||||
格式化参数是可选的:
|
||||
- 如果未指定 `width` 和 `height`,函数将根据字体系列(fontFamily)、字体大小(fontSize)和提供的文本来计算宽度和高度。
|
||||
- 如果你想要将文本相对于绘图中的其他元素居中对齐,你可以提供固定的高度和宽度,并且可以像上面描述的那样指定 `textAlign` 和 `verticalAlign`。例如:`{width:500, textAlign:"center"}`
|
||||
- 如果你想在文本周围添加一个框,设置 `{box:"box"|"blob"|"ellipse"|"diamond"}`(分别对应矩形框、气泡框、椭圆框、菱形框)
|
||||
|
||||
返回对象的 `id`。当使用线条连接对象时需要用到这个 `id`,详见后文。如果设置了 `{box:}`,则返回包围框对象的 id。
|
||||
|
||||
### addLine()
|
||||
|
||||
```typescript
|
||||
addLine(points: [[x:number,y:number]]):string
|
||||
```
|
||||
|
||||
根据提供的点添加一条线。必须包含至少两个点 `points.length >= 2`。如果提供了超过 2 个点,中间点将被添加为断点。当 `strokeSharpness` 设置为 "sharp" 时,线条会以角度方式折断;设置为 "round" 时,线条会呈现曲线。
|
||||
|
||||
返回对象的 `id`。
|
||||
|
||||
### addArrow()
|
||||
|
||||
```typescript
|
||||
addArrow(points: [[x:number,y:number]],formatting?:{startArrowHead?:string,endArrowHead?:string,startObjectId?:string,endObjectId?:string}):string ;
|
||||
```
|
||||
|
||||
根据提供的点添加一个箭头。必须包含至少两个点 `points.length >= 2`。如果提供了超过 2 个点,中间点将被添加为断点。当元素的 `style.strokeSharpness` 设置为 "sharp" 时,线条会以角度方式折断;设置为 "round" 时,线条会呈现曲线。
|
||||
|
||||
`startArrowHead` 和 `endArrowHead` 指定要使用的箭头类型,如上所述。有效值包括 "none"(无)、"arrow"(箭头)、"dot"(圆点)和 "bar"(线条)。例如:`{startArrowHead: "dot", endArrowHead: "arrow"}`
|
||||
|
||||
`startObjectId` 和 `endObjectId` 是连接对象的 ID。如果是为了连接对象,建议使用 `connectObjects` 而不是调用 addArrow()。
|
||||
|
||||
返回对象的 `id`。
|
||||
|
||||
### connectObjects()
|
||||
|
||||
```typescript
|
||||
declare type ConnectionPoint = "top"|"bottom"|"left"|"right";
|
||||
connectObjects(objectA: string, connectionA: ConnectionPoint, objectB: string, connectionB: ConnectionPoint, formatting?:{numberOfPoints: number,startArrowHead:string,endArrowHead:string, padding: number}):void
|
||||
```
|
||||
|
||||
使用箭头连接两个对象。如果两个元素中的任何一个是 `line`(线条)、`arrow`(箭头)或 `freedraw`(自由绘制)类型,则不会执行任何操作。
|
||||
|
||||
`objectA` 和 `objectB` 是字符串类型,表示要连接的对象的 ID。这些 ID 是在创建对象时由 addRect()、addDiamond()、addEllipse() 和 addText() 函数返回的。
|
||||
|
||||
`connectionA` 和 `connectionB` 指定在对象上的连接位置。有效值包括:"top"(顶部)、"bottom"(底部)、"left"(左侧)和 "right"(右侧)。
|
||||
|
||||
`numberOfPoints` 设置线条的中间断点数量。默认值为零,表示箭头的起点和终点之间没有断点。当在绘图上移动对象时,这些断点会影响 Excalidraw 重新路由线条的方式。
|
||||
|
||||
`startArrowHead` 和 `endArrowHead` 的工作方式如上文 `addArrow()` 中所述。
|
||||
|
||||
### addToGroup()
|
||||
|
||||
```typescript
|
||||
addToGroup(objectIds:[]):string
|
||||
```
|
||||
|
||||
将 `objectIds` 中列出的对象组合成一个组。返回该组的 `id`。
|
||||
219
docs/zh-cn/docs/API/utility.md
Normal file
219
docs/zh-cn/docs/API/utility.md
Normal file
@@ -0,0 +1,219 @@
|
||||
# [◀ Excalidraw Automate How To](../readme.md)
|
||||
|
||||
## 实用工具函数
|
||||
|
||||
### isExcalidrawFile()
|
||||
```typescript
|
||||
isExcalidrawFile(f:TFile): boolean
|
||||
```
|
||||
如果提供的文件是有效的 Excalidraw 文件(可以是传统的 `*.excalidraw` 文件或在 front-matter 中包含 excalidraw 键的 markdown 文件),则返回 true。
|
||||
|
||||
### clear()
|
||||
`clear()` 将清除缓存中的对象,但会保留元素样式设置。
|
||||
|
||||
### reset()
|
||||
`reset()` 会先调用 `clear()`,然后将元素样式重置为默认值。
|
||||
|
||||
### toClipboard()
|
||||
```typescript
|
||||
async toClipboard(templatePath?:string)
|
||||
```
|
||||
将生成的绘图放置到剪贴板中。当你不想创建新的绘图,而是想将额外的元素粘贴到现有绘图上时,这个功能很有用。
|
||||
|
||||
### getElements()
|
||||
```typescript
|
||||
getElements():ExcalidrawElement[];
|
||||
```
|
||||
以数组形式返回 ExcalidrawAutomate 中的 ExcalidrawElement 元素。这种格式在使用 ExcalidrawRef 时特别有用。
|
||||
|
||||
### getElement()
|
||||
```typescript
|
||||
getElement(id:string):ExcalidrawElement;
|
||||
```
|
||||
返回与指定 id 匹配的元素对象。如果元素不存在,则返回 null。
|
||||
|
||||
### create()
|
||||
```typescript
|
||||
async create(params?:{filename: string, foldername:string, templatePath:string, onNewPane: boolean})
|
||||
```
|
||||
创建并打开绘图。返回创建文件的完整路径。
|
||||
|
||||
`filename` 是要创建的绘图文件名(不包含扩展名)。如果为 `null`,Excalidraw 将自动生成文件名。
|
||||
|
||||
`foldername` 是文件创建的目标文件夹。如果为 `null`,则会根据 Excalidraw 设置使用默认的新建绘图文件夹。
|
||||
|
||||
`templatePath` 是模板文件的完整路径(包含文件名和扩展名)。该模板文件将作为基础图层,所有通过 ExcalidrawAutomate 添加的对象都会显示在模板元素的上层。如果为 `null`,则不使用模板,即使用空白画布作为添加对象的基础。
|
||||
|
||||
`onNewPane` 定义新绘图的创建位置。`false` 将在当前活动页签中打开绘图。`true` 将通过垂直分割当前页签来打开绘图。
|
||||
|
||||
`frontmatterKeys` 是要应用到文档的 frontmatter 键值集合
|
||||
{
|
||||
excalidraw-plugin?: "raw"|"parsed",
|
||||
excalidraw-link-prefix?: string,
|
||||
excalidraw-link-brackets?: boolean,
|
||||
excalidraw-url-prefix?: string
|
||||
}
|
||||
|
||||
示例:
|
||||
```javascript
|
||||
create (
|
||||
{
|
||||
filename:"my drawing",
|
||||
foldername:"myfolder/subfolder/",
|
||||
templatePath: "Excalidraw/template.excalidraw",
|
||||
onNewPane: true,
|
||||
frontmatterKeys: {
|
||||
"excalidraw-plugin": "parsed",
|
||||
"excalidraw-link-prefix": "",
|
||||
"excalidraw-link-brackets": true,
|
||||
"excalidraw-url-prefix": "🌐",
|
||||
}
|
||||
}
|
||||
);
|
||||
```
|
||||
|
||||
### createSVG()
|
||||
```typescript
|
||||
async createSVG(templatePath?:string)
|
||||
```
|
||||
返回包含生成绘图的 HTML SVGSVGElement 元素。
|
||||
|
||||
### createPNG()
|
||||
```typescript
|
||||
async createPNG(templatePath?:string, scale:number=1)
|
||||
```
|
||||
返回包含生成绘图的 PNG 图像 blob 对象。
|
||||
|
||||
### wrapText()
|
||||
```typescript
|
||||
wrapText(text:string, lineLen:number):string
|
||||
```
|
||||
返回一个按照指定最大行长度换行的字符串。
|
||||
|
||||
### 访问打开的 Excalidraw 视图
|
||||
在使用任何视图操作函数之前,你需要先初始化 targetView。
|
||||
|
||||
#### targetView
|
||||
```typescript
|
||||
targetView: ExcalidrawView
|
||||
```
|
||||
已打开的 Excalidraw 视图,被配置为视图操作的目标。使用 `setView` 进行初始化。
|
||||
|
||||
#### setView()
|
||||
```typescript
|
||||
setView(view:ExcalidrawView|"first"|"active"):ExcalidrawView
|
||||
```
|
||||
设置将作为视图操作目标的 ExcalidrawView。有效的 `view` 输入值包括:
|
||||
- ExcalidrawView 的对象实例
|
||||
- "first":如果打开了多个 Excalidraw 视图,则选择 `app.workspace.getLeavesOfType("Excalidraw")` 返回的第一个视图
|
||||
- "active":表示当前活动的视图
|
||||
|
||||
#### getExcalidrawAPI()
|
||||
```typescript
|
||||
getExcalidrawAPI():any
|
||||
```
|
||||
返回在 `targetView` 中指定的当前活动绘图的原生 Excalidraw API(ref.current)。
|
||||
查看 Excalidraw 文档请访问:https://www.npmjs.com/package/@excalidraw/excalidraw#ref
|
||||
|
||||
#### getViewElements()
|
||||
```typescript
|
||||
getViewElements():ExcalidrawElement[]
|
||||
```
|
||||
返回视图中的所有元素。
|
||||
|
||||
#### deleteViewElements()
|
||||
```typescript
|
||||
deleteViewElements(elToDelete: ExcalidrawElement[]):boolean
|
||||
```
|
||||
从视图中删除与输入参数中提供的元素相匹配的元素。
|
||||
|
||||
示例:从视图中删除选中的元素:
|
||||
```typescript
|
||||
ea = ExcalidrawAutomate;
|
||||
ea.setView("active");
|
||||
el = ea.getViewSelectedElements();
|
||||
ea.deleteViewElements();
|
||||
```
|
||||
|
||||
#### getViewSelectedElement()
|
||||
```typescript
|
||||
getViewSelectedElement():ExcalidrawElement
|
||||
```
|
||||
首先需要调用 `setView()` 来设置视图。
|
||||
|
||||
如果在目标视图 (targetView) 中选中了一个元素,该函数将返回被选中的元素。如果选中了多个元素(通过 <kbd>SHIFT+点击</kbd> 选择多个元素,或者选择一个组),将返回第一个元素。如果你想从一个组中指定要选择的元素,请双击该组中想要的元素。
|
||||
|
||||
当你想要添加一个与绘图中现有元素相关的新元素时,这个函数会很有帮助。
|
||||
|
||||
#### getViewSelectedElements()
|
||||
```typescript
|
||||
getViewSelectedElements():ExcalidrawElement[]
|
||||
```
|
||||
首先需要调用 `setView()` 来设置视图。
|
||||
|
||||
获取场景中选中元素的数组。如果没有选中任何元素,则返回 []。
|
||||
|
||||
注意:你可以调用 `getExcalidrawAPI().getSceneElements()` 来获取场景中的所有元素。
|
||||
|
||||
#### viewToggleFullScreen()
|
||||
```typescript
|
||||
viewToggleFullScreen(forceViewMode?:boolean):void;
|
||||
```
|
||||
在目标视图 (targetView) 中切换全屏模式和普通模式。通过将 forceViewMode 设置为 `true` 可以将 Excalidraw 切换到查看模式。默认值为 `false`。
|
||||
|
||||
此功能在 Obsidian 移动端上不生效。
|
||||
|
||||
#### connectObjectWithViewSelectedElement()
|
||||
```typescript
|
||||
connectObjectWithViewSelectedElement(objectA:string,connectionA: ConnectionPoint, connectionB: ConnectionPoint, formatting?:{numberOfPoints?: number,startArrowHead?:string,endArrowHead?:string, padding?: number}):boolean
|
||||
```
|
||||
与 `connectObjects()` 功能相同,但 ObjectB 是目标 ExcalidrawView 中当前选中的元素。该函数有助于在新创建的对象和目标 ExcalidrawView 中选中的元素之间放置一个箭头。
|
||||
|
||||
#### addElementsToView()
|
||||
```typescript
|
||||
async addElementsToView(repositionToCursor:boolean=false, save:boolean=false):Promise<boolean>
|
||||
```
|
||||
将使用 ExcalidrawAutomate 创建的元素添加到目标 ExcalidrawView 中。
|
||||
|
||||
`repositionToCursor` 默认值为 false
|
||||
- true:元素将被移动,使其中心点与 ExcalidrawView 上当前指针的位置对齐。你可以使用此开关将元素指向并放置到绘图中的所需位置。
|
||||
- false:元素将按照每个元素的 x&y 坐标定义的位置进行放置。
|
||||
|
||||
`save` 默认值为 false
|
||||
- true:元素添加后绘图将被保存。
|
||||
- false:绘图将在下一个自动保存周期时保存。当连续添加多个元素时使用 false。否则,最好使用 true 以最小化数据丢失的风险。
|
||||
|
||||
### onDropHook
|
||||
```typescript
|
||||
onDropHook (data: {
|
||||
ea: ExcalidrawAutomate,
|
||||
event: React.DragEvent<HTMLDivElement>,
|
||||
draggable: any, //Obsidian draggable object
|
||||
type: "file"|"text"|"unknown",
|
||||
payload: {
|
||||
files: TFile[], //TFile[] array of dropped files
|
||||
text: string, //string
|
||||
},
|
||||
excalidrawFile: TFile, //the file receiving the drop event
|
||||
view: ExcalidrawView, //the excalidraw view receiving the drop
|
||||
pointerPosition: {x:number, y:number} //the pointer position on canvas at the time of drop
|
||||
}):boolean;
|
||||
```
|
||||
当可拖拽项被拖放到 Excalidraw 上时触发的回调函数。
|
||||
|
||||
该函数应返回一个布尔值。如果拖放由钩子函数处理且应停止进一步的原生处理,则返回 true;如果应让 Excalidraw 继续处理拖放操作,则返回 false。
|
||||
|
||||
拖放类型可以是以下之一:
|
||||
- "file":当从 Obsidian 文件浏览器中拖放文件到 Excalidraw 时。在这种情况下,payload.files 将包含被拖放文件的列表。
|
||||
- "text":当拖放链接(如 URL 或 wiki 链接)或其他文本时。在这种情况下,payload.text 将包含接收到的字符串。
|
||||
- "unknown":当 Excalidraw 插件无法识别拖放对象的类型时。在这种情况下,你可以使用 React.DragEvent 来分析拖放的对象。
|
||||
|
||||
使用 Templater 启动模板或类似方法来设置钩子函数。
|
||||
|
||||
```typescript
|
||||
ea = ExcalidrawAutomate;
|
||||
ea.onDropHook = (data) => {
|
||||
console.log(data);
|
||||
return false;
|
||||
}
|
||||
```
|
||||
28
docs/zh-cn/docs/Examples/apply_template.md
Normal file
28
docs/zh-cn/docs/Examples/apply_template.md
Normal file
@@ -0,0 +1,28 @@
|
||||
# [◀ Excalidraw 自动化使用指南](../readme.md)
|
||||
|
||||
## 将 Excalidraw 模板应用到新绘图
|
||||
|
||||
这个示例与介绍中的类似,只是将图形旋转了90度,并且使用了模板,同时指定了保存绘图的文件名和文件夹,还会在新窗格中打开这个新绘图。
|
||||
|
||||
*使用 <kbd>CTRL+Shift+V</kbd> 将代码粘贴到 Obsidian 中!*
|
||||
|
||||
```javascript
|
||||
<%*
|
||||
const ea = ExcalidrawAutomate;
|
||||
ea.reset();
|
||||
ea.style.angle = Math.PI/2;
|
||||
ea.style.strokeWidth = 3.5;
|
||||
ea.addRect(-150,-50,450,300);
|
||||
ea.addText(-100,70,"Left to right");
|
||||
ea.addArrow([[-100,100],[100,100]]);
|
||||
|
||||
ea.style.strokeColor = "red";
|
||||
await ea.addText(100,-30,"top to bottom",{width:200,textAlign:"center"});
|
||||
ea.addArrow([[200,0],[200,200]]);
|
||||
await ea.create({
|
||||
filename :"My Drawing",
|
||||
foldername :"myfolder/fordemo/",
|
||||
templatePath:"Excalidraw/Template2.excalidraw",
|
||||
onNewPane :true});
|
||||
%>
|
||||
```
|
||||
21
docs/zh-cn/docs/Examples/connect_objects.md
Normal file
21
docs/zh-cn/docs/Examples/connect_objects.md
Normal file
@@ -0,0 +1,21 @@
|
||||
# [◀ Excalidraw Automate 使用指南](../readme.md)
|
||||
|
||||
## 连接对象
|
||||
|
||||
这个 [Templater](https://github.com/SilentVoid13/Templater) 模板演示了如何使用 ExcalidrawAutomate 连接两个对象。
|
||||
|
||||
*使用 <kbd>CTRL+Shift+V</kbd> 将代码粘贴到 Obsidian 中!*
|
||||
|
||||
```javascript
|
||||
<%*
|
||||
const ea = ExcalidrawAutomate;
|
||||
ea.reset();
|
||||
ea.addText(-130,-100,"Connecting two objects");
|
||||
const a = ea.addRect(-100,-100,100,100);
|
||||
const b = ea.addEllipse(200,200,100,100);
|
||||
ea.connectObjects(a,"bottom",b,"left",{numberOfPoints: 2}); //see how the line breaks differently when moving objects around
|
||||
ea.style.strokeColor = "red";
|
||||
ea.connectObjects(a,"right",b,"top",1);
|
||||
await ea.create();
|
||||
%>
|
||||
```
|
||||
70
docs/zh-cn/docs/Examples/dataviewjs_familytree.md
Normal file
70
docs/zh-cn/docs/Examples/dataviewjs_familytree.md
Normal file
@@ -0,0 +1,70 @@
|
||||
# [◀ Excalidraw Automate 使用指南](../readme.md)
|
||||
|
||||
## 使用 dataviewjs 生成家谱树
|
||||
|
||||
这个示例与使用 dataviewjs 生成思维导图的脚本类似,但输出结果是垂直呈现的。
|
||||
|
||||
### 输出效果
|
||||
|
||||

|
||||
|
||||
### 输入文件
|
||||
|
||||
任务列表格式如下:
|
||||
|
||||
```markdown
|
||||
- [ ] OBSIDIAN
|
||||
- [ ] Silver
|
||||
- [ ] PawPaw Silv
|
||||
- [ ] MawMaw Silv
|
||||
- [ ] Licat
|
||||
- [ ] PeePaw Li
|
||||
- [ ] MeeMaw Li
|
||||
```
|
||||
|
||||
### dataviewjs 脚本
|
||||
|
||||
渲染 Excalidraw 图形的代码如下:
|
||||
|
||||
```javascript
|
||||
function crawl(subtasks) {
|
||||
let size = subtasks.length > 0 ? 0 : 1; //if no children then a leaf with size 1
|
||||
for (let task of subtasks) {
|
||||
task["size"] = crawl(task.subtasks);
|
||||
size += task.size;
|
||||
}
|
||||
return size;
|
||||
}
|
||||
|
||||
const tasks = dv.page("FamilyTree.md").file.tasks[0];
|
||||
tasks["size"] = crawl(tasks.subtasks);
|
||||
|
||||
const width = 300;
|
||||
const height = 150;
|
||||
const ea = ExcalidrawAutomate;
|
||||
ea.reset();
|
||||
|
||||
function buildMindmap(subtasks, depth, offset, parentObjectID) {
|
||||
if (subtasks.length == 0) return;
|
||||
let task;
|
||||
|
||||
for (let i = 0; i < subtasks.length; i++) {
|
||||
task = subtasks[i]
|
||||
if (depth == 1) ea.style.strokeColor = '#'+(Math.random()*0xFFFFFF<<0).toString(16).padStart(6,"0");
|
||||
task["objectID"] = ea.addText((task.size/2+offset)*width,depth*height,task.text,{box:true})
|
||||
ea.connectObjects(parentObjectID,"top",task.objectID,"bottom",{startArrowHead: 'arrow', endArrowHead: 'dot'});
|
||||
if (i >= 1) {
|
||||
ea.connectObjects(subtasks[i-1]['objectID'],"right",task.objectID,"left", {endArrowHead: 'none'});
|
||||
}
|
||||
|
||||
buildMindmap(task.subtasks, depth-1,offset,task.objectID);
|
||||
offset += task.size/1.5;
|
||||
}
|
||||
|
||||
}
|
||||
|
||||
tasks["objectID"] = ea.addText(width*1.5,height*(tasks.size-1),tasks.text,{box:true, textAlign:"center"});
|
||||
buildMindmap(tasks.subtasks, 2, 0, tasks.objectID);
|
||||
|
||||
ea.createSVG().then((svg)=>dv.span(svg.outerHTML));
|
||||
```
|
||||
64
docs/zh-cn/docs/Examples/dataviewjs_mindmap.md
Normal file
64
docs/zh-cn/docs/Examples/dataviewjs_mindmap.md
Normal file
@@ -0,0 +1,64 @@
|
||||
# [◀ Excalidraw Automate 使用指南](../readme.md)
|
||||
|
||||
## 使用 dataviewjs 从任务列表生成思维导图
|
||||
|
||||
这个方法与使用 templater 生成思维导图的脚本类似,但由于 dataview 已经以树形结构返回任务,所以实现起来稍微简单一些
|
||||
|
||||
### 输出效果
|
||||
|
||||

|
||||
|
||||
### 输入文件
|
||||
|
||||
输入文件是 `Demo.md`,其内容如下:
|
||||
|
||||
```markdown
|
||||
- [ ] Root task
|
||||
- [ ] task 1.1
|
||||
- [ ] task 1.2
|
||||
- [ ] task 1.2.1
|
||||
- [ ] task 1.2.2
|
||||
- [ ] task 1.3
|
||||
- [ ] task 1.3.1
|
||||
```
|
||||
|
||||
### dataviewjs 脚本
|
||||
|
||||
`dataviewjs` 脚本如下所示:
|
||||
|
||||
*使用 <kbd>CTRL+Shift+V</kbd> 将代码粘贴到 Obsidian 中!*
|
||||
|
||||
```javascript
|
||||
function crawl(subtasks) {
|
||||
let size = subtasks.length > 0 ? 0 : 1; //if no children then a leaf with size 1
|
||||
for (let task of subtasks) {
|
||||
task["size"] = crawl(task.subtasks);
|
||||
size += task.size;
|
||||
}
|
||||
return size;
|
||||
}
|
||||
|
||||
const tasks = dv.page("Demo.md").file.tasks[0];
|
||||
tasks["size"] = crawl(tasks.subtasks);
|
||||
|
||||
const width = 300;
|
||||
const height = 100;
|
||||
const ea = ExcalidrawAutomate;
|
||||
ea.reset();
|
||||
|
||||
function buildMindmap(subtasks, depth, offset, parentObjectID) {
|
||||
if (subtasks.length == 0) return;
|
||||
for (let task of subtasks) {
|
||||
if (depth == 1) ea.style.strokeColor = '#'+(Math.random()*0xFFFFFF<<0).toString(16).padStart(6,"0");
|
||||
task["objectID"] = ea.addText(depth*width,(task.size/2+offset)*height,task.text,{box:true})
|
||||
ea.connectObjects(parentObjectID,"right",task.objectID,"left",{startArrowHead: 'dot'});
|
||||
buildMindmap(task.subtasks, depth+1,offset,task.objectID);
|
||||
offset += task.size;
|
||||
}
|
||||
}
|
||||
|
||||
tasks["objectID"] = ea.addText(0,(tasks.size/2)*height,tasks.text,{box:true});
|
||||
buildMindmap(tasks.subtasks, 1, 0, tasks.objectID);
|
||||
|
||||
ea.createSVG().then((svg)=>dv.span(svg.outerHTML));
|
||||
```
|
||||
26
docs/zh-cn/docs/Examples/insert_new_drawing.md
Normal file
26
docs/zh-cn/docs/Examples/insert_new_drawing.md
Normal file
@@ -0,0 +1,26 @@
|
||||
# [◀ Excalidraw 自动化使用指南](../readme.md)
|
||||
|
||||
## 在当前编辑的文档中插入新绘图
|
||||
|
||||
这个 [Templater](https://github.com/SilentVoid13/Templater) 模板会提示你输入绘图的标题。它将使用提供的标题创建一个新的绘图,并将其保存在你正在编辑的文档所在的文件夹中。然后,它会在光标位置嵌入新绘图,并通过拆分当前页面的方式在新的工作区中打开这个绘图。
|
||||
|
||||
*使用 <kbd>CTRL+Shift+V</kbd> 将代码粘贴到 Obsidian 中!*
|
||||
|
||||
```javascript
|
||||
<%*
|
||||
const defaultTitle = tp.date.now("HHmm")+' '+tp.file.title;
|
||||
const title = await tp.system.prompt("Title of the drawing?", defaultTitle);
|
||||
const folder = tp.file.folder(true);
|
||||
const transcludePath = (folder== '/' ? '' : folder + '/') + title + '.excalidraw';
|
||||
tR = '![['+transcludePath+']]';
|
||||
const ea = ExcalidrawAutomate;
|
||||
ea.reset();
|
||||
ea.setTheme(1); //set Theme to dark
|
||||
await ea.create({
|
||||
filename : title,
|
||||
foldername : folder,
|
||||
//templatePath: 'Excalidraw/Template.excalidraw', //uncomment if you want to use a template
|
||||
onNewPane : true
|
||||
});
|
||||
%>
|
||||
```
|
||||
103
docs/zh-cn/docs/Examples/templater_mindmap.md
Normal file
103
docs/zh-cn/docs/Examples/templater_mindmap.md
Normal file
@@ -0,0 +1,103 @@
|
||||
# [◀ Excalidraw Automate 使用指南](../readme.md)
|
||||
|
||||
## 从文本大纲生成简单思维导图
|
||||
|
||||
这是一个稍微复杂一点的示例。它将从制表符缩进的大纲生成思维导图。
|
||||
|
||||
### 输出效果
|
||||
|
||||

|
||||
|
||||
### 输入文件
|
||||
|
||||
示例输入:
|
||||
```
|
||||
- Test 1
|
||||
- Test 1.1
|
||||
- Test 2
|
||||
- Test 2.1
|
||||
- Test 2.2
|
||||
- Test 2.2.1
|
||||
- Test 2.2.2
|
||||
- Test 2.2.3
|
||||
- Test 2.2.3.1
|
||||
- Test 3
|
||||
- Test 3.1
|
||||
```
|
||||
|
||||
### Templater 脚本
|
||||
|
||||
*使用 <kbd>CTRL+Shift+V</kbd> 将代码粘贴到 Obsidian 中!*
|
||||
|
||||
```javascript
|
||||
<%*
|
||||
const IDX = Object.freeze({"depth":0, "text":1, "parent":2, "size":3, "children": 4, "objectId":5});
|
||||
|
||||
//check if an editor is the active view
|
||||
const editor = this.app.workspace.activeLeaf?.view?.editor;
|
||||
if(!editor) return;
|
||||
|
||||
//initialize the tree with the title of the document as the first element
|
||||
let tree = [[0,this.app.workspace.activeLeaf?.view?.getDisplayText(),-1,0,[],0]];
|
||||
const linecount = editor.lineCount();
|
||||
|
||||
//helper function, use regex to calculate indentation depth, and to get line text
|
||||
function getLineProps (i) {
|
||||
props = editor.getLine(i).match(/^(\t*)-\s+(.*)/);
|
||||
return [props[1].length+1, props[2]];
|
||||
}
|
||||
|
||||
//a vector that will hold last valid parent for each depth
|
||||
let parents = [0];
|
||||
|
||||
//load outline into tree
|
||||
for(i=0;i<linecount;i++) {
|
||||
[depth,text] = getLineProps(i);
|
||||
if(depth>parents.length) parents.push(i+1);
|
||||
else parents[depth] = i+1;
|
||||
tree.push([depth,text,parents[depth-1],1,[]]);
|
||||
tree[parents[depth-1]][IDX.children].push(i+1);
|
||||
}
|
||||
|
||||
//recursive function to crawl the tree and identify height aka. size of each node
|
||||
function crawlTree(i) {
|
||||
if(i>linecount) return 0;
|
||||
size = 0;
|
||||
if((i+1<=linecount && tree[i+1][IDX.depth] <= tree[i][IDX.depth])|| i == linecount) { //I am a leaf
|
||||
tree[i][IDX.size] = 1;
|
||||
return 1;
|
||||
}
|
||||
tree[i][IDX.children].forEach((node)=>{
|
||||
size += crawlTree(node);
|
||||
});
|
||||
tree[i][IDX.size] = size;
|
||||
return size;
|
||||
}
|
||||
|
||||
crawlTree(0);
|
||||
|
||||
//Build the mindmap in Excalidraw
|
||||
const width = 300;
|
||||
const height = 100;
|
||||
const ea = ExcalidrawAutomate;
|
||||
ea.reset();
|
||||
|
||||
//stores position offset of branch/leaf in height units
|
||||
offsets = [0];
|
||||
|
||||
for(i=0;i<=linecount;i++) {
|
||||
depth = tree[i][IDX.depth];
|
||||
if (depth == 1) ea.style.strokeColor = '#'+(Math.random()*0xFFFFFF<<0).toString(16).padStart(6,"0");
|
||||
tree[i][IDX.objectId] = ea.addText(depth*width,((tree[i][IDX.size]/2)+offsets[depth])*height,tree[i][IDX.text],{box:true});
|
||||
//set child offset equal to parent offset
|
||||
if((depth+1)>offsets.length) offsets.push(offsets[depth]);
|
||||
else offsets[depth+1] = offsets[depth];
|
||||
offsets[depth] += tree[i][IDX.size];
|
||||
if(tree[i][IDX.parent]!=-1) {
|
||||
ea.connectObjects(tree[tree[i][IDX.parent]][IDX.objectId],"right",tree[i][IDX.objectId],"left",{startArrowHead: 'dot'});
|
||||
}
|
||||
}
|
||||
|
||||
await ea.create({onNewPane: true});
|
||||
%>
|
||||
```
|
||||
410
docs/zh-cn/docs/ExcalidrawScriptsEngine.md
Normal file
410
docs/zh-cn/docs/ExcalidrawScriptsEngine.md
Normal file
@@ -0,0 +1,410 @@
|
||||
# [◀ Excalidraw 自动化使用指南](./readme.md)
|
||||
|
||||
> 此说明当前更新至 `768aebf`。
|
||||
|
||||
【[English](../../ExcalidrawScriptsEngine.md) | 简体中文】
|
||||
|
||||
[](https://youtu.be/hePJcObHIso)
|
||||
|
||||
## 简介
|
||||
|
||||
请将你的 ExcalidrawAutomate 脚本放入 Excalidraw 设置中定义的文件夹中。脚本文件夹不能是你的 Vault 根目录。
|
||||
|
||||

|
||||
|
||||
EA 脚本可以是 markdown 文件、纯文本文件或 .js 文件。唯一的要求是它们必须包含有效的 JavaScript 代码。
|
||||
|
||||

|
||||
|
||||
你可以通过 Obsidian 命令面板从 Excalidraw 访问你的脚本。
|
||||
|
||||

|
||||
|
||||
这样你就可以像设置其他 Obsidian 命令一样,为你喜欢的脚本分配快捷键。
|
||||
|
||||

|
||||
|
||||
## 脚本开发
|
||||
|
||||
Excalidraw 脚本会自动接收两个对象:
|
||||
|
||||
- `ea`:脚本引擎会初始化 `ea` 对象,包括设置调用脚本时的活动视图为当前视图。
|
||||
- `utils`:我从 [QuickAdd](https://github.com/chhoumann/quickadd/blob/master/docs/QuickAddAPI.md) 借用了一些实用函数,但目前并非所有 QuickAdd 实用函数都在 Excalidraw 中实现。目前可用的函数如下。详见下方示例。
|
||||
- `inputPrompt: (header: string, placeholder?: string, value?: string, buttons?: [{caption:string, action:Function}])`
|
||||
- 打开一个提示框请求输入。返回输入的字符串。
|
||||
- 你需要使用 await 等待 inputPrompt 的结果。
|
||||
- `buttons.action(input: string) => string`。按钮动作将接收当前输入字符串。如果动作返回 null,输入将保持不变。如果动作返回字符串,inputPrompt 将解析为该值。
|
||||
```typescript
|
||||
let fileType = "";
|
||||
const filename = await utils.inputPrompt (
|
||||
"Filename for new document",
|
||||
"Placeholder",
|
||||
"DefaultFilename.md",
|
||||
[
|
||||
{
|
||||
caption: "Markdown",
|
||||
action: ()=>{fileType="md";return;}
|
||||
},
|
||||
{
|
||||
caption: "Excalidraw",
|
||||
action: ()=>{fileType="ex";return;}
|
||||
}
|
||||
]
|
||||
);
|
||||
|
||||
```
|
||||
- `suggester: (displayItems: string[], items: any[], hint?: string, instructions?:Instruction[])`
|
||||
- 打开一个建议器。显示 displayItems 并返回 items[] 中对应的项。
|
||||
- 你需要使用 await 等待 suggester 的结果。
|
||||
- 如果用户取消(按ESC键),suggester 将返回 `undefined`
|
||||
- Hint(提示)和 instructions(说明)参数是可选的。
|
||||
```typescript
|
||||
interface Instruction {
|
||||
command: string;
|
||||
purpose: string;
|
||||
}
|
||||
```
|
||||
- 脚本可以有设置。这些设置作为插件设置的一部分存储,用户也可以通过 Obsidian 插件设置窗口更改。
|
||||
- 你可以使用 `ea.getScriptSettings()` 访问当前脚本的设置,并使用 `ea.setScriptSettings(settings:any)` 存储设置值
|
||||
- 在插件设置中显示脚本设置的规则如下:
|
||||
- 如果设置是简单的字面量(布尔值、数字、字符串),这些将按原样显示在设置中。设置的名称将作为值的键。
|
||||
```javascript
|
||||
ea.setScriptSettings({
|
||||
"value 1": true,
|
||||
"value 2": 1,
|
||||
"value 3": "my string"
|
||||
})
|
||||
```
|
||||
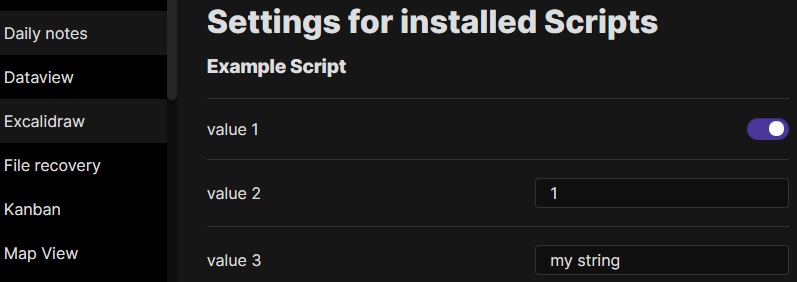
|
||||
- 如果设置是一个对象并遵循以下结构,则可以添加描述和值集。也可以使用 `hidden` 键从用户界面中隐藏值。
|
||||
```javascript
|
||||
ea.setScriptSettings({
|
||||
"value 1": {
|
||||
"value": true,
|
||||
"description": "This is the description for my boolean value"
|
||||
},
|
||||
"value 2": {
|
||||
"value": 1,
|
||||
"description": "This is the description for my numeric value"
|
||||
},
|
||||
"value 3": {
|
||||
"value": "my string",
|
||||
"description": "This is the description for my string value",
|
||||
"valueset": ["allowed 1","allowed 2","allowed 3"]
|
||||
},
|
||||
"value 4": {
|
||||
"value": "my value",
|
||||
"hidden": true
|
||||
}
|
||||
});
|
||||
```
|
||||
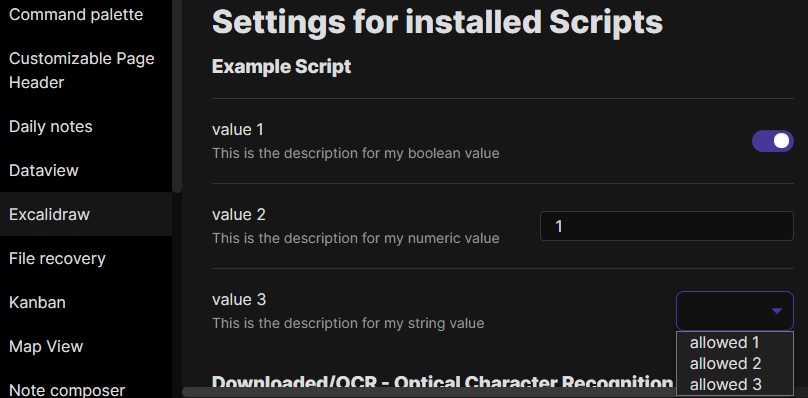
|
||||
|
||||
---------
|
||||
|
||||
## Excalidraw 自动化脚本示例
|
||||
|
||||
这些脚本可以在 GitHub [这个](https://github.com/zsviczian/obsidian-excalidraw-plugin/tree/master/ea-scripts)文件夹 📂 中下载为 `.md` 文件。
|
||||
|
||||
### 为选中元素添加边框
|
||||
|
||||
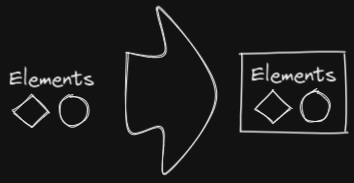
|
||||
|
||||
此脚本将在 Excalidraw 中当前选中的元素周围添加一个包围框
|
||||
|
||||
```javascript
|
||||
if(!ea.verifyMinimumPluginVersion || !ea.verifyMinimumPluginVersion("1.5.21")) {
|
||||
new Notice("This script requires a newer version of Excalidraw. Please install the latest version.");
|
||||
return;
|
||||
}
|
||||
|
||||
settings = ea.getScriptSettings();
|
||||
//check if settings exist. If not, set default values on first run
|
||||
if(!settings["Default padding"]) {
|
||||
settings = {
|
||||
"Prompt for padding?": true,
|
||||
"Default padding" : {
|
||||
value: 10,
|
||||
description: "Padding between the bounding box of the selected elements, and the box the script creates"
|
||||
}
|
||||
};
|
||||
ea.setScriptSettings(settings);
|
||||
}
|
||||
|
||||
let padding = settings["Default padding"].value;
|
||||
|
||||
if(settings["Prompt for padding?"]) {
|
||||
padding = parseInt (await utils.inputPrompt("padding?","number",padding.toString()));
|
||||
}
|
||||
|
||||
if(isNaN(padding)) {
|
||||
new Notice("The padding value provided is not a number");
|
||||
return;
|
||||
}
|
||||
elements = ea.getViewSelectedElements();
|
||||
const box = ea.getBoundingBox(elements);
|
||||
color = ea
|
||||
.getExcalidrawAPI()
|
||||
.getAppState()
|
||||
.currentItemStrokeColor;
|
||||
//uncomment for random color:
|
||||
//color = '#'+(Math.random()*0xFFFFFF<<0).toString(16).padStart(6,"0");
|
||||
ea.style.strokeColor = color;
|
||||
id = ea.addRect(
|
||||
box.topX - padding,
|
||||
box.topY - padding,
|
||||
box.width + 2*padding,
|
||||
box.height + 2*padding
|
||||
);
|
||||
ea.copyViewElementsToEAforEditing(elements);
|
||||
ea.addToGroup([id].concat(elements.map((el)=>el.id)));
|
||||
ea.addElementsToView(false);
|
||||
```
|
||||
|
||||
----
|
||||
|
||||
### 用箭头连接选中的元素
|
||||
|
||||
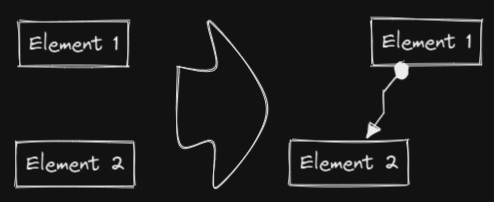
|
||||
|
||||
此脚本将用箭头连接两个对象。如果任一对象是一组分组元素(例如,一个文本元素与一个包围它的矩形分组),脚本会识别这些组,并将箭头连接到组中最大的对象(假设你想将箭头连接到文本元素周围的框)。
|
||||
```javascript
|
||||
if(!ea.verifyMinimumPluginVersion || !ea.verifyMinimumPluginVersion("1.5.21")) {
|
||||
new Notice("This script requires a newer version of Excalidraw. Please install the latest version.");
|
||||
return;
|
||||
}
|
||||
|
||||
settings = ea.getScriptSettings();
|
||||
//set default values on first run
|
||||
if(!settings["Starting arrowhead"]) {
|
||||
settings = {
|
||||
"Starting arrowhead" : {
|
||||
value: "none",
|
||||
valueset: ["none","arrow","triangle","bar","dot"]
|
||||
},
|
||||
"Ending arrowhead" : {
|
||||
value: "triangle",
|
||||
valueset: ["none","arrow","triangle","bar","dot"]
|
||||
},
|
||||
"Line points" : {
|
||||
value: 1,
|
||||
description: "Number of line points between start and end"
|
||||
}
|
||||
};
|
||||
ea.setScriptSettings(settings);
|
||||
}
|
||||
|
||||
const arrowStart = settings["Starting arrowhead"].value === "none" ? null : settings["Starting arrowhead"].value;
|
||||
const arrowEnd = settings["Ending arrowhead"].value === "none" ? null : settings["Ending arrowhead"].value;
|
||||
const linePoints = Math.floor(settings["Line points"].value);
|
||||
|
||||
const elements = ea.getViewSelectedElements();
|
||||
ea.copyViewElementsToEAforEditing(elements);
|
||||
groups = ea.getMaximumGroups(elements);
|
||||
|
||||
if(groups.length !== 2) {
|
||||
//unfortunately getMaxGroups returns duplicated resultset for sticky notes
|
||||
//needs additional filtering
|
||||
cleanGroups=[];
|
||||
idList = [];
|
||||
for (group of groups) {
|
||||
keep = true;
|
||||
for(item of group) if(idList.contains(item.id)) keep = false;
|
||||
if(keep) {
|
||||
cleanGroups.push(group);
|
||||
idList = idList.concat(group.map(el=>el.id))
|
||||
}
|
||||
}
|
||||
if(cleanGroups.length !== 2) return;
|
||||
groups = cleanGroups;
|
||||
}
|
||||
|
||||
els = [
|
||||
ea.getLargestElement(groups[0]),
|
||||
ea.getLargestElement(groups[1])
|
||||
];
|
||||
|
||||
ea.style.strokeColor = els[0].strokeColor;
|
||||
ea.style.strokeWidth = els[0].strokeWidth;
|
||||
ea.style.strokeStyle = els[0].strokeStyle;
|
||||
ea.style.strokeSharpness = els[0].strokeSharpness;
|
||||
|
||||
ea.connectObjects(
|
||||
els[0].id,
|
||||
null,
|
||||
els[1].id,
|
||||
null,
|
||||
{
|
||||
endArrowHead: arrowEnd,
|
||||
startArrowHead: arrowStart,
|
||||
numberOfPoints: linePoints
|
||||
}
|
||||
);
|
||||
ea.addElementsToView();
|
||||
```
|
||||
|
||||
----
|
||||
### 反转选中的箭头
|
||||
|
||||
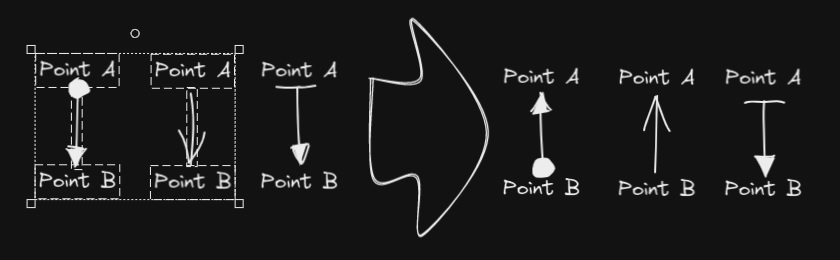
|
||||
|
||||
反转选中元素范围内**箭头**的方向。
|
||||
|
||||
```javascript
|
||||
elements = ea.getViewSelectedElements().filter((el)=>el.type==="arrow");
|
||||
if(!elements || elements.length===0) return;
|
||||
elements.forEach((el)=>{
|
||||
const start = el.startArrowhead;
|
||||
el.startArrowhead = el.endArrowhead;
|
||||
el.endArrowhead = start;
|
||||
});
|
||||
ea.copyViewElementsToEAforEditing(elements);
|
||||
ea.addElementsToView();
|
||||
```
|
||||
|
||||
----
|
||||
|
||||
### 设置选中元素的线条宽度
|
||||
|
||||
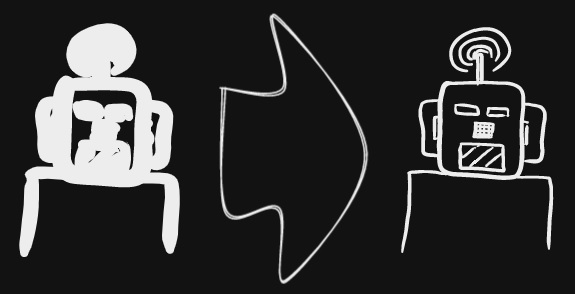
|
||||
|
||||
当你缩放自由绘制的草图并想要减小或增加它们的线条宽度时,这个脚本会很有帮助。
|
||||
```javascript
|
||||
let width = (ea.getViewSelectedElement().strokeWidth??1).toString();
|
||||
width = await utils.inputPrompt("Width?","number",width);
|
||||
const elements=ea.getViewSelectedElements();
|
||||
ea.copyViewElementsToEAforEditing(elements);
|
||||
ea.getElements().forEach((el)=>el.strokeWidth=width);
|
||||
ea.addElementsToView();
|
||||
```
|
||||
|
||||
----
|
||||
|
||||
### 设置网格大小
|
||||
|
||||
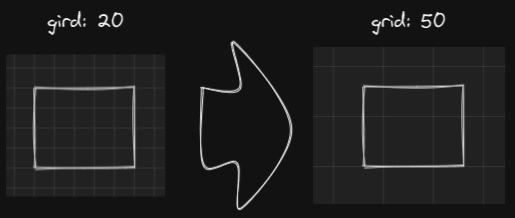
|
||||
|
||||
Excalidraw 中默认的网格大小是 20。目前通过用户界面无法更改网格大小。
|
||||
```javascript
|
||||
const grid = parseInt(await utils.inputPrompt("Grid size?",null,"20"));
|
||||
const api = ea.getExcalidrawAPI();
|
||||
let appState = api.getAppState();
|
||||
appState.gridSize = grid;
|
||||
api.updateScene({
|
||||
appState,
|
||||
commitToHistory:false
|
||||
});
|
||||
```
|
||||
|
||||
----
|
||||
|
||||
### 设置元素尺寸和位置
|
||||
|
||||
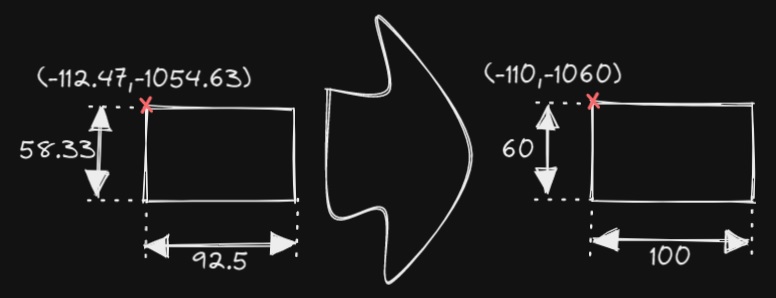
|
||||
|
||||
目前在 Excalidraw 中还没有办法指定对象的精确位置和大小。你可以使用以下简单脚本来解决这个问题。
|
||||
```javascript
|
||||
const elements = ea.getViewSelectedElements();
|
||||
if(elements.length === 0) return;
|
||||
const el = ea.getLargestElement(elements);
|
||||
const sizeIn = [el.x,el.y,el.width,el.height].join(",");
|
||||
let res = await utils.inputPrompt("x,y,width,height?",null,sizeIn);
|
||||
res = res.split(",");
|
||||
if(res.length !== 4) return;
|
||||
let size = [];
|
||||
for (v of res) {
|
||||
const i = parseInt(v);
|
||||
if(isNaN(i)) return;
|
||||
size.push(i);
|
||||
}
|
||||
el.x = size[0];
|
||||
el.y = size[1];
|
||||
el.width = size[2];
|
||||
el.height = size[3];
|
||||
ea.copyViewElementsToEAforEditing([el]);
|
||||
ea.addElementsToView();
|
||||
```
|
||||
|
||||
----
|
||||
|
||||
### 项目符号
|
||||
|
||||
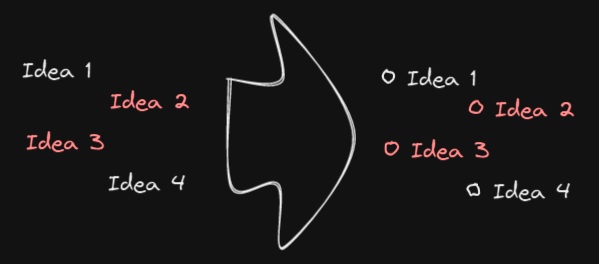
|
||||
|
||||
此脚本会在选中的每个文本元素的左上角添加一个小圆圈,并将文本和"项目符号"组合成一个组。
|
||||
```javascript
|
||||
elements = ea.getViewSelectedElements().filter((el)=>el.type==="text");
|
||||
ea.copyViewElementsToEAforEditing(elements);
|
||||
const padding = 10;
|
||||
elements.forEach((el)=>{
|
||||
ea.style.strokeColor = el.strokeColor;
|
||||
const size = el.fontSize/2;
|
||||
const ellipseId = ea.addEllipse(
|
||||
el.x-padding-size,
|
||||
el.y+size/2,
|
||||
size,
|
||||
size
|
||||
);
|
||||
ea.addToGroup([el.id,ellipseId]);
|
||||
});
|
||||
ea.addElementsToView();
|
||||
```
|
||||
|
||||
----
|
||||
|
||||
### 按行分割文本
|
||||
|
||||
**!!!需要 Excalidraw 1.5.1 或更高版本**
|
||||
|
||||
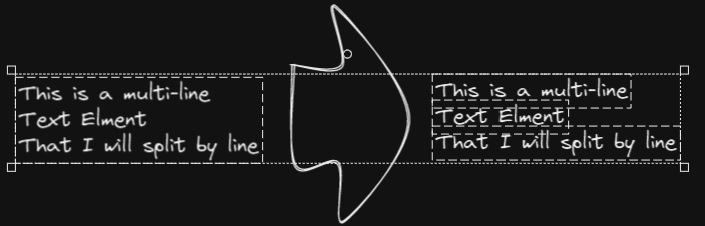
|
||||
|
||||
将文本块按行分割成单独的文本元素,以便更容易重新组织
|
||||
```javascript
|
||||
elements = ea.getViewSelectedElements().filter((el)=>el.type==="text");
|
||||
elements.forEach((el)=>{
|
||||
ea.style.strokeColor = el.strokeColor;
|
||||
ea.style.fontFamily = el.fontFamily;
|
||||
ea.style.fontSize = el.fontSize;
|
||||
const text = el.text.split("\n");
|
||||
for(i=0;i<text.length;i++) {
|
||||
ea.addText(el.x,el.y+i*el.height/text.length,text[i]);
|
||||
}
|
||||
});
|
||||
ea.addElementsToView();
|
||||
ea.deleteViewElements(elements);
|
||||
```
|
||||
|
||||
----
|
||||
|
||||
### 设置文本对齐方式
|
||||
|
||||
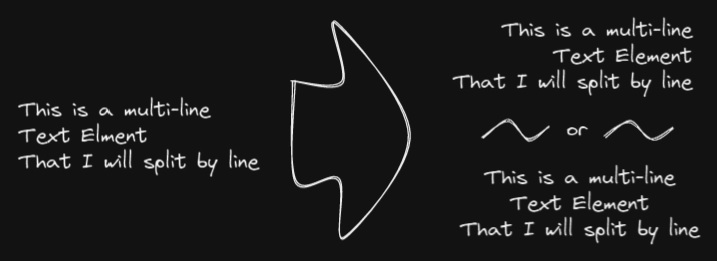
|
||||
|
||||
设置文本块的对齐方式(居中、右对齐、左对齐)。如果你想为选择文本对齐方式设置键盘快捷键,这个脚本会很有用。
|
||||
```javascript
|
||||
elements = ea.getViewSelectedElements().filter((el)=>el.type==="text");
|
||||
if(elements.length===0) return;
|
||||
let align = ["left","right","center"];
|
||||
align = await utils.suggester(align,align);
|
||||
elements.forEach((el)=>el.textAlign = align);
|
||||
ea.copyViewElementsToEAforEditing(elements);
|
||||
ea.addElementsToView();
|
||||
```
|
||||
|
||||
----
|
||||
|
||||
### 设置字体
|
||||
|
||||
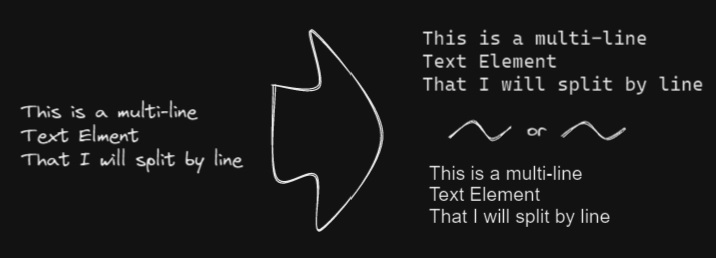
|
||||
|
||||
设置文本块的字体(Virgil、Helvetica、Cascadia)。如果你想为选择字体设置键盘快捷键,这个功能会很有用。
|
||||
```javascript
|
||||
elements = ea.getViewSelectedElements().filter((el)=>el.type==="text");
|
||||
if(elements.length===0) return;
|
||||
let font = ["Virgil","Helvetica","Cascadia"];
|
||||
font = parseInt(await utils.suggester(font,["1","2","3"]));
|
||||
if (isNaN(font)) return;
|
||||
elements.forEach((el)=>el.fontFamily = font);
|
||||
ea.copyViewElementsToEAforEditing(elements);
|
||||
ea.addElementsToView();
|
||||
```
|
||||
5804
docs/zh-cn/docs/Release-notes.md
Normal file
5804
docs/zh-cn/docs/Release-notes.md
Normal file
File diff suppressed because it is too large
Load Diff
57
docs/zh-cn/docs/readme.md
Normal file
57
docs/zh-cn/docs/readme.md
Normal file
@@ -0,0 +1,57 @@
|
||||
# Excalidraw 自动化使用指南
|
||||
|
||||
> 此说明当前更新至 `e793526`。
|
||||
|
||||
【[English](../../readme.md) | 简体中文】
|
||||
|
||||
使用 ExcalidrawAutomate 可以通过 [ExcalidrawAutomate 脚本引擎](ExcalidrawScriptsEngine.md)、[Templater](https://silentvoid13.github.io/Templater/docs/) 或 [QuickAdd](https://github.com/chhoumann/quickadd) 插件来创建或操作 Excalidraw 绘图,并使用 [DataviewJS](https://blacksmithgu.github.io/obsidian-dataview/docs/api/intro/) 生成嵌入式的 SVG 和 PNG 图像。
|
||||
|
||||
通过一些简单的配置,使用 ExcalidrawAutomate 你可以:
|
||||
- 生成简单的思维导图
|
||||
- 构建家谱
|
||||
- 填写 SVG 表单
|
||||
- 创建自定义图表
|
||||
- 在 Excalidraw 中自动化简单任务(即创建宏)
|
||||
|
||||

|
||||
|
||||
## API 文档
|
||||
|
||||
- **从这里开始** [API 介绍](API/introduction.md)
|
||||
- [属性和函数概览](API/attributes_functions_overview.md)
|
||||
- [元素样式](API/element_style.md)
|
||||
- [画布样式](API/canvas_style.md)
|
||||
- [添加对象](API/objects.md)
|
||||
- [实用函数](API/utility.md)
|
||||
|
||||
## ExcalidrawAutomate 脚本引擎
|
||||
|
||||
当你想要自动化一些简单的步骤时,比如在文本元素周围添加一个框、用箭头连接两个对象、或者设置自定义的线宽或网格值等类似"宏"的自动化操作,我建议使用脚本引擎。
|
||||
- [ExcalidrawAutomate 脚本引擎](ExcalidrawScriptsEngine.md)
|
||||
|
||||
## 示例
|
||||
- **Templater**
|
||||
- [在当前编辑的文档中插入新绘图](Examples/insert_new_drawing.md)
|
||||
- [连接对象](Examples/connect_objects.md)
|
||||
- [应用 Excalidraw 模板](Examples/apply_template.md)
|
||||
- [使用 Templater 创建思维导图](Examples/templater_mindmap.md)
|
||||
|
||||
- **Dataview**
|
||||
- [使用 Dataview 创建思维导图](Examples/dataviewjs_mindmap.md)
|
||||
- [使用 Dataview 创建家谱](Examples/dataviewjs_familytree.md)
|
||||
|
||||
## 支持与反馈
|
||||
|
||||
### 支持原作者
|
||||
|
||||
如果你喜欢这个插件,请通过以下方式支持:
|
||||
- 在社交媒体上分享这个插件
|
||||
- 在 Twitter 上关注作者 [@zsviczian](https://twitter.com/zsviczian)
|
||||
- 访问作者的博客 [zsolt.blog](https://zsolt.blog)
|
||||
- [赞助作者](https://ko-fi.com/zsolt)
|
||||
|
||||
[<img src="https://user-images.githubusercontent.com/14358394/115450238-f39e8100-a21b-11eb-89d0-fa4b82cdbce8.png" width="150" alt="赞助按钮">](https://ko-fi.com/zsolt)
|
||||
|
||||
### 支持中文翻译
|
||||
|
||||
如果这些中文翻译对你有帮助,欢迎通过 [爱发电](https://afdian.com/a/daomishu) 支持译者。
|
||||
91
docs/zh-cn/ea-scripts/README.md
Normal file
91
docs/zh-cn/ea-scripts/README.md
Normal file
@@ -0,0 +1,91 @@
|
||||
# Excalidraw 脚本引擎脚本库
|
||||
|
||||
> 此说明当前更新至 `768aebf`。
|
||||
|
||||
【[English](../../../ea-scripts/README.md) | 简体中文】
|
||||
|
||||
点击观看介绍视频:
|
||||
|
||||
[](https://youtu.be/hePJcObHIso)
|
||||
|
||||
> **警告**
|
||||
> 相比视频中展示的方法,现在有更简单的方式来安装/管理脚本
|
||||
|
||||
查看 [Excalidraw 脚本引擎](../../ExcalidrawScriptsEngine.md) 文档了解更多详情。
|
||||
|
||||
## 如何在 Obsidian 仓库中安装脚本
|
||||
|
||||
安装内置脚本的步骤:
|
||||
|
||||
- 在 Obsidian 中打开一个 Excalidraw 绘图
|
||||
- 在面板下拉菜单中选择"安装或更新 Excalidraw 脚本"
|
||||
- 点击其中一个可用脚本
|
||||
- 点击"安装此脚本"(注意如果脚本已经安装,你会看到更新选项)
|
||||
- 重启 Obsidian 使脚本生效
|
||||
|
||||
注意:默认情况下,脚本会被安装到你仓库中的 `Excalidraw/Scripts/Downloaded` 文件夹
|
||||
|
||||
<details><summary>手动安装脚本</summary>
|
||||
|
||||
打开你感兴趣的脚本,将其保存到你的 Obsidian 仓库中(包括第一行的 `/*`),或者在"Raw"模式下打开并将全部内容复制到 Obsidian 中。
|
||||
|
||||
|
||||
|
||||
</details>
|
||||
|
||||
## 可用脚本列表
|
||||
|
||||
|标题|描述|图标|贡献者|
|
||||
|----|----|----|----|
|
||||
|[添加连接点](../../../ea-scripts/Add%20Connector%20Point.md)|此脚本将在选中文本元素的左上角添加一个小圆圈,并将文本和"圆点"组合成一组。||[@zsviczian](https://github.com/zsviczian)|
|
||||
|[添加现有文件链接并打开](../../../ea-scripts/Add%20Link%20to%20Existing%20File%20and%20Open.md)|提示从保险库(Vault)中选择文件。为选中的元素添加指向所选文件的链接。你可以在设置中控制是在当前活动面板还是相邻面板中打开文件。|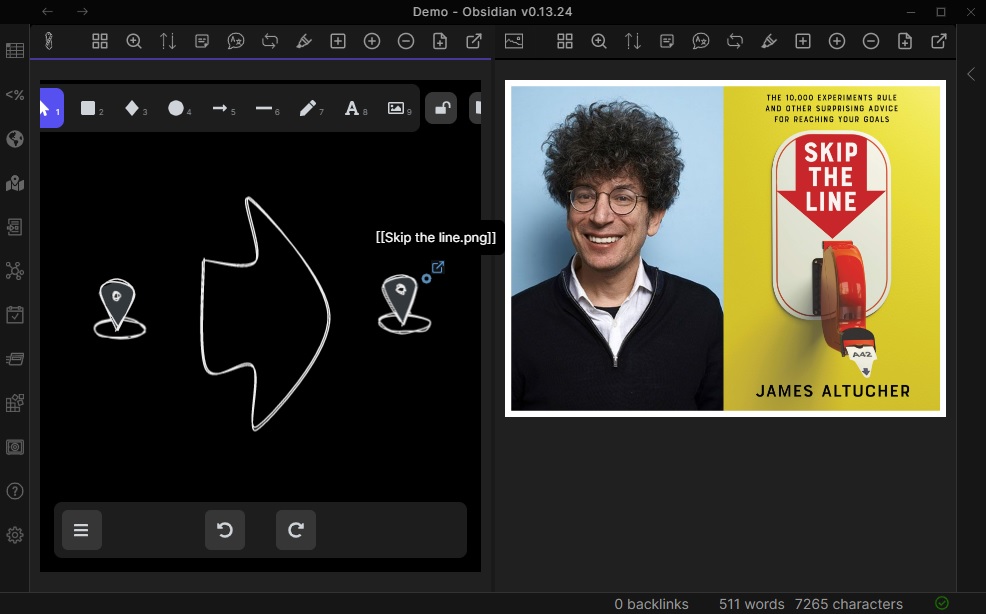|[@zsviczian](https://github.com/zsviczian)|
|
||||
|[添加新页面链接并打开](../../../ea-scripts/Add%20Link%20and%20Open%20Page.md)|提示输入文件名。提供创建和打开新的 Markdown 或 Excalidraw 文档的选项。为绘图中选中的对象添加指向新文件的链接。你可以在设置中控制是在当前活动面板或是相邻面板中打开文件。|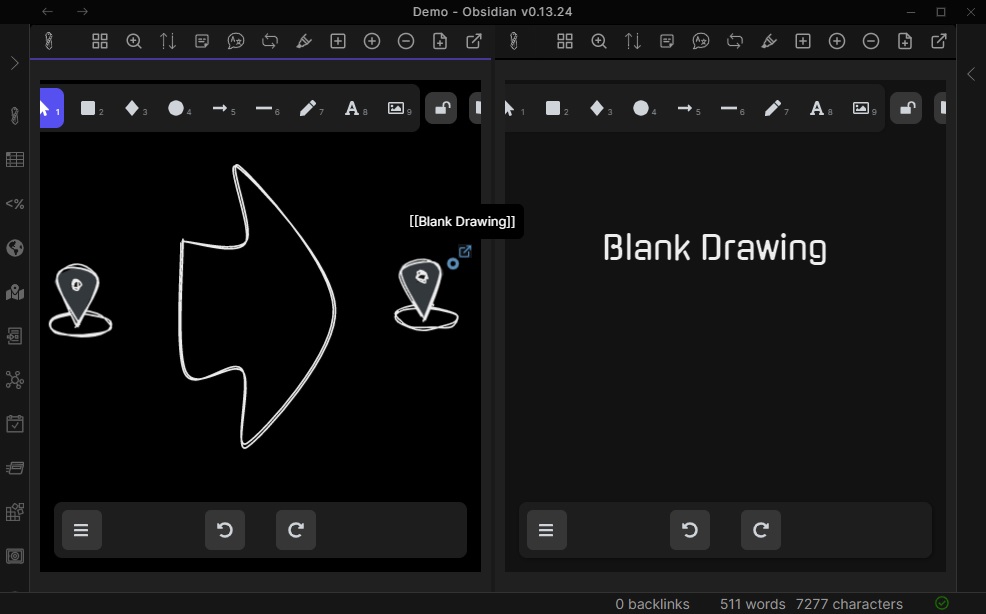|[@zsviczian](https://github.com/zsviczian)|
|
||||
|[添加流程下一步](../../../ea-scripts/Add%20Link%20to%20New%20Page%20and%20Open.md)|此脚本将提示你输入流程步骤的标题,然后创建带有该文本的便签。如果选中了某个元素,脚本将用箭头将这个新步骤与上一步骤(选中的元素)连接起来。如果没有选中元素,脚本会假定这是流程的第一步,只会输出带有输入文本的便签。|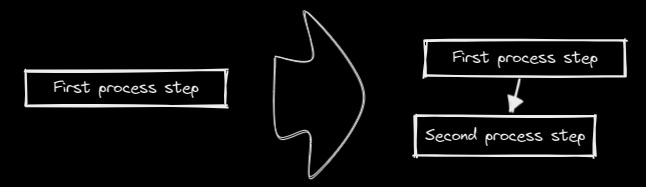|[@zsviczian](https://github.com/zsviczian)|
|
||||
|[分割椭圆](../../../ea-scripts/Boolean%20Operations.md)|使用此脚本可以对形状进行布尔运算。|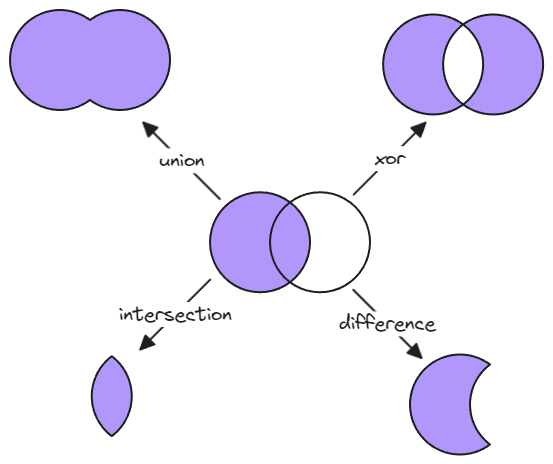|[@GColoy](https://github.com/GColoy)|
|
||||
|[为每个选中的组添加边框](../../../ea-scripts/Box%20Each%20Selected%20Groups.md)|此脚本将为 Excalidraw 中当前选中的每个组添加封装框。|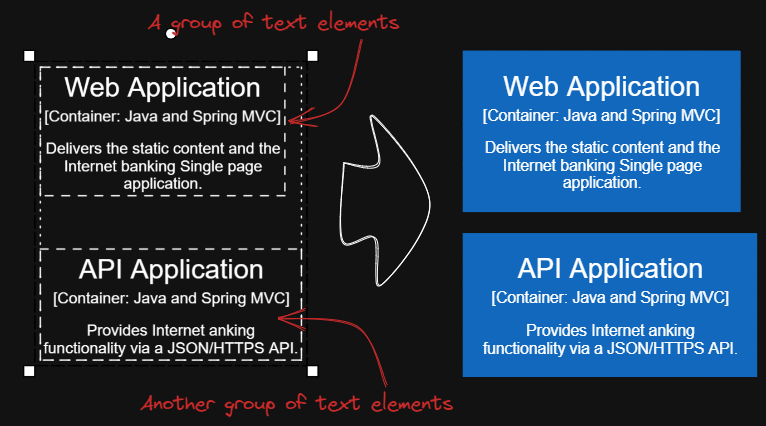|[@1-2-3](https://github.com/1-2-3)|
|
||||
|[为选中元素添加边框](../../../ea-scripts/Box%20Selected%20Elements.md)|此脚本将为 Excalidraw 中当前选中的元素添加一个封装框。||[@zsviczian](https://github.com/zsviczian)|
|
||||
|[更改选中元素的形状](../../../ea-scripts/Change%20shape%20of%20selected%20elements.md)|此脚本允许你更改选中的矩形、菱形和椭圆的形状|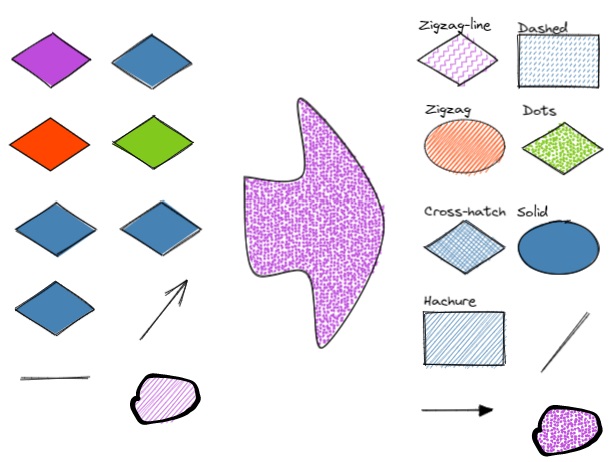|[@zsviczian](https://github.com/zsviczian)|
|
||||
|[连接元素](../../../ea-scripts/Connect%20elements.md)|此脚本将用箭头连接两个对象。如果任一对象是一组分组的元素(例如,与封装矩形分组的文本元素),脚本将识别这些组,并将箭头连接到组中最大的对象(假设你想将箭头连接到文本元素周围的框)。||[@zsviczian](https://github.com/zsviczian)|
|
||||
|[将自由绘制转换为线条](../../../ea-scripts/Convert%20freedraw%20to%20line.md)|将选中的自由绘制对象转换为可编辑的线条。这样你就可以通过拖动线条点来调整绘图,如果是封闭线条还可以选择形状填充。你可以在设置中调整转换点的密度|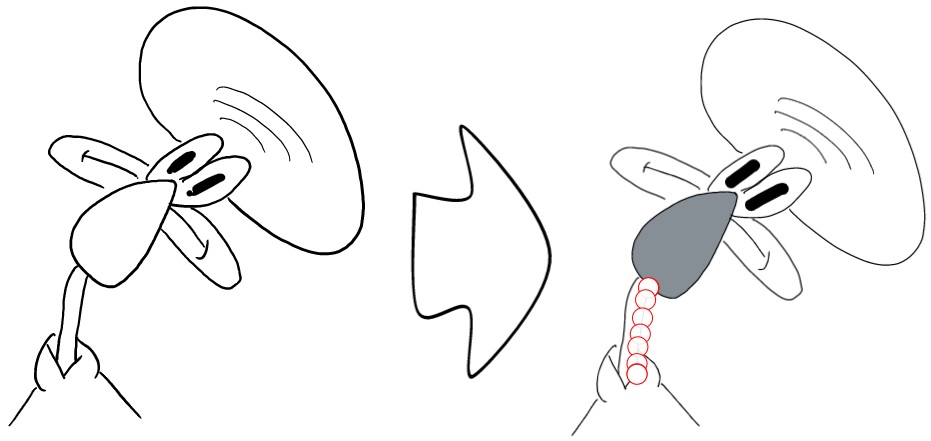|[@zsviczian](https://github.com/zsviczian)|
|
||||
|[将选中的文本元素转换为便签](../../../ea-scripts/Convert%20selected%20text%20elements%20to%20sticky%20notes.md)|将选中的纯文本元素转换为具有透明背景和透明描边颜色的便签。本质上是将文本元素转换为可换行的格式。|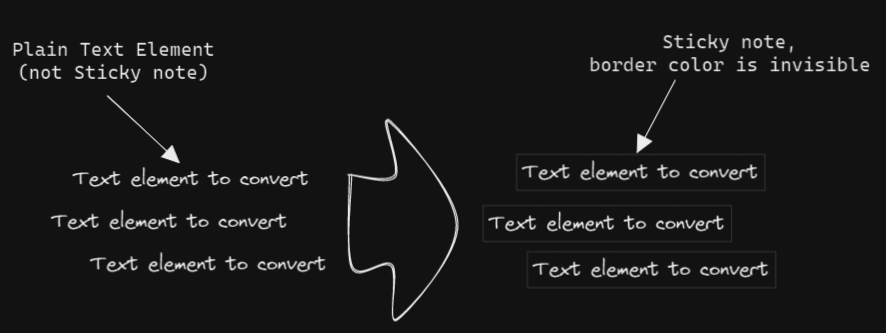|[@zsviczian](https://github.com/zsviczian)|
|
||||
|[将文本转换为带文件夹和别名的链接](../../../ea-scripts/Convert%20text%20to%20link%20with%20folder%20and%20alias.md)|将文本元素转换为指向所选文件夹中文件的链接,并将原始文本设置为别名。脚本会提示用户从保险库(Vault)中选择一个现有文件夹。|`原始文本` => `[[选定文件夹/原始文本\|原始文本]]`|[@zsviczian](https://github.com/zsviczian)|
|
||||
|[将选中元素样式复制到全局](../../../ea-scripts/Copy%20Selected%20Element%20Styles%20to%20Global)|此脚本会将任何选中元素的样式复制到 Excalidraw 的全局样式中。|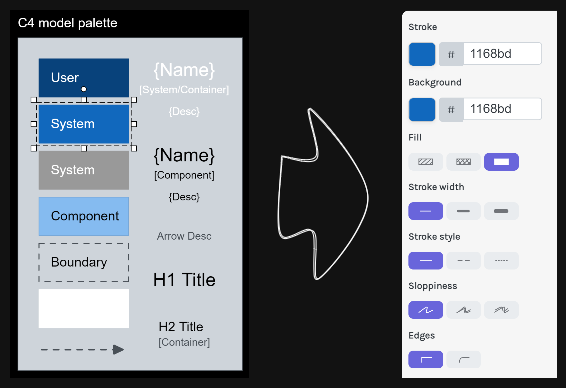|[@1-2-3](https://github.com/1-2-3)|
|
||||
|[创建新的 Markdown 文件并嵌入到当前绘图中](../../../ea-scripts/Create%20new%20markdown%20file%20and%20embed%20into%20active%20drawing.md)|此脚本会提示你输入文件名,然后创建一个具有该文件名的新 Markdown 文档,在相邻面板中打开新的 Markdown 文档,并将该 Markdown 文档嵌入到当前的 Excalidraw 绘图中。|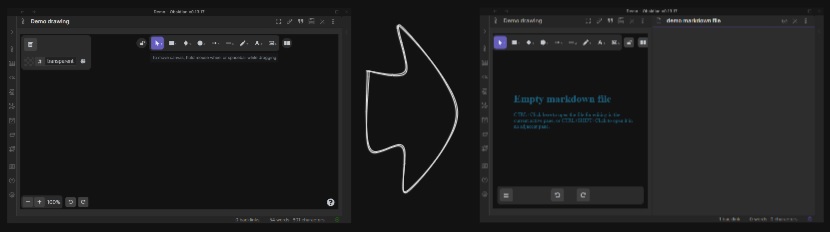|[@zsviczian](https://github.com/zsviczian)|
|
||||
|[加深背景颜色](../../../ea-scripts/Darken%20background%20color.md)|此脚本每次将选中元素的背景颜色加深 2%。你可以多次使用此脚本直到满意为止。建议为此脚本设置快捷键,这样你就可以快速尝试加深和减淡颜色效果。与"修改背景颜色不透明度"脚本相比,其优点是元素的背景颜色不受画布颜色影响,并且颜色值不会以奇怪的 rgba() 形式出现。|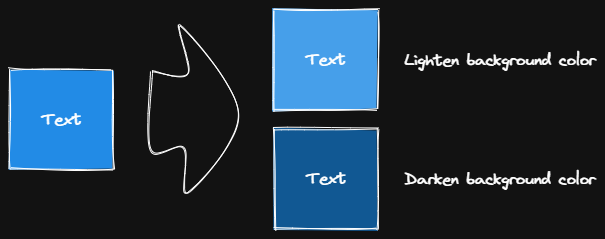|[@1-2-3](https://github.com/1-2-3)|
|
||||
|[肘形连接器](../../../ea-scripts/Elbow%20connectors.md)|此脚本将选中的连接器转换为肘形。|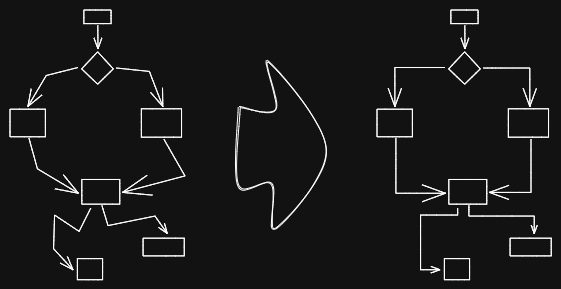|[@1-2-3](https://github.com/1-2-3)|
|
||||
|[水平扩展矩形并保持文本居中](../../../ea-scripts/Expand%20rectangles%20horizontally%20keep%20text20%centered.md)|此脚本会扩展选中矩形的宽度,直到它们都具有相同的宽度,并保持文本居中。||[@1-2-3](https://github.com/1-2-3)|
|
||||
|[水平扩展矩形](../../../ea-scripts/Expand%20rectangles%20horizontally.md)|此脚本会扩展选中矩形的宽度,直到它们都具有相同的宽度。||[@1-2-3](https://github.com/1-2-3)|
|
||||
|[垂直扩展矩形并保持文本居中](../../../ea-scripts/Expand%20rectangles%20vertically%20keep%20text%20centered.md)|此脚本会扩展选中矩形的高度,直到它们都具有相同的高度,并保持文本居中。||[@1-2-3](https://github.com/1-2-3)|
|
||||
|[垂直扩展矩形](../../../ea-scripts/Expand%20rectangles%20vertically.md)|此脚本会扩展选中矩形的高度,直到它们都具有相同的高度。||[@1-2-3](https://github.com/1-2-3)|
|
||||
|[固定中心点水平距离](../../../ea-scripts/Fixed%20horizontal%20distance%20between%20centers.md)|此脚本会以固定的中心点间距水平排列选中的元素。|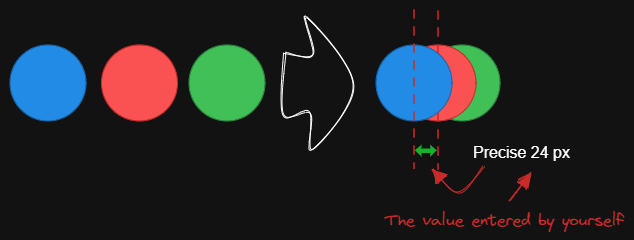|[@1-2-3](https://github.com/1-2-3)|
|
||||
|[固定内部距离](../../../ea-scripts/Fixed%20inner%20distance.md)|此脚本会以固定的内部距离排列选中的元素和组。||[@1-2-3](https://github.com/1-2-3)|
|
||||
|[固定间距](../../../ea-scripts/Fixed%20spacing.md)|此脚本会以固定的间距水平排列选中的元素。当我们创建架构图或思维导图时,经常需要以固定间距排列大量元素。"固定间距"和"固定垂直距离"脚本可以为我们节省大量时间。|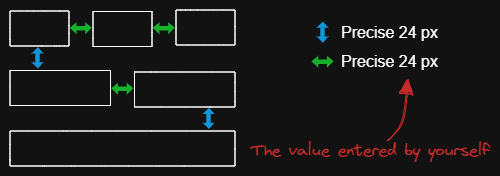|[@1-2-3](https://github.com/1-2-3)|
|
||||
|[固定中心点垂直距离](../../../ea-scripts/Fixed%20vertical%20distance%20between%20centers.md)|此脚本会以固定的中心点间距垂直排列选中的元素。|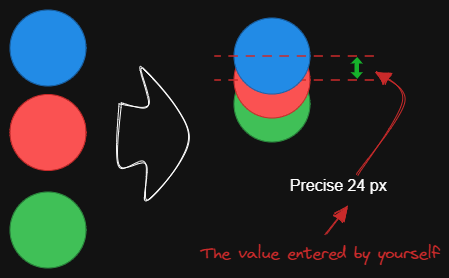|[@1-2-3](https://github.com/1-2-3)|
|
||||
|[固定垂直距离](../../../ea-scripts/Fixed%20vertical%20distance.md)|此脚本会以固定间距垂直排列选中的元素。当我们创建架构图或思维导图时,经常需要以固定间距排列大量元素。`固定间距`和`固定垂直距离`脚本可以为我们节省大量时间。|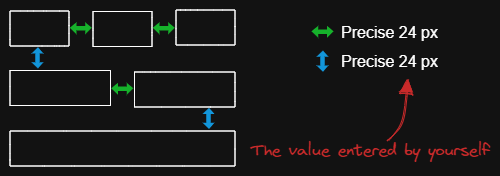|[@1-2-3](https://github.com/1-2-3)|
|
||||
|[减淡背景颜色](../../../ea-scripts/Lighten%20background%20color.md)|此脚本每次将选中元素的背景颜色减淡 2%。你可以多次使用此脚本直到满意为止。建议为此脚本设置快捷键,这样你就可以快速尝试加深和减淡颜色效果。与"修改背景颜色不透明度"脚本相比,其优点是元素的背景颜色不受画布颜色影响,并且颜色值不会以奇怪的 rgba() 形式出现。||[@1-2-3](https://github.com/1-2-3)|
|
||||
|[思维导图连接器](../../../ea-scripts/Mindmap%20connector.md)|此脚本为选中的元素创建类似思维导图的连线(目前仅支持右侧和向下方向)。连线的起点将根据元素的创建时间确定。因此你应该先创建标题元素。|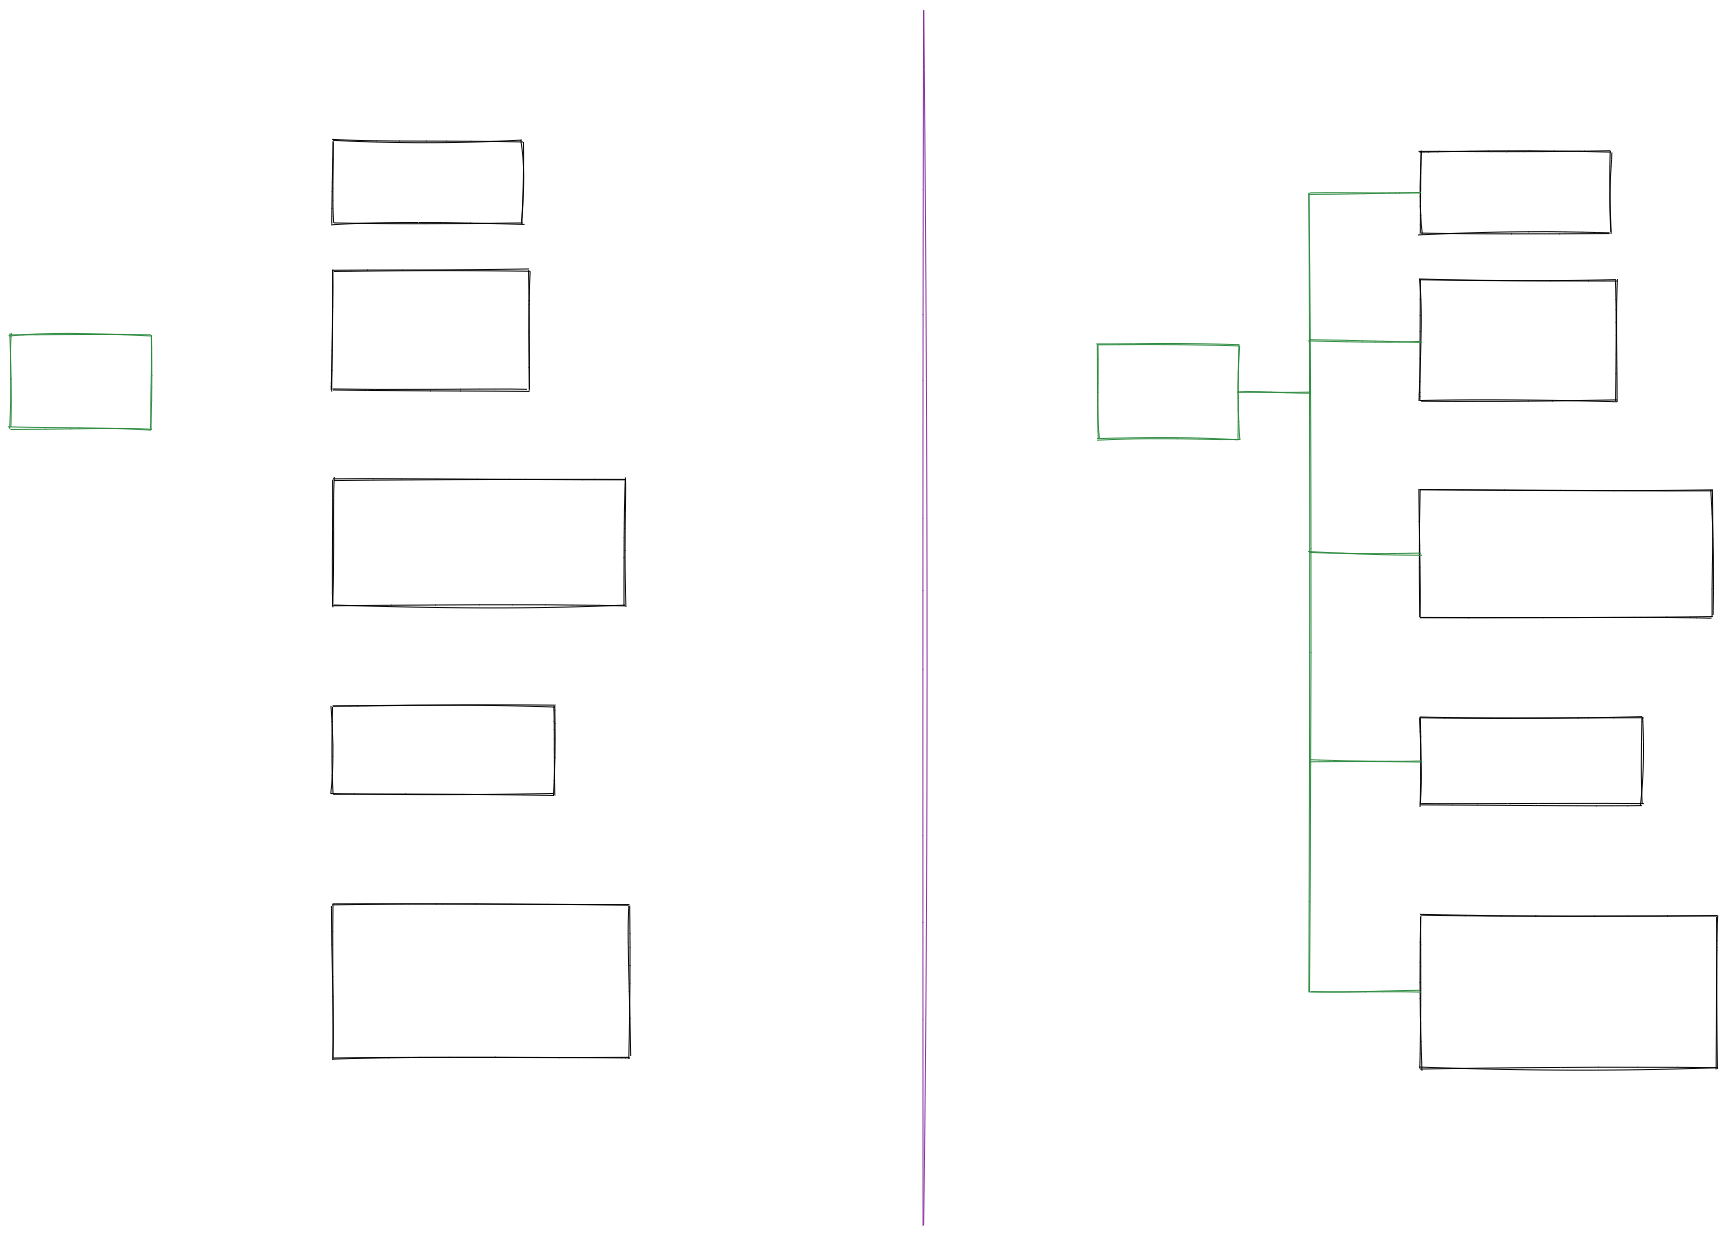|[@xllowl](https://github.com/xllowl)|
|
||||
|[修改背景颜色不透明度](../../../ea-scripts/Modify%20background%20color%20opacity.md)|此脚本会更改选中框的背景颜色不透明度。Excalidraw 中的默认背景颜色太深,导致文字难以阅读。你可以通过设置透明度来使颜色变浅。你可以反复调整透明度直到满意为止。虽然 Excalidraw 在其原生属性设置中有不透明度选项,但它也会改变边框的透明度。使用此脚本可以只更改背景颜色的不透明度而不影响边框。|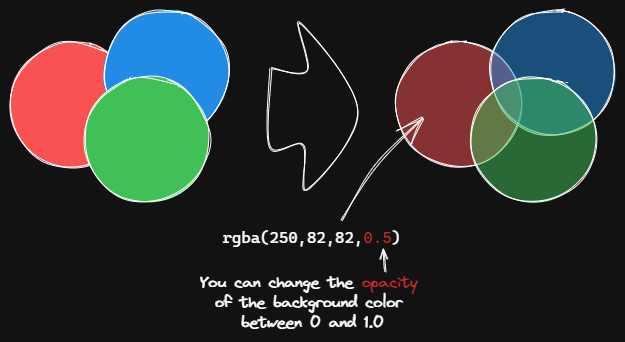|[@1-2-3](https://github.com/1-2-3)|
|
||||
|[标准化选中箭头](../../../ea-scripts/Normalize%20Selected%20Arrows.md)|此脚本将重置选中箭头的起点和终点位置。箭头将指向连接框的中心,并与框保持 8px 的间距。|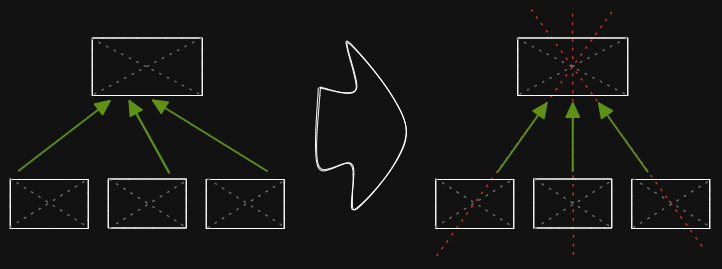|[@1-2-3](https://github.com/1-2-3)|
|
||||
|[OCR - 光学字符识别](../../../ea-scripts/OCR%20-%20Optical%20Character%20Recognition.md)|此脚本将 1) 把选中的图片文件发送到 [taskbone.com](https://taskbone.com) 提取图片中的文字,并 2) 将文字作为文本元素添加到你的绘图中。|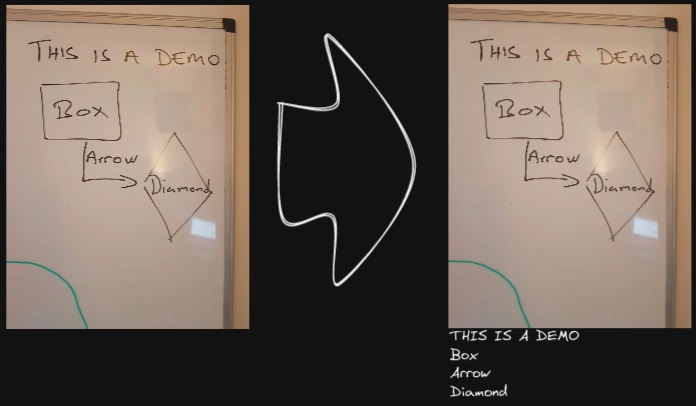|[@zsviczian](https://github.com/zsviczian)|
|
||||
|[有机线条](../../../ea-scripts/Organic%20Line.md)|将选中的自由绘制线条转换为从开始到结束笔压逐渐减小的线条。转换后的线条会被放置在图层的最底层,位于所有其他元素之下。在绘制有机思维导图时很有帮助。|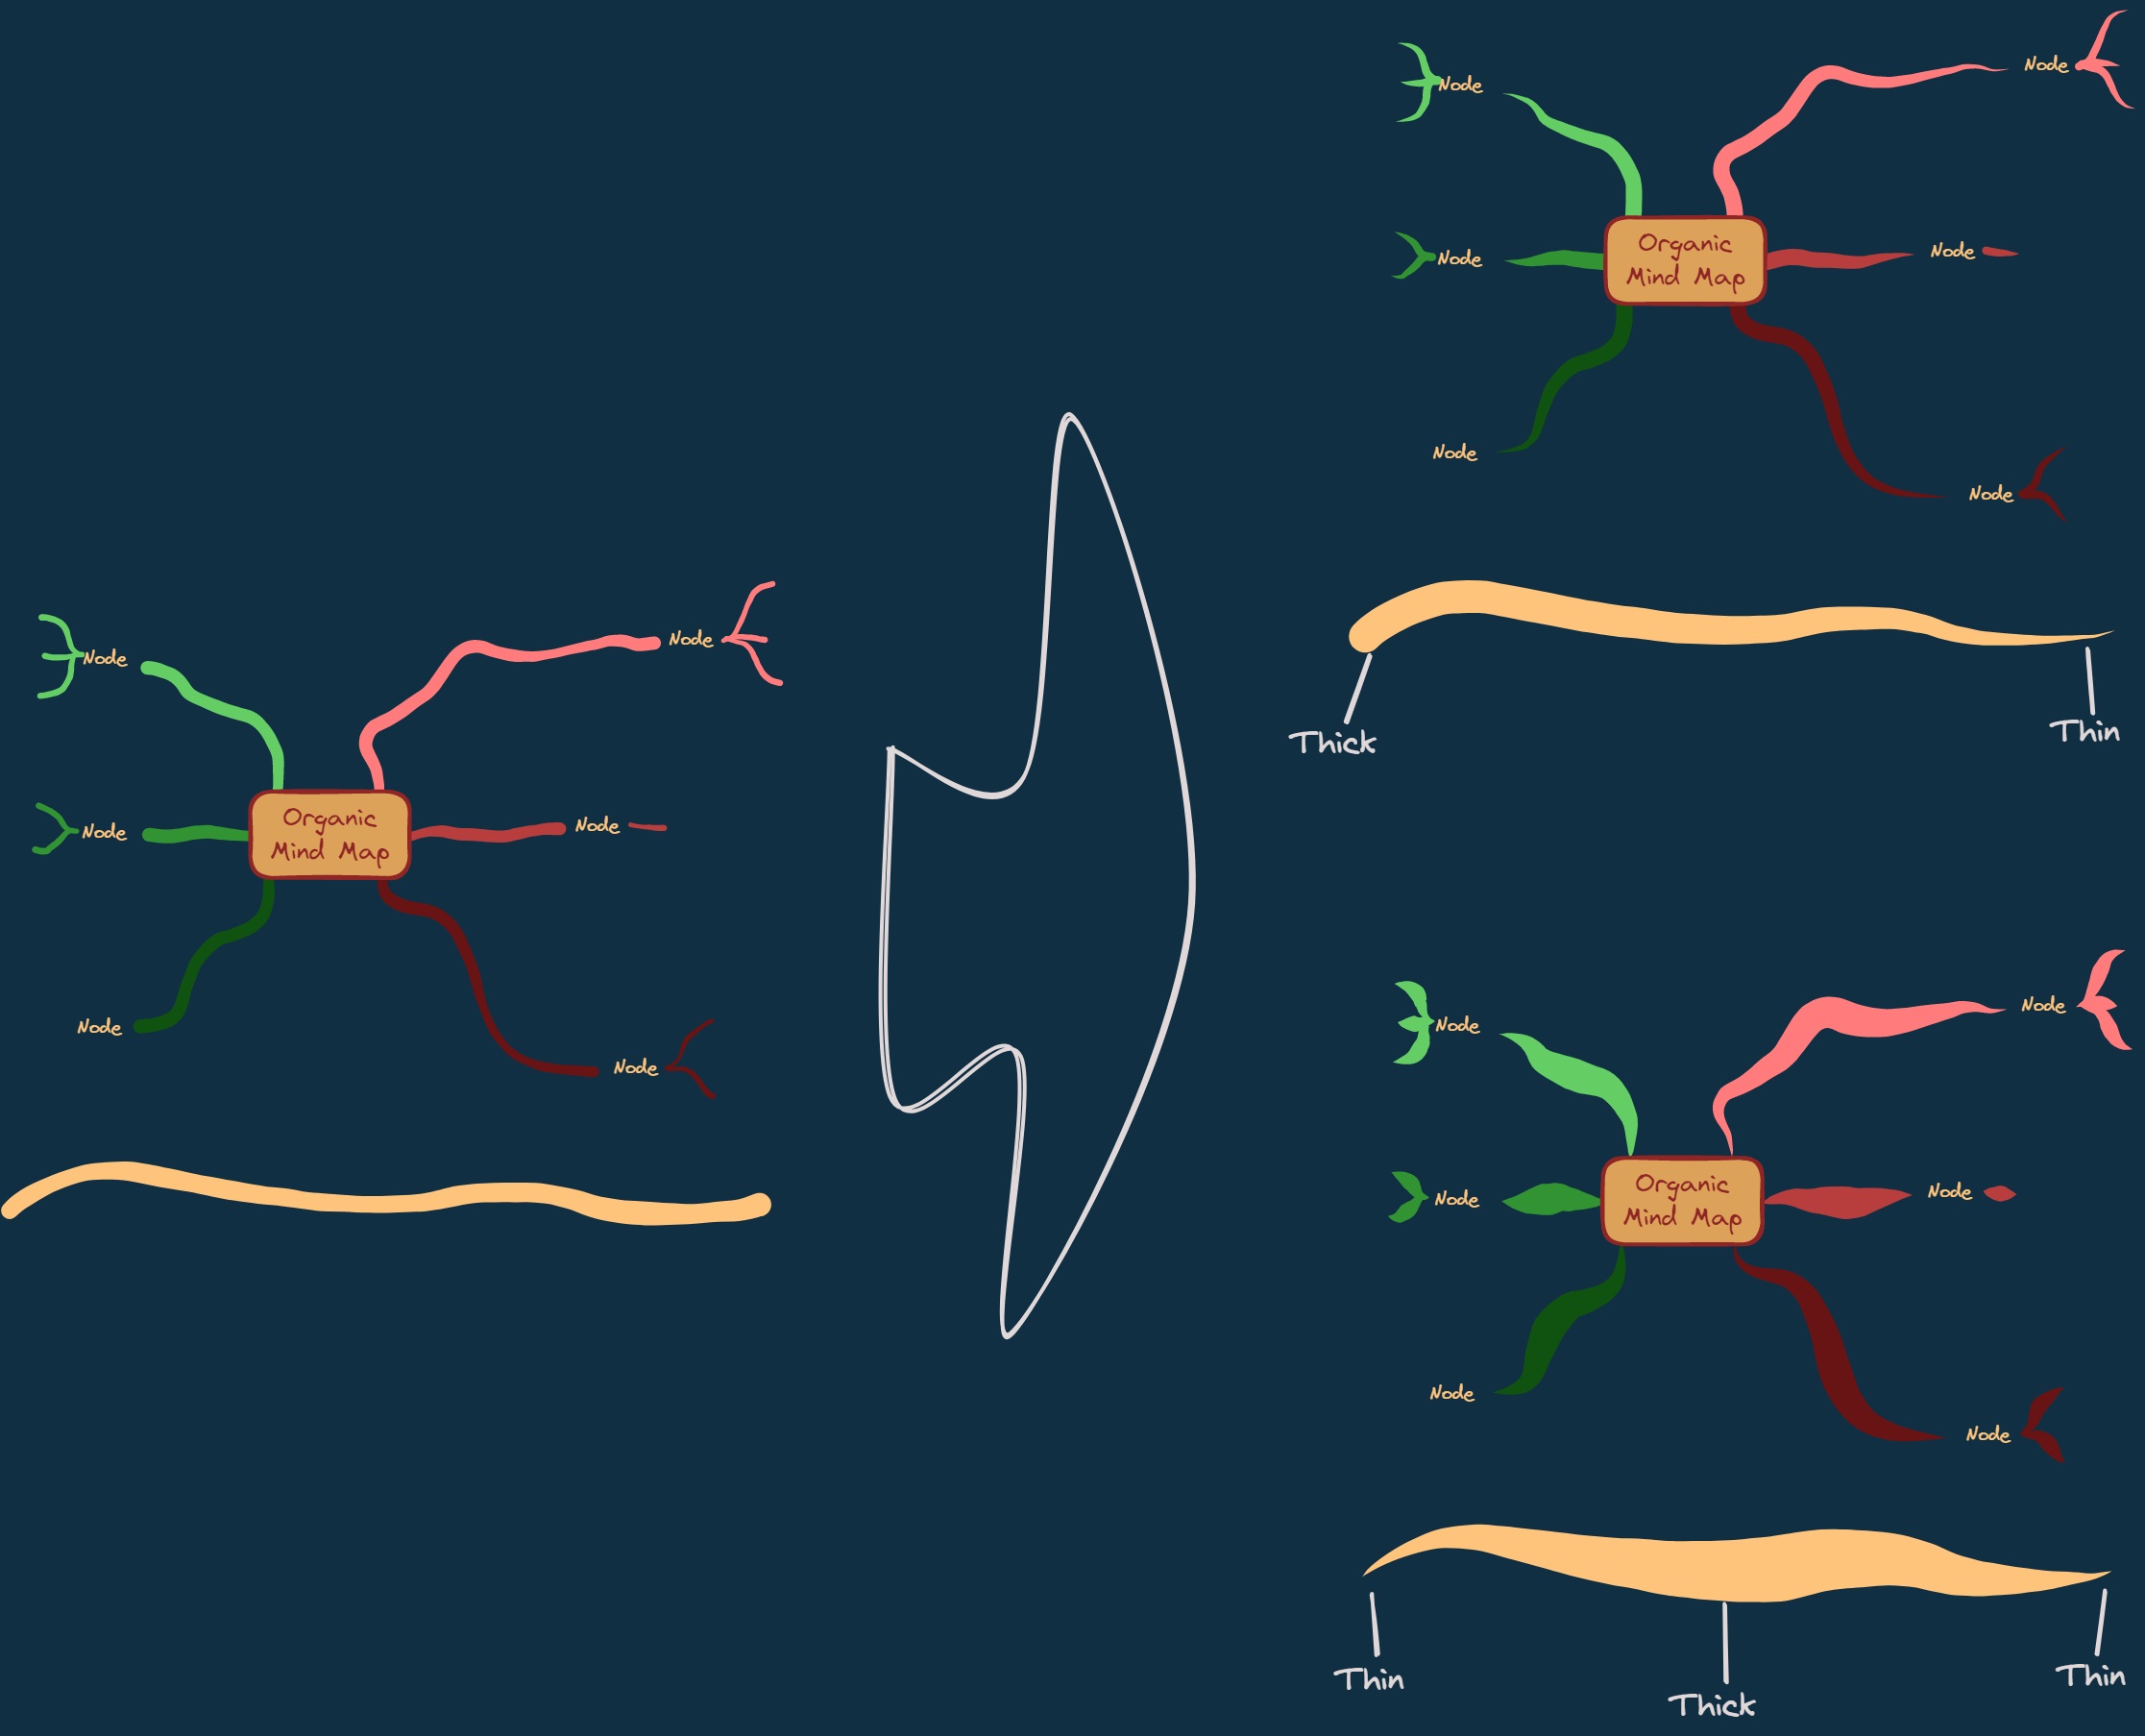|[@zsviczian](https://github.com/zsviczian)|
|
||||
|[重复元素](../../../ea-scripts/Repeat%20Elements.md)|此脚本会检测两个选中元素之间的差异,包括位置、大小、角度、描边和背景颜色,并根据用户输入的重复次数创建多个具有相同差异的元素。|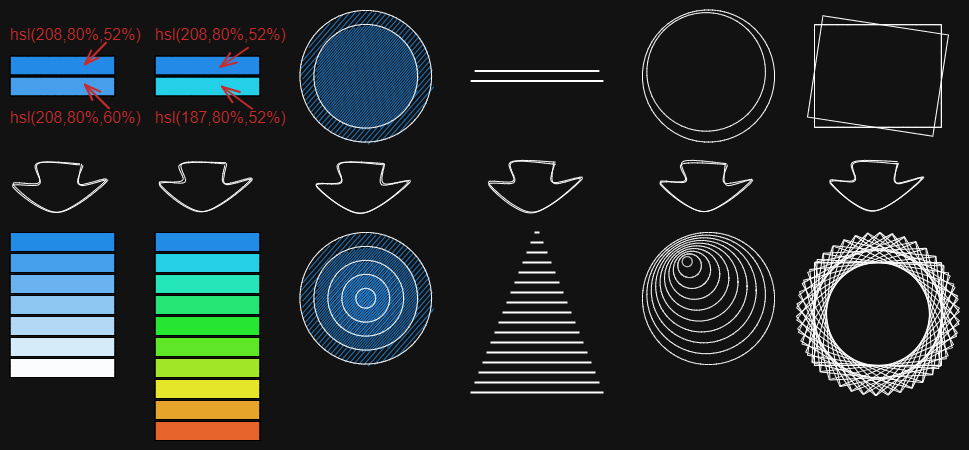|[@1-2-3](https://github.com/1-2-3)|
|
||||
|[重置 LaTeX 大小](../../../ea-scripts/Reset%20LaTeX%20Size.md)|将嵌入的 LaTeX 公式大小重置为默认大小或默认大小的倍数。||[@firai](https://github.com/firai)|
|
||||
|[反转箭头](../../../ea-scripts/Reverse%20arrows.md)|反转选中元素范围内的**箭头**方向。||[@zsviczian](https://github.com/zsviczian)|
|
||||
|[手写助手](../../../ea-scripts/Scribble%20Helper.md)|iOS 手写助手,用于改善文本元素的手写体验。如果没有选中元素,则会在指针位置创建一个文本元素,你可以使用编辑框通过手写来修改文本。如果选中了文本元素,则会打开输入提示框,你可以在其中通过手写修改文本。||[@zsviczian](https://github.com/zsviczian)|
|
||||
|[选择特定类型元素](../../../ea-scripts/Select%20Elements%20of%20Type.md)|显示当前图像中不同元素类型的列表供选择。只有选定类型的元素会在画布上被选中。如果运行脚本时没有选中任何元素,则脚本会处理画布上的所有元素。如果执行脚本时已选中某些元素,则脚本只会处理这些选中的元素。<br>此脚本在以下情况下很有用,例如,当你想要将所有箭头置于顶层,或想要更改所有文本元素的颜色等。||[@zsviczian](https://github.com/zsviczian)|
|
||||
|[通过添加阴影克隆为未闭合线条对象设置背景颜色](../../../ea-scripts/Set%20background%20color%20of%20unclosed%20line%20object%20by%20adding%20a%20shadow%20clone.md)|使用此脚本为未闭合(即开放)线条对象设置背景颜色,方法是创建对象的克隆。脚本会将克隆的描边颜色设置为透明,并添加一条直线来闭合对象。使用设置来定义默认背景颜色、填充样式和克隆的描边宽度。默认情况下,克隆会与原始对象组合在一起,你也可以在设置中禁用此功能。||[@zsviczian](https://github.com/zsviczian)|
|
||||
|[设置尺寸](../../../ea-scripts/Set%20Dimensions.md)|目前在 Excalidraw 中无法指定对象的确切位置和大小。你可以使用这个简单的脚本来弥补这个不足。||[@zsviczian](https://github.com/zsviczian)|
|
||||
|[设置字体](../../../ea-scripts/Set%20Font%20Family.md)|设置文本块的字体(Virgil、Helvetica、Cascadia)。如果你想为选择字体设置键盘快捷键,这个脚本很有用。||[@zsviczian](https://github.com/zsviczian)|
|
||||
|[设置网格](../../../ea-scripts/Set%20Grid.md)|Excalidraw 中的默认网格大小是 20。目前无法通过用户界面更改网格大小。这个脚本提供了一种方法来弥补这个不足。||[@zsviczian](https://github.com/zsviczian)|
|
||||
|[设置链接别名](../../../ea-scripts/Set20%Link20%Alias.md)|遍历选中文本元素中的所有链接,并提示用户为每个找到的链接设置或修改别名。|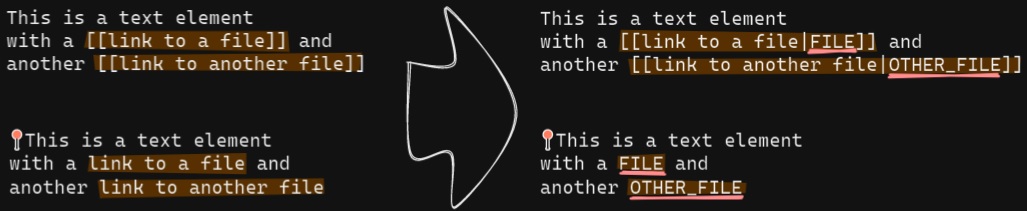|[@zsviczian](https://github.com/zsviczian)|
|
||||
|[设置选中元素的描边宽度](../../../ea-scripts/Set%20Stroke%20Width%20of%20Selected%20Elements.md)|此脚本将设置选中元素的描边宽度。这在缩放自由绘制草图并想要减小或增加其线条宽度时很有用。||[@zsviczian](https://github.com/zsviczian)|
|
||||
|[按行分割文本](../../../ea-scripts/Split%20text%20by%20lines.md)|将文本行分割成单独的文本元素,以便更容易重新组织||[@zsviczian](https://github.com/zsviczian)|
|
||||
|[设置文本对齐方式](../../../ea-scripts/Set%20Text%20Alignment.md)|设置文本块的对齐方式(居中、右对齐、左对齐)。如果你想为选择文本对齐方式设置键盘快捷键,这个脚本很有用。||[@zsviczian](https://github.com/zsviczian)|
|
||||
|[分割椭圆](../../../ea-scripts/Split%20Ellipse.md)|此脚本会在线条与椭圆相交的任何点处分割椭圆。|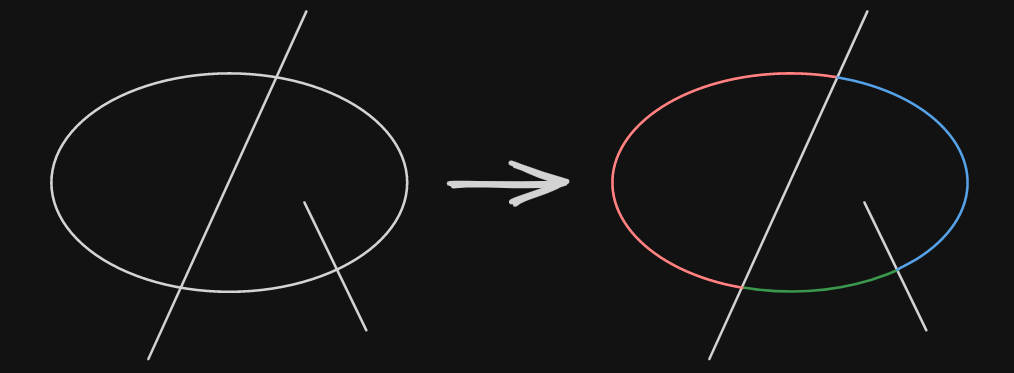|[@GColoy](https://github.com/GColoy)|
|
||||
|[TheBrain导航](../../../ea-scripts/TheBrain-navigation.md)|基于Excalidraw的保险库(Vault)图形用户界面。需要[Dataview插件](https://github.com/blacksmithgu/obsidian-dataview)。生成类似于[TheBrain](https://TheBrain.com)的图形视图。在[YouTube](https://youtu.be/plYobK-VufM)上观看此脚本的介绍。|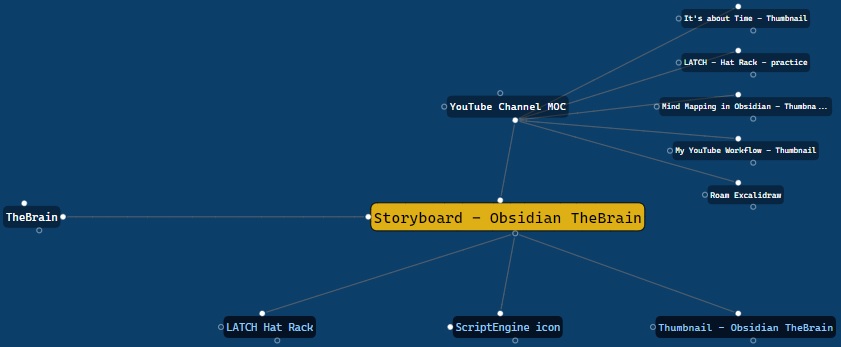|[@zsviczian](https://github.com/zsviczian)|
|
||||
|[移动端切换全屏](../../../ea-scripts/Toggle%20Fullscreen%20on%20Mobile.md)|隐藏Obsidian工作区叶片填充和标题(基于设置中的选项,默认"隐藏标题"=false),这将使Excalidraw全屏显示。⚠ 注意,如果标题不可见,将很难调用命令面板来结束全屏。只有在你有键盘或已经练习过打开命令面板的情况下才隐藏标题!|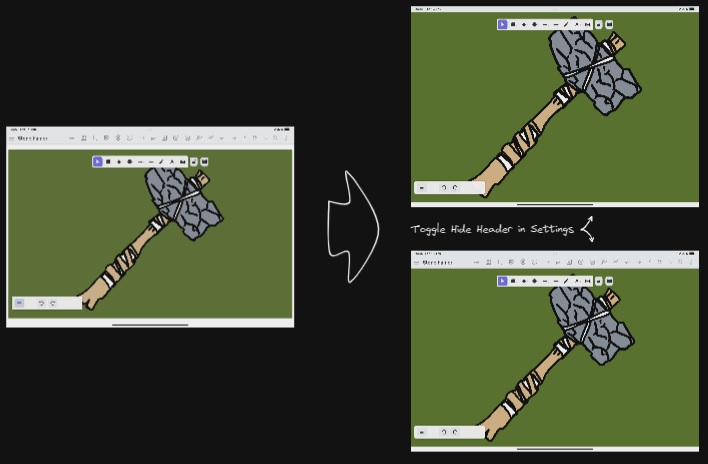|[@zsviczian](https://github.com/zsviczian)|
|
||||
|[切换网格](../../../ea-scripts/Toggle%20Grid.md)|切换网格的显示与隐藏。||[@GColoy](https://github.com/GColoy)|
|
||||
|[将文本元素转移到Excalidraw markdown元数据](../../../ea-scripts/Transfer%20TextElements%20to%20Excalidraw%20markdown%20metadata.md)|此脚本将从画布中删除选中的文本元素,并将这些文本元素中的文本复制到Excalidraw markdown文件的元数据中。这意味着,文本将不再在绘图中可见,但你可以在Obsidian中搜索文本并找到包含此图像的绘图。||[@zsviczian](https://github.com/zsviczian)|
|
||||
|[缩放以适应选中元素](../../../ea-scripts/Zoom%20to%20Fit%20Selected%20Elements.md)|类似于Excalidraw标准的<kbd>SHIFT+2</kbd>功能:缩放以适应选中元素,但可以缩放到1000%。灵感来源:[#272](https://github.com/zsviczian/obsidian-excalidraw-plugin/issues/272)||[@zsviczian](https://github.com/zsviczian)|
|
||||
|[硬件橡皮擦支持](../../../ea-scripts/Hardware%20Eraser%20Support.md)|允许在支持的笔上使用笔反转/硬件橡皮擦。|[@threethan](https://github.com/threethan)|
|
||||
|[笔的自动绘制](../../../ea-scripts/Auto%20Draw%20for%20Pen.md)|当悬停笔时自动从选择工具切换到绘制工具,然后再切换回来。|[@threethan](https://github.com/threethan)|
|
||||
@@ -1,4 +1,7 @@
|
||||
# Excalidraw Script Engine scripts library
|
||||
|
||||
【English | [简体中文](../docs/zh-cn/ea-scripts/README.md)】
|
||||
|
||||
Click to watch the intro video:
|
||||
|
||||
[](https://youtu.be/hePJcObHIso)
|
||||
|
||||
@@ -1,7 +1,7 @@
|
||||
{
|
||||
"id": "obsidian-excalidraw-plugin",
|
||||
"name": "Excalidraw",
|
||||
"version": "2.9.2",
|
||||
"version": "2.10.0",
|
||||
"minAppVersion": "1.1.6",
|
||||
"description": "An Obsidian plugin to edit and view Excalidraw drawings",
|
||||
"author": "Zsolt Viczian",
|
||||
|
||||
@@ -23,7 +23,7 @@
|
||||
"license": "MIT",
|
||||
"dependencies": {
|
||||
"@popperjs/core": "^2.11.8",
|
||||
"@zsviczian/excalidraw": "0.18.0-3",
|
||||
"@zsviczian/excalidraw": "0.18.0-6",
|
||||
"chroma-js": "^2.4.2",
|
||||
"clsx": "^2.0.0",
|
||||
"@zsviczian/colormaster": "^1.2.2",
|
||||
|
||||
@@ -30,7 +30,7 @@ export default {
|
||||
"脚本已是最新 - 点击重新安装",
|
||||
OPEN_AS_EXCALIDRAW: "打开为 Excalidraw 绘图",
|
||||
TOGGLE_MODE: "在 Excalidraw 和 Markdown 模式之间切换",
|
||||
DUPLICATE_IMAGE : "复制选定的图像,并分配一个不同的图像 ID",
|
||||
DUPLICATE_IMAGE: "复制选定的图像,并分配一个不同的图像 ID",
|
||||
CONVERT_NOTE_TO_EXCALIDRAW: "转换:空白 Markdown 文档 => Excalidraw 绘图文件",
|
||||
CONVERT_EXCALIDRAW: "转换: *.excalidraw => *.md",
|
||||
CREATE_NEW: "新建绘图文件",
|
||||
@@ -58,8 +58,8 @@ export default {
|
||||
NEW_IN_POPOUT_WINDOW_EMBED: "新建绘图 - 于新窗口 - 并将其嵌入(形如 ![[drawing]])到当前 Markdown 文档中",
|
||||
TOGGLE_LOCK: "文本元素:原文模式(RAW)⟺ 预览模式(PREVIEW)",
|
||||
DELETE_FILE: "从库中删除所选图像(或以图像形式嵌入绘图中的 Markdown)的源文件",
|
||||
COPY_ELEMENT_LINK: "复制所选元素的链接(形如 [[file#^id]]])",
|
||||
COPY_DRAWING_LINK: "复制绘图的嵌入链接(形如 ![[darwing]])",
|
||||
COPY_ELEMENT_LINK: "复制所选元素的链接(形如 [[file#^id]])",
|
||||
COPY_DRAWING_LINK: "复制绘图的嵌入链接(形如 ![[drawing]])",
|
||||
INSERT_LINK_TO_ELEMENT:
|
||||
`复制所选元素为内部链接(形如 [[file#^id]] )。\n按住 ${labelCTRL()} 可复制元素所在分组为内部链接(形如 [[file#^group=id]] )。\n按住 ${labelSHIFT()} 可复制所选元素所在区域为内部链接(形如 [[file#^area=id]] )。`,
|
||||
INSERT_LINK_TO_ELEMENT_GROUP:
|
||||
@@ -91,15 +91,15 @@ export default {
|
||||
`插入 LaTeX 公式(例如:\\binom{n}{k} = \\frac{n!}{k!(n-k)!})。`,
|
||||
ENTER_LATEX: "输入 LaTeX 表达式",
|
||||
READ_RELEASE_NOTES: "阅读本插件的更新说明",
|
||||
RUN_OCR: "OCR 完整画布:识别涂鸦和图片里的文本并复制到剪贴板和文档属性中",
|
||||
RERUN_OCR: "重新运行 OCR 完整画笔:识别涂鸦和图片里的文本并复制到剪贴板和文档属性中",
|
||||
RUN_OCR: "OCR 整个画布:识别涂鸦和图片里的文本并复制到剪贴板和文档属性中",
|
||||
RERUN_OCR: "重新 OCR 整个画布:识别涂鸦和图片里的文本并复制到剪贴板和文档属性中",
|
||||
RUN_OCR_ELEMENTS: "OCR 选中的元素:识别涂鸦和图片里的文本并复制到剪贴板",
|
||||
TRAY_MODE: "绘图工具属性页:面板模式 ⟺ 托盘模式",
|
||||
SEARCH: "搜索文本",
|
||||
CROP_PAGE: "对所选页面裁剪并添加蒙版",
|
||||
CROP_IMAGE: "对图片裁剪并添加蒙版",
|
||||
ANNOTATE_IMAGE : "在 Excalidraw 中标注图像",
|
||||
INSERT_ACTIVE_PDF_PAGE_AS_IMAGE: "将当前激活的的 PDF 页面作为图片插入",
|
||||
INSERT_ACTIVE_PDF_PAGE_AS_IMAGE: "将当前激活的 PDF 页面作为图片插入",
|
||||
RESET_IMG_TO_100: "重置图像元素的尺寸为 100%",
|
||||
RESET_IMG_ASPECT_RATIO: "重置所选图像元素的纵横比",
|
||||
TEMPORARY_DISABLE_AUTOSAVE: "临时禁用自动保存功能,直到本次 Obsidian 退出(小白慎用!)",
|
||||
@@ -1013,86 +1013,86 @@ FILENAME_HEAD: "文件名",
|
||||
|
||||
// 导出对话框
|
||||
// 对话框和标签页
|
||||
EXPORTDIALOG_TITLE : "导出图形",
|
||||
EXPORTDIALOG_TAB_IMAGE : "图像",
|
||||
EXPORTDIALOG_TAB_PDF : "PDF",
|
||||
EXPORTDIALOG_TITLE: "导出图形",
|
||||
EXPORTDIALOG_TAB_IMAGE: "图像",
|
||||
EXPORTDIALOG_TAB_PDF: "PDF",
|
||||
// 设置持久化
|
||||
EXPORTDIALOG_SAVE_SETTINGS : "将图像设置保存到文件 doc.properties 吗?",
|
||||
EXPORTDIALOG_SAVE_SETTINGS_SAVE : "保存为预设",
|
||||
EXPORTDIALOG_SAVE_SETTINGS_ONETIME : "仅本次使用",
|
||||
EXPORTDIALOG_SAVE_SETTINGS: "将图像设置保存到文件 doc.properties 吗?",
|
||||
EXPORTDIALOG_SAVE_SETTINGS_SAVE: "保存为预设",
|
||||
EXPORTDIALOG_SAVE_SETTINGS_ONETIME: "仅本次使用",
|
||||
// 图像设置
|
||||
EXPORTDIALOG_IMAGE_SETTINGS : "图像",
|
||||
EXPORTDIALOG_IMAGE_DESC : "PNG 支持透明。外部文件可以包含 Excalidraw 场景数据。",
|
||||
EXPORTDIALOG_PADDING : "边距",
|
||||
EXPORTDIALOG_SCALE : "缩放",
|
||||
EXPORTDIALOG_CURRENT_PADDING : "当前边距:",
|
||||
EXPORTDIALOG_SIZE_DESC : "缩放会影响输出大小",
|
||||
EXPORTDIALOG_SCALE_VALUE : "缩放:",
|
||||
EXPORTDIALOG_IMAGE_SIZE : "大小:",
|
||||
EXPORTDIALOG_IMAGE_SETTINGS: "图像",
|
||||
EXPORTDIALOG_IMAGE_DESC: "PNG 支持透明。外部文件可以包含 Excalidraw 场景数据。",
|
||||
EXPORTDIALOG_PADDING: "边距",
|
||||
EXPORTDIALOG_SCALE: "缩放",
|
||||
EXPORTDIALOG_CURRENT_PADDING: "当前边距:",
|
||||
EXPORTDIALOG_SIZE_DESC: "缩放会影响输出大小",
|
||||
EXPORTDIALOG_SCALE_VALUE: "缩放:",
|
||||
EXPORTDIALOG_IMAGE_SIZE: "大小:",
|
||||
// 主题和背景
|
||||
EXPORTDIALOG_EXPORT_THEME : "主题",
|
||||
EXPORTDIALOG_THEME_LIGHT : "浅色",
|
||||
EXPORTDIALOG_THEME_DARK : "深色",
|
||||
EXPORTDIALOG_BACKGROUND : "背景",
|
||||
EXPORTDIALOG_BACKGROUND_TRANSPARENT : "透明",
|
||||
EXPORTDIALOG_BACKGROUND_USE_COLOR : "使用场景颜色",
|
||||
EXPORTDIALOG_EXPORT_THEME: "主题",
|
||||
EXPORTDIALOG_THEME_LIGHT: "浅色",
|
||||
EXPORTDIALOG_THEME_DARK: "深色",
|
||||
EXPORTDIALOG_BACKGROUND: "背景",
|
||||
EXPORTDIALOG_BACKGROUND_TRANSPARENT: "透明",
|
||||
EXPORTDIALOG_BACKGROUND_USE_COLOR: "使用场景颜色",
|
||||
// 选择
|
||||
EXPORTDIALOG_SELECTED_ELEMENTS : "导出",
|
||||
EXPORTDIALOG_SELECTED_ALL : "整个场景",
|
||||
EXPORTDIALOG_SELECTED_SELECTED : "仅选中部分",
|
||||
EXPORTDIALOG_SELECTED_ELEMENTS: "导出",
|
||||
EXPORTDIALOG_SELECTED_ALL: "整个场景",
|
||||
EXPORTDIALOG_SELECTED_SELECTED: "仅选中部分",
|
||||
// 导出选项
|
||||
EXPORTDIALOG_EMBED_SCENE : "包含场景数据吗?",
|
||||
EXPORTDIALOG_EMBED_YES : "是",
|
||||
EXPORTDIALOG_EMBED_NO : "否",
|
||||
EXPORTDIALOG_EMBED_SCENE: "包含场景数据吗?",
|
||||
EXPORTDIALOG_EMBED_YES: "是",
|
||||
EXPORTDIALOG_EMBED_NO: "否",
|
||||
// PDF 设置
|
||||
EXPORTDIALOG_PDF_SETTINGS : "PDF",
|
||||
EXPORTDIALOG_PAGE_SIZE : "页面大小",
|
||||
EXPORTDIALOG_PAGE_ORIENTATION : "方向",
|
||||
EXPORTDIALOG_ORIENTATION_PORTRAIT : "纵向",
|
||||
EXPORTDIALOG_ORIENTATION_LANDSCAPE : "横向",
|
||||
EXPORTDIALOG_PDF_FIT_TO_PAGE : "页面适配",
|
||||
EXPORTDIALOG_PDF_FIT_OPTION : "适配页面",
|
||||
EXPORTDIALOG_PDF_FIT_2_OPTION : "适配至最多 2 页" ,
|
||||
EXPORTDIALOG_PDF_FIT_4_OPTION : "适配至最多 4 页" ,
|
||||
EXPORTDIALOG_PDF_FIT_6_OPTION : "适配至最多 6 页" ,
|
||||
EXPORTDIALOG_PDF_FIT_8_OPTION : "适配至最多 8 页" ,
|
||||
EXPORTDIALOG_PDF_FIT_12_OPTION : "适配至最多 12 页" ,
|
||||
EXPORTDIALOG_PDF_FIT_16_OPTION : "适配至最多 16 页" ,
|
||||
EXPORTDIALOG_PDF_SCALE_OPTION : "使用图像缩放(可能跨多页)",
|
||||
EXPORTDIALOG_PDF_PAPER_COLOR : "纸张颜色",
|
||||
EXPORTDIALOG_PDF_PAPER_WHITE : "白色",
|
||||
EXPORTDIALOG_PDF_PAPER_SCENE : "使用场景颜色",
|
||||
EXPORTDIALOG_PDF_PAPER_CUSTOM : "自定义颜色",
|
||||
EXPORTDIALOG_PDF_ALIGNMENT : "页面位置",
|
||||
EXPORTDIALOG_PDF_ALIGN_CENTER : "居中",
|
||||
EXPORTDIALOG_PDF_ALIGN_CENTER_LEFT : "左对齐居中" ,
|
||||
EXPORTDIALOG_PDF_ALIGN_CENTER_RIGHT : "右对齐居中" ,
|
||||
EXPORTDIALOG_PDF_ALIGN_TOP_LEFT : "左上角",
|
||||
EXPORTDIALOG_PDF_ALIGN_TOP_CENTER : "顶部居中",
|
||||
EXPORTDIALOG_PDF_ALIGN_TOP_RIGHT : "右上角",
|
||||
EXPORTDIALOG_PDF_ALIGN_BOTTOM_LEFT : "左下角",
|
||||
EXPORTDIALOG_PDF_ALIGN_BOTTOM_CENTER : "底部居中",
|
||||
EXPORTDIALOG_PDF_ALIGN_BOTTOM_RIGHT : "右下角",
|
||||
EXPORTDIALOG_PDF_MARGIN : "边距",
|
||||
EXPORTDIALOG_PDF_MARGIN_NONE : "无",
|
||||
EXPORTDIALOG_PDF_MARGIN_TINY : "小",
|
||||
EXPORTDIALOG_PDF_MARGIN_NORMAL : "正常",
|
||||
EXPORTDIALOG_SAVE_PDF_SETTINGS : "保存 PDF 设置",
|
||||
EXPORTDIALOG_SAVE_CONFIRMATION : "PDF 配置已保存为插件默认设置",
|
||||
EXPORTDIALOG_PDF_SETTINGS: "PDF",
|
||||
EXPORTDIALOG_PAGE_SIZE: "页面大小",
|
||||
EXPORTDIALOG_PAGE_ORIENTATION: "方向",
|
||||
EXPORTDIALOG_ORIENTATION_PORTRAIT: "纵向",
|
||||
EXPORTDIALOG_ORIENTATION_LANDSCAPE: "横向",
|
||||
EXPORTDIALOG_PDF_FIT_TO_PAGE: "页面适配",
|
||||
EXPORTDIALOG_PDF_FIT_OPTION: "适配页面",
|
||||
EXPORTDIALOG_PDF_FIT_2_OPTION: "适配至最多 2 页" ,
|
||||
EXPORTDIALOG_PDF_FIT_4_OPTION: "适配至最多 4 页" ,
|
||||
EXPORTDIALOG_PDF_FIT_6_OPTION: "适配至最多 6 页" ,
|
||||
EXPORTDIALOG_PDF_FIT_8_OPTION: "适配至最多 8 页" ,
|
||||
EXPORTDIALOG_PDF_FIT_12_OPTION: "适配至最多 12 页" ,
|
||||
EXPORTDIALOG_PDF_FIT_16_OPTION: "适配至最多 16 页" ,
|
||||
EXPORTDIALOG_PDF_SCALE_OPTION: "使用图像缩放(可能跨多页)",
|
||||
EXPORTDIALOG_PDF_PAPER_COLOR: "纸张颜色",
|
||||
EXPORTDIALOG_PDF_PAPER_WHITE: "白色",
|
||||
EXPORTDIALOG_PDF_PAPER_SCENE: "使用场景颜色",
|
||||
EXPORTDIALOG_PDF_PAPER_CUSTOM: "自定义颜色",
|
||||
EXPORTDIALOG_PDF_ALIGNMENT: "页面位置",
|
||||
EXPORTDIALOG_PDF_ALIGN_CENTER: "居中",
|
||||
EXPORTDIALOG_PDF_ALIGN_CENTER_LEFT: "左对齐居中" ,
|
||||
EXPORTDIALOG_PDF_ALIGN_CENTER_RIGHT: "右对齐居中" ,
|
||||
EXPORTDIALOG_PDF_ALIGN_TOP_LEFT: "左上角",
|
||||
EXPORTDIALOG_PDF_ALIGN_TOP_CENTER: "顶部居中",
|
||||
EXPORTDIALOG_PDF_ALIGN_TOP_RIGHT: "右上角",
|
||||
EXPORTDIALOG_PDF_ALIGN_BOTTOM_LEFT: "左下角",
|
||||
EXPORTDIALOG_PDF_ALIGN_BOTTOM_CENTER: "底部居中",
|
||||
EXPORTDIALOG_PDF_ALIGN_BOTTOM_RIGHT: "右下角",
|
||||
EXPORTDIALOG_PDF_MARGIN: "边距",
|
||||
EXPORTDIALOG_PDF_MARGIN_NONE: "无",
|
||||
EXPORTDIALOG_PDF_MARGIN_TINY: "小",
|
||||
EXPORTDIALOG_PDF_MARGIN_NORMAL: "正常",
|
||||
EXPORTDIALOG_SAVE_PDF_SETTINGS: "保存 PDF 设置",
|
||||
EXPORTDIALOG_SAVE_CONFIRMATION: "PDF 配置已保存为插件默认设置",
|
||||
// 按钮
|
||||
EXPORTDIALOG_PNGTOFILE : "导出 PNG 文件",
|
||||
EXPORTDIALOG_SVGTOFILE : "导出 SVG 文件",
|
||||
EXPORTDIALOG_PNGTOVAULT : "PNG 保存到 Vault",
|
||||
EXPORTDIALOG_SVGTOVAULT : "SVG 保存到 Vault",
|
||||
EXPORTDIALOG_EXCALIDRAW : "Excalidraw",
|
||||
EXPORTDIALOG_PNGTOCLIPBOARD : "PNG 复制到剪贴板",
|
||||
EXPORTDIALOG_SVGTOCLIPBOARD : "SVG 复制到剪贴板",
|
||||
EXPORTDIALOG_PDF : "导出 PDF 文件",
|
||||
EXPORTDIALOG_PNGTOFILE: "导出 PNG 文件",
|
||||
EXPORTDIALOG_SVGTOFILE: "导出 SVG 文件",
|
||||
EXPORTDIALOG_PNGTOVAULT: "PNG 保存到 Vault",
|
||||
EXPORTDIALOG_SVGTOVAULT: "SVG 保存到 Vault",
|
||||
EXPORTDIALOG_EXCALIDRAW: "Excalidraw",
|
||||
EXPORTDIALOG_PNGTOCLIPBOARD: "PNG 复制到剪贴板",
|
||||
EXPORTDIALOG_SVGTOCLIPBOARD: "SVG 复制到剪贴板",
|
||||
EXPORTDIALOG_PDF: "导出 PDF 文件",
|
||||
|
||||
EXPORTDIALOG_PDF_PROGRESS_NOTICE : "正在导出 PDF。如果图像较大,可能需要一些时间。" ,
|
||||
EXPORTDIALOG_PDF_PROGRESS_DONE : "导出完成" ,
|
||||
EXPORTDIALOG_PDF_PROGRESS_ERROR : "导出 PDF 时出错,请检查开发者控制台以获取详细信息" ,
|
||||
EXPORTDIALOG_PDF_PROGRESS_NOTICE: "正在导出 PDF。如果图像较大,可能需要一些时间。" ,
|
||||
EXPORTDIALOG_PDF_PROGRESS_DONE: "导出完成" ,
|
||||
EXPORTDIALOG_PDF_PROGRESS_ERROR: "导出 PDF 时出错,请检查开发者控制台以获取详细信息" ,
|
||||
|
||||
// exportUtils.ts
|
||||
PDF_EXPORT_DESKTOP_ONLY : "PDF 导出功能仅限桌面端使用" ,
|
||||
PDF_EXPORT_DESKTOP_ONLY: "PDF 导出功能仅限桌面端使用" ,
|
||||
};
|
||||
@@ -17,6 +17,19 @@ I develop this plugin as a hobby, spending my free time doing this. If you find
|
||||
|
||||
<div class="ex-coffee-div"><a href="https://ko-fi.com/zsolt"><img src="https://storage.ko-fi.com/cdn/kofi6.png?v=6" border="0" alt="Buy Me a Coffee at ko-fi.com" height=45></a></div>
|
||||
`,
|
||||
"2.10.0": `
|
||||
## New from Excalidraw.com
|
||||
- Lasso select [#9169](https://github.com/excalidraw/excalidraw/pull/9169)
|
||||
- Add container to multiple text elements [#9348](https://github.com/excalidraw/excalidraw/pull/9348)
|
||||
|
||||
## Fixed from Excalidraw.com
|
||||
- Rounded diamond edge elbow arrow U route [#9349](https://github.com/excalidraw/excalidraw/pull/9349)
|
||||
- Improved eraser performance [#9352](https://github.com/excalidraw/excalidraw/pull/9352)
|
||||
- Keep arrow label horizontal [#9364](https://github.com/excalidraw/excalidraw/pull/9364)
|
||||
|
||||
## Fixed in ExcalidrawAutomate
|
||||
- ea.addText did not honor the width parameter.
|
||||
`,
|
||||
"2.9.2":`
|
||||
- More minor fix. Toolbars are not responsive when dynamic styling is turned off. [#2287](https://github.com/zsviczian/obsidian-excalidraw-plugin/issues/2287)
|
||||
`,
|
||||
|
||||
Reference in New Issue
Block a user